background image

3. Installation

3. Installation

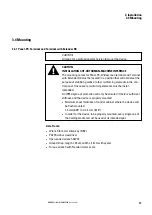
CAUTION

Installation requires qualified electrician

CAUTION
ELECTROSTATIC DISCHARGE

Do not touch components (e.g., connector pins) that are elec-
trostatic-sensitive.

Discharge any static electricity from your body before touching
the XP-504 (e.g., by touching an earthed metal object).

Electrostatic discharges may damage or ruin assembly parts.
Because of this, it is necessary to take precautions whenever hand-
ling the XP-504 cards.
Please refer to the guidelines for electrostatic-sensitive components
for more information (ESD guidelines).

ATTENTION

Arrange for an electrician to install and connect the power supply.

l

The controls and connectors must remain accessible even after the device has
been installed.

l

No direct sunlight on the devices.

CAUTION
UV LIGHT

Plastics will become brittle when exposed to UV light. This artificial
aging will reduce the XP-504 unit's lifespan. Protect the XP-504 series
devices from direct sunlight and other sources of UV radiation.

l

Make sure that the XP-504 devices do not overheat.

l

The minimum clearance to components that radiate heat, such as transformers
under heavy loads, is 15 cm.

l

The controls and connectors must remain accessible even after the device has
been installed.

XP-504

04/2022 MN048028EN Eaton.com

39

Summary of Contents for XP-504-10-A10-A01-2B

Page 1: ...Manual 04 2022 MN048028EN XP 504 Manual...

Page 2: ...document Publication date 04 2022 3rd edition Copyright 2021 Eaton Automation GmbH CH 9008 St Gallen Author Editor Antje Nonnen Eaton Industries GmbH Hein Moeller Stra e 7 11 D 53115 Bonn All rights i...

Page 3: ...plemented for the I O interface so that a line or wire breakage on the signal side does not result in undefined states in the automation devi ces l Deviations of the mains voltage from the nominal val...

Page 4: ......

Page 5: ...ce models 17 1 2 1 Features on XP 504 PCs 17 1 2 2 Configuration of the XP 504 Widescreen terminal 18 1 2 3 Device variants 18 1 2 3 1 XP 504 series visualization software 18 1 2 3 2 Widescreen termin...

Page 6: ...and de aeration 40 3 2 Installation position 42 3 2 1 Panel PC Terminal and Terminal with Extender RX 42 3 2 1 1 Mounting position 42 3 2 1 2 Mounting position 42 3 2 2 Box PC 44 3 2 2 1 Mounting posi...

Page 7: ...7 4 1 Layout of interfaces 68 4 1 1 Panel PC 68 4 1 2 Box PC 69 4 1 3 Terminal 70 4 1 4 Terminal with Extender RX 70 4 1 5 Extender TX 71 4 2 SD card 72 4 3 USB interfaces 74 4 3 1 USB Host 74 4 3 2 U...

Page 8: ...o Open Runtime 96 7 2 8 License Eaton Visual Designer Runtime 96 7 2 9 Enabling disabling IIS communication for Visual Designer 97 7 2 10 Enabling disabling the automatic screen lock 97 8 Faults 99 9...

Page 9: ...XP 504 10 Terminal with Extender RX 119 A 1 2 9 XP 504 15 Terminal with Extender RX 120 A 1 2 10 XP 504 21 Terminal with Extender RX 121 A 1 2 11 XP 504 EXT module 122 A 1 3 General data 123 A 1 4 Inf...

Page 10: ...g system or application soft ware Make sure to always use the latest documentation for your device The latest version of this documentation as well as additional references is availa ble for download...

Page 11: ...d electrician Follow the safety instructions for the XP 504 The section on safety instructions must be read and understood by everyone who will be working with the XP 504 before the actual work is per...

Page 12: ...P 504 is installed and commissioned by unqualified per sonnel and or is used improperly Eaton assumes no liability for any damages resul ting from cases such as these 0 1 4 Device designations and abb...

Page 13: ...bels Risk of personal injury warning DANGER Warns of hazardous situations that result in serious injury or death WARNING Warns of the possibility of hazardous situations that could result in serious i...

Page 14: ...owing useful additional information 0 1 5 2 Additional user information Documents such as manuals are listed after the icon together with the cor responding name and Eaton number Publication title For...

Page 15: ...virtually all branches of industry related to mechanical and plant engineering The XP 504 series features a modular design that makes it possible to put together custom solutions out of standard compo...

Page 16: ...ed with two Terminals two Terminal with Extender RX or one Terminal and one Terminal with Extender RX When choosing devices it is necessary to take into account the distances between the devices and t...

Page 17: ...te for the devices as well as section Approvals and declarations in the appendix Prohibited uses actions etc It is strictly prohibited to use the device in order to implement safety relevant functions...

Page 18: ...variants 1 2 3 1 XP 504 series visualization software The Panel PC and Box PC configurations differ from each other in terms of the run time license for the optional visualization software Galileo Ope...

Page 19: ...ies varies Panel PC Box PC Terminal Terminal with Extender RX Extender TX 2 x Ethernet 4 x USB3 0 1 x RS232 RS422 485 1 x HDMI 1 x DP Slot for SD card 1 x USB Type B used by the touch functionality 1...

Page 20: ...nufacturer l Part number l Part No l Power supply requirement l Serial No l Type approval and certification marks and information l Layout of interfaces To get fast and effective support make sure to...

Page 21: ...for GALILEO visualization software 2V Windows 10 Enterprise LTSC runtime license for Visual Designer visualization software Tab 2 Bundles with visualization software Box PC XP 504 Type Interfaces Vers...

Page 22: ...1 Description 1 4 What the different parts of the part number mean XP 504 Type Series EXT MODUL 22 XP 504 04 2022 MN048028EN Eaton com...

Page 23: ...r supplier or through the Eaton online catalog Eaton com ecat 1 6 Support To get fast and effective support make sure to provide Customer Service with the fol lowing information from the nameplate l P...

Page 24: ...ot evaluated by UL Ambient temperature 0 C to 45 C Maximum relative humidity of 95 for temperatures of up to 45 C derated linearly to a relative humidity of 50 at 40 C The torque used to tighten the s...

Page 25: ...he back and 10 towards the front for landscape and vertical installation Operation up to an altitude of 2000 m above sea level Overvoltage category II Pollution Degree 2 Suitable power supply for clas...

Page 26: ...ons only Use XP 504 devices in non hazardous location environments For safe installation as well as to meet approval requirements make sure to adhere to the specifications for holding brackets and tig...

Page 27: ...nd l XP 504 TERMINAL EXT The ground resistance of accessible metal parts must be less than 109 ohms Make sure that the device is not exposed to dangerous impacts and other types of dangerous mechanica...

Page 28: ...1 Description 1 10 Marine approvals 1 10 Marine approvals An application for approval for the XP 504 has been submitted to Det Norske Veritas 28 XP 504 04 2022 MN048028EN Eaton com...

Page 29: ...terface ATTENTION Pay attention to the hazard severity levels used throughout this docu mentation whenever a hazard is indicated The hazard symbol and signal word used and the corresponding text will...

Page 30: ...Working with individual pages taken out from the information for use may lead to bodily injury and property damage due to failure to observe relevant safety information Always work with the latest an...

Page 31: ...t l The required ambient conditions must be met l Maintenance work must be carried out correctly Make sure to read the Legal disclaimer page 12 We assume no liability for damages consequential damages...

Page 32: ...ons only Use XP 504 devices in non hazardous location environments For safe installation as well as to meet approval requirements make sure to adhere to the specifications for holding brackets and tig...

Page 33: ...anical shock De energize the device before disconnecting plug connections Clean only with a clean soft antistatic damp cloth When used in a potentially explosive atmosphere Zone 22 The XP 504 A10 A01...

Page 34: ...cards Please refer to the guidelines for electrostatic sensitive components for more information ESD guidelines CAUTION INTERFERENCES The values specified in the technical data as well as the device...

Page 35: ...s sectional area 6 mm length 350 mm width 20 mm The XP 504 needs to be connected to the conductive structure in e g the control panel using the central earth point This method of earthing is mandatory...

Page 36: ...HAZARD If the device is or has been exposed to environmental fluctuations ambient temperature air humidity condensation may form on or inside it As long as this condensation is present there will be a...

Page 37: ...rol panel If necessary reinforcing elements must be instal led added An IP65 degree of protection will only be ensured if there is sufficient stiffness and the device is properly mounted l Minimum she...

Page 38: ...J45 plug in connection from strong vibrations l Protect the RJ45 plug in connection from tensile forces at the socket WARNING XP 504 units are products designed for use in industrial envi ronments as...

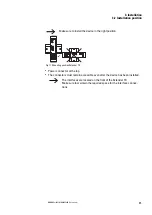
Page 39: ...ation ESD guidelines ATTENTION Arrange for an electrician to install and connect the power supply l The controls and connectors must remain accessible even after the device has been installed l No dir...

Page 40: ...eration l Do not cover the ventilation openings cooling fins and housing of the XP 504 PCs during installation They are designed to allow air to circulate in order to cool the device l The XP 504 uses...

Page 41: ...there will be enough air circulation in order to prevent overheating Ambient temperature with natural convection 0 C 32 F T 45 C 113 F The panel builder is responsible for the temperature rise calcula...

Page 42: ...the installation location is sufficiently thick Material thickness of 1 5 mm 0 06 d 4 mm 0 16 and flatness of 0 5 mm 0 02 at the installation cutout with a surface rough ness Rz 120 IP 65 DIN ISO 276...

Page 43: ...in accessible even after the device has been installed The interfaces are located on the bottom of the computer core on Panel PC Terminal and Terminal with Extender RX Make sure to consider the space...

Page 44: ...ow clearances are maintained Make sure to install the device in the right position Fig 10 Mounting positionBox PC l Correct mounting position Power connector at the bottom or heat sink at the top l Th...

Page 45: ...nting positionExtender TX l Power connector at the top l The connectors must remain accessible even after the device has been installed The interfaces are located on the front of the Extender TX Make...

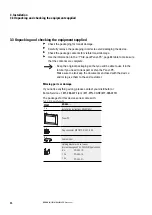
Page 46: ...uture if you need to transport or ship the Panel PC Make sure to also keep the documents enclosed with the device and or to give them to the end customer Missing parts or damage If you notice anything...

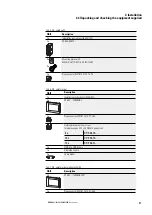
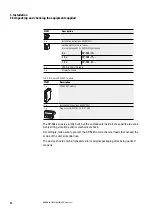
Page 47: ...ption 1 x Installation instructions IL048018ZU 1 x XP 504 TERMINAL 1 x Plug connector MSTBT 2 5 3 ST 5 08 Holding bracket with set screw Internal hexagon M 4 x 25 DIN 914 galvanized 8 x XP 504 10 10 x...

Page 48: ...XP 504 EXT module 1 x Installation instructions IL048019ZU 1 x Plug connector MSTBT 2 5 4 ST 5 08 Tab 8 Std packXP 504 EXT module The XP 504 series is sturdily built but the components inside it are...

Page 49: ...ecessary reinforcing elements must be instal led added An IP65 degree of protection will only be ensured if there is sufficient stiffness and the device is properly mounted l Minimum sheet thickness o...

Page 50: ...lding brackets The holding brackets are included as accessories with the HMI The number of brackets will depend on the specific device model 8 x 10 devices 10 x 15 devices 12 x 21 devices All holding...

Page 51: ...t the center fixing position Fig 13 Location of holding brackets for IP65 on the XP 504 10 15 devices Locations for ten holding brackets for an IP65 degree of protection and for devices used in hazard...

Page 52: ...ositions as well as to the left and right of the center l On the left and right sides of the device One holding bracket each at the upper and lower fixing positions Fig 15 Location of holding brackets...

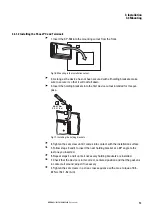
Page 53: ...se 0 6 0 7 Nm 5 31 6 2 lb in 3 4 Fig 17 Installing the holding brackets 4 Tighten the set screw until it comes into contact with the installation surface 5 Follow steps 3 and 4 to insert the next hold...

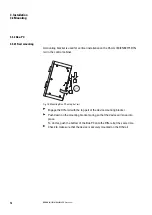
Page 54: ...2 Fig 18 Mounting Box PC on top hat rail Engage the DIN rail with the top part of the device mounting bracket Push down on the mounting bracket spring so that the device will snap into place To do thi...

Page 55: ...s The two enclosed mounting plates are identical and are included in the equipment supplied with the Box PC together with the required four M3x5 3 16 TORX T10 A2 ISO14583 Use both mounting plates Tigh...

Page 56: ...5 DIN rail in the control cabinet Engage the DIN rail with the device with the power supply facing up Snap the spring mechanism into place on the DIN rail To do this push down on the mounting clamp sp...

Page 57: ...connection characteristics Wire cross sectional area 6 mm length 350 mm width 20 mm The XP 504 needs to be connected to the conductive structure in e g the control panel using the central earth point...

Page 58: ...with Extender RX as well as the XP 504 EXT module require a 24 VDC rated operating voltage from a power supply with safe isolation SELV A galvanically isolated power supply is only found in Panel PCs...

Page 59: ...04 15 max 43 2 W XP 504 21 max 48 0 W XP 504 BOXPC max 31 2 W Terminals of the device series XP 504 10 terminal max 7 2 W 15 terminal max 9 6 W 21 terminal max 16 8 W 10 terminal EXT max 12 W 15 termi...

Page 60: ...tory required for proper function Grounding concept instructions for low impedance component grounding 16 5 mm 0 65 6 mm 0 24 20 mm 0 78 6 mm 0 2 4 6 5 mm 0 26 350 mm 13 77 Fig 19 Functional earth wit...

Page 61: ...m Length 350 mm Width 20 mm Tightening torque 1 3 Nm 11 5 lb in for the M6 nut Tab 9 Earthing specifications Functional earth 0 V 24 V DC 1 2 Panel PC 0 V 24 V DC 2 1 Terminal 0 V 24 V DC 2 1 Terminal...

Page 62: ...ion 3 5 1 2 Functional earthing Box PC and Extender TX For Box PCs and XP 504 EXT modules a functional earth via the connection on the plug connector is enough Make sure to observe the power supply sp...

Page 63: ...minate the connection cable for the power supply in advance Plug the pre assembled plug into the socket on the enclosure Pay attention to the polarity 24V and 0V Connect the power supply cable to a 24...

Page 64: ...DC 0 5 0 6 Nm 4 4 5 3 lb in XP 504 TERMINAL 24 V DC 0 V Ue 24 V DC 12 32 V DC SELV Ie 0 V 24 V DC 0 5 0 6 Nm 4 4 5 3 lb in 0 V 24 V DC Fig 21 Connecting the screw terminals with MSTBT 2 5 3 ST 5 08 P...

Page 65: ...0 5 0 6 Nm 4 4 5 3 lb in FE 0 V 24 V DC Fig 22 Connecting the screw terminals with MSTBT 2 5 3 ST 5 08 PIN Signal Connection Configuration 0 V 24 V DC 1 24 VDC Power Supply 24 VDC SELV safety extra l...

Page 66: ...4 4 5 3 lb in 0 V 24 V DC n c 24 V DC 0 V Fig 23 Connecting the screw terminals with MSTBT 2 5 4 ST 5 08 PIN Signal Connection Configuration 0 V 24 V DC n c 1 Functional earth 2 n c Internally connec...

Page 67: ...nding conductor with a cross sectional area that is several times larger than that of the cable shielding parallel to the cable CAUTION INTERFERENCES The values specified in the technical data as well...

Page 68: ...e 6 LAN 1000 MBit s Ethernet 2 LAN RJ 45 socket 8 pole 2 LEDs CAT5e 6 LAN 1000 MBit s Dual USB Host 3 0 Dual USB3 0 2 0 T plug type A Dual USB Host 3 0 Dual USB3 0 2 0 T plug type A DP Default display...

Page 69: ...LAN RJ 45 socket 8 pole 2 LEDs CAT5e 6 LAN 1000 MBit s Ethernet 2 LAN RJ 45 socket 8 pole 2 LEDs CAT5e 6 LAN 1000 MBit s Dual USB Host 3 0 Dual USB3 0 2 0 T plug type A Dual USB Host 3 0 Dual USB3 0...

Page 70: ...USB 2 0 not galvanically isolated Type B connector used by the touch functionality 4 1 4 Terminal with Extender RX Fig 27 Interfaces equipment Terminal with Extender RX Interface Version 24 VDC power...

Page 71: ...ace Version Mini USB B Default display interface DP Default display interface RJ45 Extender TX RJ 45 socket 8 pole 2 LEDs CAT5e 6 The RJ45 sockets on Terminal with Extender RX and Extender TX are used...

Page 72: ...rite operation is in progress data loss is highly likely to occur Remove the SD card only when the XP 504 is de energized Before switching off the device make sure that there are no pro grams writing...

Page 73: ...4 Using peripheral devices External connections 4 2 SD card 4 5 1 1 2 3 Fig 29 Removing the SD card XP 504 04 2022 MN048028EN Eaton com 73...

Page 74: ...eters may render them unsuitable for use in industrial environments The USB and HDMI Connectors are for maintenance only except when installed together with strain relief metal plate with the cable ti...

Page 75: ...10 5 Volt VBUS supply voltage Power 2 D UP Data cable USB 2 0 11 D DOWN Data cable USB 2 0 3 D UP Data cable USB 2 0 12 D DOWN Data cable USB 2 0 4 GND Chassis ground 13 GND Chassis ground 5 SSRX UP...

Page 76: ...interfaces 4 3 3 Mini USB B Available on Extender TX module Fig 34 Type B mini USB port pinout PIN specification Wire Function 1 Power Red 5V 2 Data White Data 3 Data Green Data 4 n c Host device 5 G...

Page 77: ...is means that an active network has been detected and a LINK 2 to it has been established When the yellow LED 1 flashes this means that data is being transferred For the network use shielded twisted p...

Page 78: ...1 LANE 0_P 8 GND 15 AUX_DP 2 GND 9 LANE 2_N 16 GND 3 LANE 0_N 10 LANE 3_P 17 AUX_DN 4 LANE 1_P 11 GND 18 Hot Plug Detect 5 GND 12 LANE 3_N 19 GND 6 LANE 1_N 13 GND 20 3 3V 7 LANE 2_P 14 GND Available...

Page 79: ...for use in industrial environments The USB and HDMI Connectors are for maintenance only except when installed together with strain relief metal plate with the cable ties provided 19 17 15 13 11 9 7 5...

Page 80: ...ections to it 1 6 7 8 9 2 3 4 5 Fig 38 Pin assignment RS232 RS422 RS485 PIN Signal Meaning PIN signal Meaning 1 DCD Data Carrier Detect 6 DSR Data Set Ready 2 RXD Receive Data 7 RTS Request to Send 3...

Page 81: ...D M S Data 2 12 n c 21 n c 3 T D M S Data 2 4 Shield 13 n c 22 T D M S Clock Shield 4 n c 14 5 Volt Power 23 T D M S Clock 5 n c 15 GND 24 T D M S Clock 6 DDC Clock Return for 5V H Sync and V Sync C1...

Page 82: ...4 Using peripheral devices External connections 4 7 DVI I 82 XP 504 04 2022 MN048028EN Eaton com...

Page 83: ...consult the Section Faults page 99 section The XP 504 will be shut down as soon as it is not being powered CAUTION SHORT CIRCUIT HAZARD If the device is or has been exposed to environmental fluctuatio...

Page 84: ...he first time you use the keyboard Mouse The XP 504 has been designed to work with a variety of mouse types Serial mouse can be connected to the serial port The matching mouse driver must be installed...

Page 85: ...d to the power supply In other words it does not have to be separately switched on and off Reducing the level of brightness will increase the display back light s lifespan If the Panel PC or Box PC wi...

Page 86: ...5 Commissioning 5 2 Running the XP 504 86 XP 504 04 2022 MN048028EN Eaton com...

Page 87: ...intended mal functions l Do not under any circumstance use the Touch display to control safety relevant functions l Before cleaning the device switch to a safe operating mode Before performing mainten...

Page 88: ...mes and take suitable measures in order to protect it from soiling Before using the device check which types of potential soiling may accumulate on the Touch display and which functions may be trigger...

Page 89: ...If gestures are performed incorrectly on the Widescreen terminal they may not be recognized or they may be recognized incorrectly When this occurs the device will either not respond to the operator s...

Page 90: ...Connect a keyboard to the Panel PC or Box PC Open the Control Panel and click on Tablet PC Settings A Under the Display tab click on Setup B Control Panel All Control Panel Items Tablet PC Settings Fi...

Page 91: ...the screen saver to start running In devices with multi touch cap abilities touching the touch panel once will cause the operating sys tem to resume i e trigger a wake up event If the touch panel is...

Page 92: ...s panel Avoiding static contact and continuing to run intended functions l After approx 10 seconds touch the corresponding icon on the touch panel again and check the results l If you will be using an...

Page 93: ...nterprise LTSC operating system 7 2 3 1 Protect Mode Operated with two drives C and D The Eaton XP 504 family of products running the Windows 10 Enterprise LTSC oper ating system have a unique and exc...

Page 94: ...ain unchanged under normal operation Other drives such as D Not protected even when Protect Mode is enabled Files to be stored through normal operations process data trends recipes alarm lists If Prot...

Page 95: ...network while Pro tect Mode is disabled and that all media used for software installation to be con nected to the unit are scanned for malware prior to attachment We recommend to operate the device a...

Page 96: ...y without a username and password having to be entered For information on the corresponding steps please visit and enter Enabling automatic logon in Win dows in the search box 7 2 7 License Eaton Gali...

Page 97: ...s that can be accessed by clicking on Start Eaton in Windows l Activate IIS cmd l Deactivate IIS cmd Alternatively you can also configure the required settings directly in the Windows services and Win...

Page 98: ...7 Operating System 7 2 Windows 10 Enterprise LTSC 98 XP 504 04 2022 MN048028EN Eaton com...

Page 99: ...supply The display stays dark Dimmed brightness If the brightness setting has not been dimmed the device will need to be repaired The Projected Capacitive Touch PCT is not responding or is responding...

Page 100: ...8 Faults 100 XP 504 04 2022 MN048028EN Eaton com...

Page 101: ...way Clean the frame and the display only with a clean soft antistatic damp cloth 9 1 2 Replacing the Battery Panel PC and Box PC Only the PCs of the device series XP 504 contain a battery This battery...

Page 102: ...settings before repla cing the battery Dispose of used batteries properly in accordance with local reg ulations The battery in the Panel PC can be accessed directly on a battery holder Fig 42 Battery...

Page 103: ...Arrange for a qualified electrician or for EATON Service to replace the battery In order to prevent damage to the device do the following before opening the enclos ure Shut down the operating system D...

Page 104: ...in red Set the SD card holder with the bracket to the side so that you can get to the bat tery Disconnect the plug from the motherboard and carefully remove the battery from the inside of the enclosu...

Page 105: ...e inside onto the enclosure Use the two screws you removed earlier to screw the SD card holder back in place Close Box PC Put the enclosure cover back in place Screw the six screws Torx A2 M3x8 ISO 14...

Page 106: ...ton s Technical Support CAUTION DESTRUCTION The XP 504 should only be opened by the manufacturer or by an authorized center Operate the device until only with the enclosure fully closed and sealed Use...

Page 107: ...n may form on or inside it As long as this condensation is present there will be a short circuit hazard Do not switch on the device when it has condensation in or on it If the device has condensation...

Page 108: ...radiation from heating appliances Before commissioning If storing transporting the device in cold weather conditions or in such a way that it will be exposed to extreme differences in tem perature ma...

Page 109: ...nal Aluminum Surface powder spray painted RAL 9006 white aluminum Display enclosure Widescreen terminal Galvanized steel 1 mm thick Cover glass Tempered glass across the entire surface ESG tempered so...

Page 110: ...1 1 Data sheet 111 A 1 2 Dimension and weight specifications 112 A 1 3 General data 123 A 1 4 Information on the power supply 126 A 1 5 Approvals and declarations 127 A 2 Further usage information 12...

Page 111: ...999 XP 504 15 A10 A01 2V 360002 XP 504 21 A10 A01 2B 360003 XP 504 21 A10 A01 2V Catalog No Type Box PC 400011 XP 504 BOXPC A10 A00 2B 400012 XP 504 BOXPC A10 A00 2V Catalog No Type Extender TX 400013...

Page 112: ...evices in mm inches Width x Height x Depth without plug 280 mm x 201 mm x 89 mm 11 02 x 7 91 x 3 5 0 2 mm Built in depth 82 0 mm 3 22 Weight 2 7 kg 5 95 lbs Hole diameter built in e f d 45 10 l Materi...

Page 113: ...m inches Width x Height x Depth without plug 412 1 mm x 261 6 mm x 89 mm 16 22 x 9 37 x 3 5 0 2 mm Built in depth 82 0 mm 3 22 Weight 4 9 kg 10 91 lbs Hole diameter built in e f d 45 10 l Material thi...

Page 114: ...hout plug 544 mm x 336 mm x 89 mm 21 42 x 12 9 x x 3 5 0 2 mm Built in depth 82 0 mm 3 22 Weight 7 55 kg 16 64 lbs Hole diameter built in e 256 mm 10 07 0 5 0 02 d f 175 mm 6 88 0 5 0 02 45 10 2 mm 0...

Page 115: ...38 55 mm 2 17 48 mm 1 89 23 mm 0 91 7 25 mm 0 29 6 22 mm 0 24 30 4 mm 1 2 39 5 mm 1 56 48 66 mm 1 92 24 mm 0 94 27 45 mm 1 08 28 9 mm 1 14 8 mm 0 31 25 8 mm 1 02 30 4 mm 1 2 19 9 mm 0 78 Fig 46 Dimen...

Page 116: ...Width x Height x Depth without plug 280 mm x 201 mm x 89 mm 11 02 x 7 91 x 3 5 0 2 mm Built in depth 82 0 mm 3 22 Weight 2 6 kg 5 73 lbs Hole diameter built in 256 mm 0 5 10 08 0 02 175 mm 0 5 6 89 0...

Page 117: ...Height x Depth without plug 412 1 mm x 261 6 mm x 89 mm 16 22 x 9 37 x 3 5 0 2 mm Built in depth 82 0 mm 3 22 Weight 4 0 kg 8 81 lbs Hole diameter built in 45 10 388 mm 0 5 15 28 0 02 239 mm 0 5 9 41...

Page 118: ...x Height x Depth without plug 544 mm x 336 mm x 89 mm 21 42 x 12 9 x x 3 5 0 2 mm Built in depth 82 0 mm 3 22 Weight 6 1 kg 13 48 lbs Hole diameter built in 45 10 519 mm 0 5 20 43 0 02 313 mm 0 5 12...

Page 119: ...inches Width x Height x Depth without plug 280 mm x 201 mm x 89 mm 11 02 x 7 91 x 3 5 0 2 mm Built in depth 82 0 mm 3 22 Weight 2 7 kg 5 95 lbs Hole diameter built in 45 10 256 mm 0 5 10 08 0 02 175...

Page 120: ...Width x Height x Depth without plug 412 1 mm x 261 6 mm x 89 mm 16 22 x 9 37 x 3 5 0 2 mm Built in depth 82 0 mm 3 22 Weight 4 1 kg 9 03 lbs Hole diameter built in 45 10 388 mm 0 5 15 28 0 02 239 mm...

Page 121: ...hes Width x Height x Depth without plug 544 mm x 336 mm x 89 mm 21 42 x 12 9 x x 3 5 0 2 mm Built in depth 82 0 mm 3 22 Weight 6 2 kg 13 66 lbs Hole diameter built in 45 10 519 mm 0 5 20 43 0 02 313 m...

Page 122: ...7 5 m 1 08 25 5 m 1 26 m 1 02 114 mm 4 49 43 5 mm 1 71 22 6 mm 0 89 99 5 mm 3 92 Fig 53 Dimensions XP 504 EXT module in mm Inch Width x Height x Depth without plug 22 6 mm x 99 35 mm x 113 65 mm 0 2 m...

Page 123: ...front IP20 at rear Box PC Extender TX IP20_x EMC Emitted interference XP 504 Class A Assembly part Materials used Display frame Widescreen terminal Aluminum Surface powder spray painted RAL 9006 white...

Page 124: ...Board Computer BIOS AMI UEFI CPU Intel Atom QuadCore E3950 2GHz Cache memory 8GB DDR3L RAM Flash memory Industrial flash technology mSATA 64 GB mSATA Slot for SD card 1 x SD card slot externally acce...

Page 125: ...04 21 54 6 cm 21 5 Screen area visible XP 504 10 216 96 mm x 135 26 mm XP 504 15 344 23 mm x 193 54 mm XP 504 21 476 06 mm x 276 79 mm Contrast ratio Normally XP 504 10 normally 900 1 XP 504 15 normal...

Page 126: ...ltages SELV set forth in IEC UL 61010 2 201 Electrical current Ie Panel PC Terminal Terminal with Extender RX 10 1 25 65 cm 1 6 A 0 3 A 0 5 A 15 6 39 6 cm 1 8 A 0 4 A 0 6 A 21 5 54 6 cm 2 0 A 0 7 A 0...

Page 127: ...ctive 2014 30 EU EMC Directive 2014 34 EU ATEX Directive The requirements are evaluated on the basis of the following standards EN 61000 6 4 2007 A1 2011 EN 61000 6 2 2005 AC 2005 EN 61131 2 2007 Appl...

Page 128: ...68 2 27 15g 11ms Vibration IEC EN 60068 2 6 Displacement amplitude 5 9 Hz 3 5 mm 9 60 Hz 0 15 mm Acceleration amplitude 60 150 Hz 2 g Free fall packaged IEC EN 60068 2 32 Climatic proofing Cold to IEC...

Page 129: ...Leaflet Extender TX IL048019ZU Networks in Brief Information on networks in general and on how to integrate PCs and touch displays in networks MN05010009Z Download Center Eaton Online Catalog Enter X...

Page 130: ...Appendix A 2 Further usage information 130 XP 504 04 2022 MN048028EN Eaton com...

Page 131: ...Current 58 126 D Damage 46 Declarations 127 Description 15 Device variants 18 Dimensions 112 Directives 127 Display 125 Disposal Recycling 109 Download Center 129 DP 68 71 DVI I 81 E Earthing 60 62 E...

Page 132: ...ounting 49 54 56 Mounting distance 41 Mounting position 42 SD card 43 44 N Nameplate 20 O Online Catalog 129 Operating System 124 Operation Proper 31 Original Operating Instructions 2 P Package conten...

Page 133: ...Touch Sensor 123 Transit damage 46 Transport 107 Troubleshooting 99 U UL listing 24 USB B 75 USB Device 70 USB Host 68 69 USB host 74 V Versions 21 Voltage range 58 126 W Weight 112 XP 504 04 2022 MN0...

Page 134: ...omers most critical challenges Our focus is on delivering the right solution for the application But decision makers demand more than just innovative products They turn to Eaton for an unwavering comm...

Reviews: