2
EATON
IB500014EN
Installation instructions
Installation Instructions – Caretaker
Wall/Pole Mount
Tools Required:
1/2” Socket wrench, 7/16” Socket wrench,
drill, 3/16” drill bit.
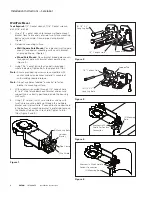
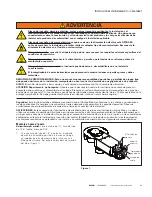
1. Use a 1/2” socket wrench to remove wall/pole mount
bracket from fixture and set aside two fixture mounting
bolts and wire shield. Discard pipe clamp bracket.
(Figure 1.)
2. Determine mounting surface.
●
●
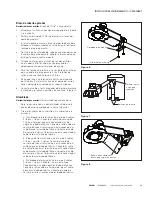
Wall/Square Pole Mount:
Place bracket (wall/sq pole
mount) face against mounting surface with bracket
arrow pointing up. (Figure 2.)
●
●
Wood Pole Mount:
Place bracket (wood pole mount)
face against pole with bracket arrow pointing up.
(Figure 3.)
3. Using 7/16” socket, drive four lag bolts (provided)
where indicated. Tighten bolts to approx. 6-8 ft-lbs.
ote:
N
Ensure provided lag screws are compatible with
anchor material and anchor material is capable of
withstanding required torque.
ote:
N
Do not use holes labeled “luminaire” to fasten
bracket to mounting surface.
4. With supply wires pulled through 1/2” conduit hole
6” to 8”, slide fixture down over bracket and ensure
support tab is correctly positioned inside the housing
wall cavity.
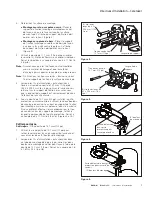
5. Using 1/2” socket, install wire shield as shown with
two fixture mounting bolts up through the wall/pole
bracket and into luminaire. If connection to conduit hole
in the bottom of mounting bracket is preferred, remove
the knockout tab on the wire shield. Tighten to 6-8
ft-lbs.(Figure 4 and 5.)
Figure 1.
Figure 2.
Figure 3.
Figure 4.
Figure 5.
Support Tab
Support Tab
1/2” Conduit Hole
1/2” Conduit Hole
(4) 1/4” X 2”
Long Lag Bolts
(4) 1/4” X 2”
Long Lag Bolts
(2) Mounting Bolts
Universal
Bracket
Pipe Clamp
Wire Shield
(2) Mounting
Bolts
Knockout In Wire
Shield For Conduit
Connection
(2) Mounting Bolts
Knockout In Wire Shield For
Conduit Connection

