background image

OPERATION

EATON

Powerware

®

9170

+

UPS (3–18 kVA) User’s Guide

S

164201393 Rev C

www.powerware.com

87

Alarm Log

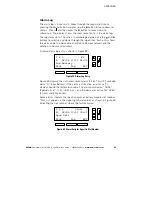
The alarm log is in menu 2 2. Move through the menu structure by
pressing the Menu button and pressing the

B

button to move down to

menu 2. Press

and then press the

B

button to move down to

submenu 2. The display shows the most recent entry in the alarm log.

The log stores up to 10 entries, in chronological order. Use the

Y

and

B

buttons to scroll up and down through the log entries. Each entry shows
the alarm code, the alarm date and time (in 24-hour format), and the
duration (in hours and minutes).

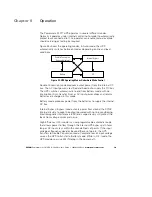
A typical alarm log entry is shown in Figure 59:

2 2 6

#0

A

02/05 17:51 04:35

Low Battery
Slot

Top

ESC

Figure 59. Alarm Log Entry

Figure 59 displays the sixth most-recent alarm (2 2 6). This UPS sounded
alarm “A” (Low Battery). If the alarm is still active, an asterisk (*)
displays beside the letter alarm code. The alarm occurred on “02/05”
(February 5) at “17:51” (5:51 p.m.), and the alarm was active for “04:35”
(4 hours and 35 minutes).

Some alarms indicate the specific power or battery module slot number.
“Slot: nn” appears in the upper right hand corner, as shown in Figure 60,
indicating the slot number where the fault occurred.

2 2 6

Slot:

7

M

02/05 17:51 00:01

Open Cell
Slot

Top

ESC

Figure 60. Alarm Entry for Specific Slot Number

Summary of Contents for Powerware 9170+

Page 1: ...Powerware 9170 UPS 3 18 kVA User s Guide...

Page 2: ...Directive 89 336 EEC relating to EMC The EC Declaration of Conformity is available upon request for products with a CE mark For copies of the EC Declaration of Conformity contact Eaton Power Quality...

Page 3: ...esidential area is likely to cause harmful interference in which case the user will be required to correct the interference at his own expense ICES 003 This Class A Interference Causing Equipment meet...

Page 4: ...onal information such as important operating and maintenance instructions This symbol indicates that you should not discard the UPS or the UPS batteries in the trash This product contains sealed lead...

Page 5: ...Mount Installation Three and Six Slot Cabinets 14 Floor Anchor Kit Installation 16 Moving the Cabinets 17 3 UPS with Bypass Electrical Installation 19 Input Current Ratings 21 Bypass Switches 22 UPS I...

Page 6: ...91 Powerware LanSafe Power Management Software 91 Optional Interface Kits 91 Communication Slots 92 ConnectUPS Web SNMP Card BD Model 92 Relay Interface Card BestDock Model 92 Dedicated Input Signals...

Page 7: ...ms in power modules and automatically transfers control and load to the remaining power modules All power modules share the load requirements equally For example three power modules are capable of sup...

Page 8: ...ingle output voltage 200 208 220 230 or 240 Vac DO NOT mix the two types of power modules in the same Powerware 9170 cabinet S Do NOT install more than seven power and or optional battery charger modu...

Page 9: ...sion de sortie 200 208 220 230 ou 240 Vca NE m langez PAS les deux types de blocs de puissance dans le m me module d unit d alimentation S N installez PAS plus de sept chargeurs de batteries optionnel...

Page 10: ...dulos de potencia en el mismo gabinete de la Unidad de distribuci n de alimentaci n S NO instale en los m dulos de potencia del sistema m s de siete m dulos de potencia y o de cargadores opcionales de...

Page 11: ...the 3 slot and 9 slot configurations and identify basic Powerware 9170 system features Six slot and 12 slot cabinets are also available external battery cabinets are available in 6 9 and 12 slot size...

Page 12: ...INTRODUCTION EATON Powerware 9170 UPS 3 18 kVA User s Guide S 164201393 Rev C www powerware com 6 Front Panel Display Front Cover Cabinet Base Figure 3 Nine Slot Cabinet Front View...

Page 13: ...Slots Power Outlets optional Input Power Cable optional DB 9 Communication Port Wiring Access Figure 4 Nine Slot Cabinet Rear View Handle Latch Release Insertion Extraction Cams Handle Thumbscrew Fig...

Page 14: ...INTRODUCTION EATON Powerware 9170 UPS 3 18 kVA User s Guide S 164201393 Rev C www powerware com 8...

Page 15: ...es All cabinet sizes require the following clearances to allow for servicing and adequate ventilation S Sides 15 2 cm 6 S Top and back 30 5 cm 12 S Front 91 5 cm 36 If flexible conduit connects the UP...

Page 16: ...odules are shipped on one pallet Refer to the unpacking instruction sheet LTS 1724 packed inside the UPS shipping carton NOTE Verify that all Powerware 9170 UPS power modules are the proper type for t...

Page 17: ...t cabinets NOTE If you are installing a 12 slot Powerware 9170 UPS with non isolated output do not follow this procedure Proceed to Stabilizer Bracket Installation Twelve Slot Cabinet Only on page 13...

Page 18: ...ired units continue to UPS with Bypass Electrical Installation on page 19 or UPS Electrical Installation on page 39 Caster Cart Installation Three and Six Slot Cabinets An optional caster cart ASY 052...

Page 19: ...ation Twelve Slot Cabinet Only The 12 slot Powerware 9170 UPS cabinet with non isolated output is shipped with two stabilizer brackets These brackets must be attached to the wall or the floor behind t...

Page 20: ...ure requires two people to lift and position the cabinet into the equipment rack Install the cabinet in the rack before installing power and battery modules and before making connections to the intend...

Page 21: ...Figure 9 Tab Slots Metal Clip Nuts Figure 9 Metal Clip Nut and Tab Slot Locations 5 Install a rack mount ear two for 6 slot cabinets on each side of the UPS cabinet see Figure 10 Insert the two offse...

Page 22: ...ails of the rack Verify that the holes in the ears align with the holes in the rack 9 Secure the UPS in the rack using eight 10 32 1 2 Torx screws 16 for 6 slot cabinets or other appropriate customer...

Page 23: ...7 cm 34 25 B A Floor Anchor Bracket Figure 12 Floor Anchor Brackets Bolted to UPS Cabinet Moving the Cabinets CAUTION Do NOT attempt to raise the cabinet with the power or battery modules installed Th...

Page 24: ...ion 3 Locate the four plastic caps covering the caster bolts They are at the corners of the cabinet base 4 Pry the caps out of the bolt access holes 5 Use a 1 2 hex style socket wrench to turn each of...

Page 25: ...as a licensed electrician should perform the electrical installation Risk of electrical shock The Powerware 9170 UPS input power may be hardwired through conduit to either a main power source circuit...

Page 26: ...uide S 164201393 Rev C www powerware com 20 External Bypass Switch Off Service Line Off Service Line UPS UPS Off Service Line UPS User Supplied if required External Batteries optional Building Service...

Page 27: ...uit Breaker Sizes 200 240 Vac 50 60 Hz UPS Capacity Input Circuit Breaker Rating 3 kVA 25A 6 kVA 40A 9 kVA 60A 12 kVA 80A 15 kVA 100A 18 kVA 125A NOTE If you are installing an optional battery charger...

Page 28: ...ies given in Table 310 16 of the National Electrical Code ANSI NFPA 70 1999 and article 220 All circuit conductors including the neutral conductor must be the same size ampacity wire Code may require...

Page 29: ...sconnects AC input from the UPS this is the appropriate position for UPS maintenance or repair To disconnect AC input power during maintenance or service turn the bypass switch to the SERVICE position...

Page 30: ...UPS WITH BYPASS ELECTRICAL INSTALLATION EATON Powerware 9170 UPS 3 18 kVA User s Guide S 164201393 Rev C www powerware com 24 D E A C B Figure 14 Bypass Switch Dimensions...

Page 31: ...The bypass switch should be mounted securely to a sturdy surface You may need to turn the cabinet 90 degrees on its side to enable operator access to the switch handle 2 Remove the six screws in the b...

Page 32: ...ww powerware com 26 Entrance Panel Battery Cable Wiring Access Hole for Optional EPO and Bypass Input Signals Wiring Access Hole for an Optional Generator Input Signal Figure 15 UPS Power Entrance Pan...

Page 33: ...C output conductors must be run through separate conduits UPS output circuits must be installed in dedicated conduit systems and not shared with other electrical circuits Figure 16 shows input and out...

Page 34: ...cess cover and the proper installation wiring diagram make the terminal strip connections and tighten all connections as specified in Table 2 on page 22 Use copper wire that is the appropriate size fo...

Page 35: ...d Africa CAUTION Confirm that the UPS is wired for the proper input voltage as shown in Figure 18 and that the proper power modules either split phase or universal are installed to produce the desired...

Page 36: ...m even if the full capacity of the UPS has not been reached N DC 50 or 60 Hz 100 200 110 220 127 220 120 208 or 120 240V Out Menu 4 2 4 set to 200 220 208 or 240 as required X2 X1 X X N L1 X L2 100 11...

Page 37: ...igure 21 Do not connect the white and black pair of wires in this cable CAUTION EPO and external bypass circuits are not isolated from line voltage and wiring must be installed according to local code...

Page 38: ...d External Bypass short to common when active Generator Set Plastic Cable Tie Figure 22 Input Control Signal Wiring for External Controls 15 Place the signal wires through the proper conduit or gromme...

Page 39: ...UPS Output O t t Wi Wiring Diagrams UPS Input Voltage UPS Output Voltage Output Wires Input Output System 100 200 110 220 120 208 120 240 127 220 100 200 110 220 120 208 120 240 127 220 L1 L2 N Figure...

Page 40: ...ircuit conductors All AC circuit conductors including the neutral conductor must be the same size ampacity have the same rating 75 C copper wire and be sized according to the input circuit breaker See...

Page 41: ...S 110 220 Input 110 220 Output S 120 208 Input 120 208 Output S 120 240 Input 120 240 Output S 100 200 Input 100 200 Output S 127 220 Input 127 220 Output 3 2 3 2 3 3 7 4 5 7 6 1 Figure 23 External By...

Page 42: ...www powerware com 36 2 S 200 Input 200 Output S 208 Input 208 Output S 220 Input 220 Output S 230 Input 230 Output S 240 Input 240 Output 1 3 2 3 3 3 7 4 5 7 6 Figure 24 External Bypass Switch L1 L2...

Page 43: ...Guide S 164201393 Rev C www powerware com 37 S 220 Input 220 Output S 230 Input 230 Output S 240 Input 240 Output 2 1 3 2 3 3 3 7 4 5 7 6 Figure 25 External Bypass Switch L1 N Non Isolated Output Uni...

Page 44: ...UPS WITH BYPASS ELECTRICAL INSTALLATION EATON Powerware 9170 UPS 3 18 kVA User s Guide S 164201393 Rev C www powerware com 38...

Page 45: ...installation Risk of electrical shock If a bypass switch is not used the UPS input may be hardwired through conduit to a main power source circuit breaker and the UPS output may either be hardwired t...

Page 46: ...eaker Sizes 200 240 Vac 50 60 Hz UPS Capacity Input Circuit Breaker Rating 3 kVA 25A 6 kVA 40A 9 kVA 60A 12 kVA 80A 15 kVA 100A 18 kVA 125A NOTE If you are installing an optional battery charger modul...

Page 47: ...in FOR U S INSTALLATIONS READ THIS IMPORTANT NOTE This table lists the mm2 and AWG wire size for each circuit breaker size shown on the wiring diagrams The minimum recommended circuit breaker sizes fo...

Page 48: ...el To install the UPS without an external bypass switch 1 Unscrew and remove the rear cover s of the UPS top cover on 3 or 6 slot top two covers on 9 or 12 slot See Figure 27 The entrance panel contai...

Page 49: ...Rev C www powerware com 43 Entrance Panel Battery Cable Wiring Access Hole for Optional EPO Wiring Access Hole for an Optional Generator Input Signal Figure 27 UPS Power Entrance Panel Nine Slot Cabin...

Page 50: ...output circuits must be installed in dedicated conduit systems and not shared with other electrical circuits Figure 28 shows input and output wiring terminals inside the Powerware 9170 UPS cabinet 3 2...

Page 51: ...dle East Asia and Africa CAUTION Confirm that the UPS is wired for the proper input voltage as shown in Figure 29 and that the proper power modules either split phase or universal are installed to pro...

Page 52: ...if the full capacity of the UPS has not been reached N DC 50 or 60 Hz 100 200 110 220 127 220 120 208 or 120 240V Out Menu 4 2 4 set to 200 220 208 or 240 as required X2 X1 X X N L1 X L2 100 110 127...

Page 53: ...Signal Common Emergency Power off normally closed External Bypass short to common when active Generator Set Plastic Cable Tie Figure 32 Input Control Signal Wiring 9 Place the signal wires through the...

Page 54: ...t Wi Wiring Diagrams UPS Input Voltage UPS Output Voltage Output Wires Input Output System 100 200 110 220 120 208 120 240 127 220 100 200 110 220 120 208 120 240 127 220 L1 L2 N Figure 29a on page 4...

Page 55: ...and be sized according to the input circuit breaker See Table 7 on page 41 for recommended wire sizes The UPS input and output conductors must be run through separate conduits NOTE 3 The customer must...

Page 56: ...S 110 220 Input 110 220 Output S 120 208 Input 120 208 Output S 120 240 Input 120 240 Output S 100 200 Input 100 200 Output S 127 220 Input 127 220 Output 2 2 4 6 6 5 1 Figure 33 No External Bypass L1...

Page 57: ...www powerware com 51 S 200 Input 200 Output S 208 Input 208 Output S 220 Input 220 Output S 230 Input 230 Output S 240 Input 240 Output 1 2 2 4 6 6 5 Figure 34 No External Bypass L1 L2 Non Isolated Ou...

Page 58: ...Guide S 164201393 Rev C www powerware com 52 S 220 Input 220 Output S 230 Input 230 Output S 240 Input 240 Output 1 2 2 4 6 6 5 Figure 35 No External Bypass L1 N Non Isolated Output and Universal Powe...

Page 59: ...in the system NOTE In isolated output installations connect the UPS green and yellow neutral to ground wire N G bond to the UPS output terminal as illustrated in Figure 38 on page 55 Table 9 Wiring D...

Page 60: ...l to Ground Bonding for Isolated Output As required under safety regulations issued by various regulatory agencies the UPS cabinet must have a ground bond connection for the neutral terminal of an iso...

Page 61: ...he UPS rear cover are located directly below the line input terminals Figure 16 on page 27 shows input and output wiring terminals inside the Powerware 9170 UPS cabinet If there is any question as to...

Page 62: ...rcuit conductors All AC circuit conductors including the neutral conductor must be the same size ampacity have the same rating 75 C copper wire and be sized according to the input circuit breaker See...

Page 63: ...t 100 200 Output S 120 208 Input 120 240 Output BBM bypass required S 110 220 Input 110 220 Output S 115 230 Input 115 230 Output S 120 240 Input 120 240 Output 1 4 2 4 2 3 4 4 9 5 7 9 6 8 Figure 39 E...

Page 64: ...58 S 100 200 Input 100 200 Output S 120 208 Input 120 240 Output S 110 220 Input 110 220 Output S 115 230 Input 115 230 Output S 120 240 Input 120 240 Output 1 4 3 4 7 9 9 6 8 Figure 40 No External By...

Page 65: ...require the bypass switch to be BBM contact your service representative for details S 120 208 Input 120 208 Output S 127 220 Input 127 220 Output 1 4 2 4 2 3 4 4 9 5 7 9 6 8 10 Figure 41 External Bypa...

Page 66: ...Guide S 164201393 Rev C www powerware com 60 S 120 208 Input 120 208 Output S 127 220 Input 127 220 Output 1 4 3 4 7 9 8 9 6 10 Figure 42 No External Bypass L1 L2 N Isolated Output for Derived Three P...

Page 67: ...external battery cabinet verify that all AC input power is removed from the UPS Open the input service circuit breaker or turn the external bypass switch to the SERVICE position S Disconnect all batt...

Page 68: ...pair of pliers to bend the narrow links 1 and 2 in Figure 44 between the outer edge of the lower breakaway panel and the rear panel 4 Use the pliers to bend the entire breakaway panel at 3 and 4 in Fi...

Page 69: ...y onto the DC and DC bolts as shown in Figure 45 Replace the compression lug onto the DC bolt of the bus bar extension assembly Secure the assembly by replacing the two nuts removed in Step 6 8 Use th...

Page 70: ...the strain relief clamp shown in Figure 46 Remove the clamp by loosening the star nut on the inside of the entry plate leaving the nut in place Replace the clamp with a panel to conduit feedthrough a...

Page 71: ...orque all three compression lugs to 8 5 9 6 Nm 75 85 lb in 18 If an additional battery cabinet will be connected to the first in a daisy chain configuration use another external battery cabinet cable...

Page 72: ...User s Guide S 164201393 Rev C www powerware com 66 To UPS or Previous Battery Cabinet To Next Battery Cabinet Figure 48 Connecting Additional Battery Cabinets 20 Reinstall the remaining rear covers u...

Page 73: ...output voltage even though its batteries are disconnected To confirm that there is no UPS output voltage always disconnect all of the AC input sources and unplug all strings of internal battery modul...

Page 74: ...le see Figure 49 Repeat for each additional battery module NOTE All power modules in the Powerware 9170 UPS cabinet must be of the same type Split phase power modules have brown labels universal singl...

Page 75: ...ired the UPS skip to Startup for Hardwired Units on page 72 Startup for Plug Receptacle Units To start a plug receptacle unit 1 Plug the power cable of the unit into an approved functional power outle...

Page 76: ...ns on whenever input power is present and at least one power module is installed Set up the initial operating parameters through the front panel display see Initial Startup Parameters on page 75 NOTE...

Page 77: ...nded to divide loads between upper and lower receptacles as equally as possible In some configurations each set of receptacles is limited to one half of the total UPS capacity Whether the cabinet has...

Page 78: ...ation port shown in Figure 52 using the supplied communication cable DB 9 Connector for Computer Cable Figure 52 Communication Port 5 If your unit is wired to an external bypass switch you must perfor...

Page 79: ...Access the UPS On Off function through the front panel display NOTE If the UPS has been manually set to operate in Bypass or Battery mode change the System Control Mode Preference menu 4 1 selection t...

Page 80: ...witch to LINE Measure the voltage to the protected equipment at the load distribution panel and verify that it is correct 14 Switch the bypass switch to UPS and verify the voltage to the protected equ...

Page 81: ...ing the load See DB 9 Communication Port on page 94 for details 20 If there are receptacles on the UPS rear panel plug the equipment to be protected into the UPS output receptacles NOTE DO NOT protect...

Page 82: ...t press the button Set Time time 14 51 38 ESC 4 The output voltage is the most important operating parameter you must set as part of the initial configuration screens Select the desired UPS output vol...

Page 83: ...alarm occurs This setting affects only the alarm the system continues to operate as an N X system even if this parameter is left at the default value of 0 Set Redundancy RSetting 0 ESC 7 To password p...

Page 84: ...UPS STARTUP EATON Powerware 9170 UPS 3 18 kVA User s Guide S 164201393 Rev C www powerware com 78...

Page 85: ...UPS switches automatically to and from Battery mode with no interruption 0 ms transfer time as AC input power drops and returns Batteries are charged in this mode Battery mode produces power from the...

Page 86: ...e Off mode caused by a low battery alarm condition the UPS automatically recovers and if the Auto Restart parameter is enabled switches to Double Conversion mode Auto Restart is enabled as a factory d...

Page 87: ...ode selection is set to Battery The UPS can not go directly from Off to Battery Removing Input Power Always transfer the UPS to Off mode before removing input power The batteries will discharge if the...

Page 88: ...arm LED red Illuminates to signal that the unit has detected an alarm condition 3 Battery LED yellow Illuminates to signal that the unit is operating on battery power and producing output voltage 4 Li...

Page 89: ...down for a specific power module 0 is defined as System for observing overall system operation One or two triangles at the right of the display indicate which arrow buttons are active for moving withi...

Page 90: ...inets Md AUTO M4 B7 12 St ON LINE acvout 232 V Config OFF Menu Figure 57 Front Panel Display Normal Operation Operating parameters on the third line of the display vary depending on the operating mode...

Page 91: ...nutes of inactivity the UPS automatically deletes any active password level and returns to the normal running display Changing Parameter Settings Changing an operating parameter is similar to setting...

Page 92: ...he B and Y buttons to scroll up and down through the log entries Each entry shows the date and time the unit switched to battery operation in 24 hour format and the duration of battery operation in ho...

Page 93: ...r format and the duration in hours and minutes A typical alarm log entry is shown in Figure 59 2 2 6 0 A 02 05 17 51 04 35 Low Battery Slot Top ESC Figure 59 Alarm Log Entry Figure 59 displays the six...

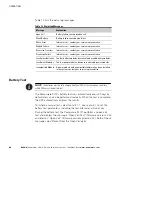
Page 94: ...ules decrease load or add power modules Incompatible Module A power module with incompatible firmware has been installed in the system contact your service representative Battery Test NOTE The batteri...

Page 95: ...61 shows all the Powerware 9170 system parameters The menu structure has six primary level menus System Status Menu 1 through Service Menu 6 Each primary menu has secondary items numbered by their lo...

Page 96: ...2 13 Full Load P1 1 2 6 VAOut 1 2 14 Full Load P2 1 2 7 VAout P1 N 1 2 15 PowerFactor L1 1 2 8 VAout P2 N 1 2 16 PowerFactor L2 1 3 1 Battery Volts 1 3 2 Runtime 1 3 3 Seconds on Battery ESC 4 3 1 Inv...

Page 97: ...tions accompanying the Software Suite CD Powerware LanSafe software uses an RS 232 serial link to communicate with the UPS and it provides you with up to date graphics of UPS power and system data and...

Page 98: ...Protocol SNMP software packages may also be used to communicate remotely with the Powerware 9170 system The ConnectUPS BD Web SNMP Card also allows UPS dependent computer systems to automatically shu...

Page 99: ...causes fewer recognized line faults during generator instability S Frequency Glitch Count This parameter increases the number of bad frequency cycles before the unit transfers to battery power allowi...

Page 100: ...mal AC input power is restored during the 120 second delay S The UPS output automatically restarts after the UPS determines the normal AC input power is stable S The shutdown and restart timing repres...

Page 101: ...battery cabinets do require some attention to assure continued reliable service Follow Powerware s recommended maintenance schedule which includes S Check operating environment for clean cool dry cond...

Page 102: ...to prevent the switch from being turned without first signaling the UPS NOTE When the red button is released the UPS remains in its internal Bypass mode Return the UPS to Auto mode by selecting that m...

Page 103: ...ce the front cover s 8 If the batteries are not properly installed the Open Cell alarm activates Check the batteries in the slot indicated on the alarm screen Power Module Replacement The Powerware 91...

Page 104: ...itry Label the original module with masking tape or some other identifier Record the serial number of the replacement module for your warranty 5 Insert the replacement module by sliding it carefully i...

Page 105: ...frequency tracks input frequency to selectable limit 0 1 to 5 0 Hz 3 0 Hz default switches to battery operation outside this tolerance On battery 50 Hz or 60 Hz 0 1 Hz Regulation 3 load regulation und...

Page 106: ...l to ground bond is required other local codes may take precedence Table 16 Split Phase Model Specifications ASY 0673 3 kVA 2500 Watts Voltage Input Current Output Current Input Service Heat Dissipati...

Page 107: ...nt Input Service Heat Dissipation Normal Mode 200 64A 60A 220 60A 56A 208 56A 58A 80A 1145W 3 90 kBTU h 220 52A 56A 80A 1145W 3 90 kBTU hr 230 58A 52A 240 56A 50A 15 kVA 12500 Watts Voltage Input Curr...

Page 108: ...rent plus 2A for each power module in the system For redundant power module operation N X increase the input current rating by 2A for each additional redundant power module Table 17 Universal Model Sp...

Page 109: ...Normal Mode 200 42A 45A 208 40 5A 43 5A 220 39A 42A 60A 860W 2 93 kBTU hr 230 37 5A 39A 240 36A 37 5A 12 kVA 8400 Watts Voltage Input Current Output Current Input Service Heat Dissipation Normal Mode...

Page 110: ...65A 70A 100A 1430W 4 88 kBTU hr 230 62 5A 65A 240 60A 62 5A 18 kVA 12600 Watts Voltage Input Current Output Current Input Service Heat Dissipation Normal Mode 200 84A 90A 208 81A 87A 220 78A 84A 125A...

Page 111: ...ive chemicals and other contaminants The Powerware 9170 UPS uses internal fans to circulate the air for cooling The air must be free to circulate around the UPS and battery cabinet s Do not operate th...

Page 112: ...slot 80 cm 31 5 43 cm 17 0 65 cm 25 5 47 kg 103 lb 6 slot with caster cart 84 5 cm 33 25 43 cm 17 0 65 cm 25 5 52 kg 115 lb 9 slot 119 5 cm 47 0 61 cm 24 0 72 5 cm 28 5 72 kg 158 lb 12 slot 154 5 cm...

Page 113: ...tton labeled OFF Confirm the selection by pressing the button labeled Yes If On Off control is password protected enter the user password 0377 In the event of a front panel display failure you can tur...

Page 114: ...n beside the switch before turning the switch Set the UPS to turn on in High Efficiency mode Go to menu 4 1 Select the system mode desired at power on by pressing the or button When the display shows...

Page 115: ...SC Figure 62 Typical System Active Alarm Display Figure 63 shows a detailed alarm entry Some alarms provide additional information on the second line of the display to help identify the cause of the a...

Page 116: ...o high because of a charger problem battery problem or incorrect parameter setting Contact your service representative E Low AC Output The UPS has shut down because the AC output voltage is too low to...

Page 117: ...ective module T Call Service Module Handle Open firmware versions 2 22 and later The UPS has detected an open power module handle Look for the slot number third line on display of the power module and...

Page 118: ...ntact your service representative M Check Battery Open Cell A battery pair of modules has failed an open cell test Look for the slot number third line on display of the failed modules Verify that both...

Page 119: ...S Serial number S Version number if available S Date of failure or problem S Symptoms of failure or problem S Customer return address and contact information If repair is required you will be given a...

Page 120: ...TROUBLESHOOTING EATON Powerware 9170 UPS 3 18 kVA User s Guide S 164201393 Rev C www powerware com 114...

Page 121: ...ermined by Company All Warranted Items returned to Company and all parts replaced by Company shall become the property of Company Expenses for any labor to repair the Warranted Item beyond the initial...

Page 122: ...OMPANY DOES NOT WARRANT SOFTWARE INCLUDING SOFTWARE EMBEDDED IN PRODUCTS THAT IS NOT CREATED BY COMPANY WITHOUT LIMITING THE FOREGOING COMPANY SPECIFICALLY DOES NOT WARRANT SOFTWARE SUCH AS LINUX THAT...

Page 123: ...ed warranty this Warranty applies only to the original End User the End User of any Powerware 5115 5125 5140 9104 9120 9125 9155 9170 and FERRUPS Products individually and collectively the Product and...

Page 124: ...PECIFICALLY DOES NOT WARRANT SOFTWARE SUCH AS LINUX THAT WAS CREATED USING AN OPEN SOURCE MODEL OR IS DISTRIBUTED PURSUANT TO AN OPEN SOURCE LICENSE THIS WARRANTY IS THE SOLE AND EXCLUSIVE WARRANTY OF...

Page 125: ...rolina 27616 USA Load Protection Guarantee US and Canada Powerware UPS Models 3105 3110 3115 5110 5115 5125 9120 9125 9150 9155 9170 and FERRUPS GUARANTOR The Guarantor for the load protection guarant...

Page 126: ...ITS OR REVENUE LOSS OF USE OF PRODUCTS LOSS OF DATA COST OF CAPITAL CLAIMS OF CUSTOMERS OF THE END USER OR ANY SPECIAL INDIRECT INCIDENTAL OR CONSEQUENTIAL DAMAGES WHATSOEVER THE TOTAL CUMULATIVE LIAB...

Reviews: