2
EATON
IB512003EN
Installation instructions
Installation Instructions - LumaWatt Remote Sensor
INSTALLATION
This lighting fixture has been shipped complete with one
of several mounting options. Please follow the installation
instructions specific to the catalog part that you ordered.
Tools required
Ratchet, a shallow 3/4” socket and 1/4 hex nut driver; 3/8”
Allen drive for 1/2” inch bolt; #2 Phillips head screw driver;
torque wrench.
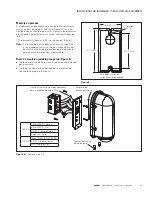
Pole Mount (Figure 1.)
The housing mounts standard to a square pole using the
toggle bolts supplied. A round Pole mount adapter (included)
mounts housing to a 4”- 6” round pole. A 4” pole is the
minimum recommended.
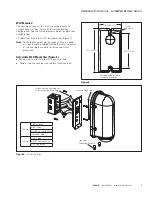
1. Mount toggle bolts to pole by inserting the toggle into
the pole. If using a round pole mount adapter (optional)
shown, install toggle through the 1/2” holes first.
Cinch up collar against pole and remove finger tabs.
Squeezing the tabs will shear them at the cinch collar.
(Figure 2.)
2. Fasten housing mounting plate, slot facing downward,
with 2 x ¼”-20 hex bolts as shown. Tightening torque
shall be 50 in-lbs. (Figure 3.)
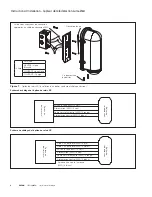
3. Route and attach wires per wiring diagram. Feed wires
through the mount plate and feed wires through the
pole.
ote:
N
3’ of leads are provided extending outside the
housing. (Figure 4.)
4. Insert wires into the pole as you place the housing on
the mount plate. The bracket on the inside fixture and
lanyard allow for hanging the housing during installation.
ote:
N
Do not to pinch the lanyard cable when installing
the housing. Once the housing is in position, tighten
using (2) set screws. Tighten until screw is bottomed
out.
Figure 1.
Figure 2.
Figure 3.
5. Verification. Once powered a LED indicator under the
sensor lens will glow continuous green, indicating
that the sensor is ready for commissioning. See the
LumaWatt Admistrators Guide or Lumawatt installation
sheet for troubleshooting information.
Square Pole
Mount
Round Pole
Mount
30” [760mm]
Maximum
1-1/2” [38mm]
Diameter Hole
(2) 1/2” [13mm]
Diameter Holes
4-9/16”
[117mm]
2-1/2” [64mm]
2-1/16” [53mm]
After Tabs
Broken Flush
Fingertabs
Aligned Top
and Bottom
Shown with
Tabs Before
Breaking Off.
Collar Side
Flush
UP
1/4-20 X 1.5”
Hex Bolt
Wall Plate with
Gasket Installed
Slot Facing Down
Figure 4.
Housing
Mounting
Screws
Lanyard
Hook Tab
Lanyard
Hook Tab
Housing
Mounting
Screws

