


Eaton’s Wiring Devices
Home automation hub
Figure 4: Eaton Home project display
Configure, test, and deploy a project
Refer to the following instructions on creating,
testing, and deploying devices. You can deploy the
devices through your Eaton Home app.
Including Z-Wave device to Home Automation
Hub
:
For the Eaton Home mobile application, follow the
following steps:
• Tap the
Inventory
icon on the top right
• Select ‘Devices’ from the ‘Configure’ menu at
the bottom of the screen
• Tap the
Inventory
icon from the bottom of
the screen
• Select the category of device you want to add to
the controller. E.g.: ‘Lighting’
• Name the device you want to add and select the
area you want. Tap ‘Continue’
Excluding Z-Wave device to Home Automation Hub:
For the Eaton Home mobile application, follow the
following steps:
• Tap the
Inventory
icon on the top right
• Select ‘Devices’ from the ‘Configure’ menu at the
bottom of the screen
• Select the category of device you want to exclude
from the network; the screen should show list of all
the devices in that category.
• Tap ‘
⋮
’ next to the name of the device you want to
exclude. Tap ‘Remove’ from the drop down menu
• Tap ‘Start Removal Mode’ to put the controller in
exclusion mode.
• Follow the instructions with your Z-Wave device to put
that device in exclusion mode.
• Follow the instructions on the screen to compete the
exclusion process.
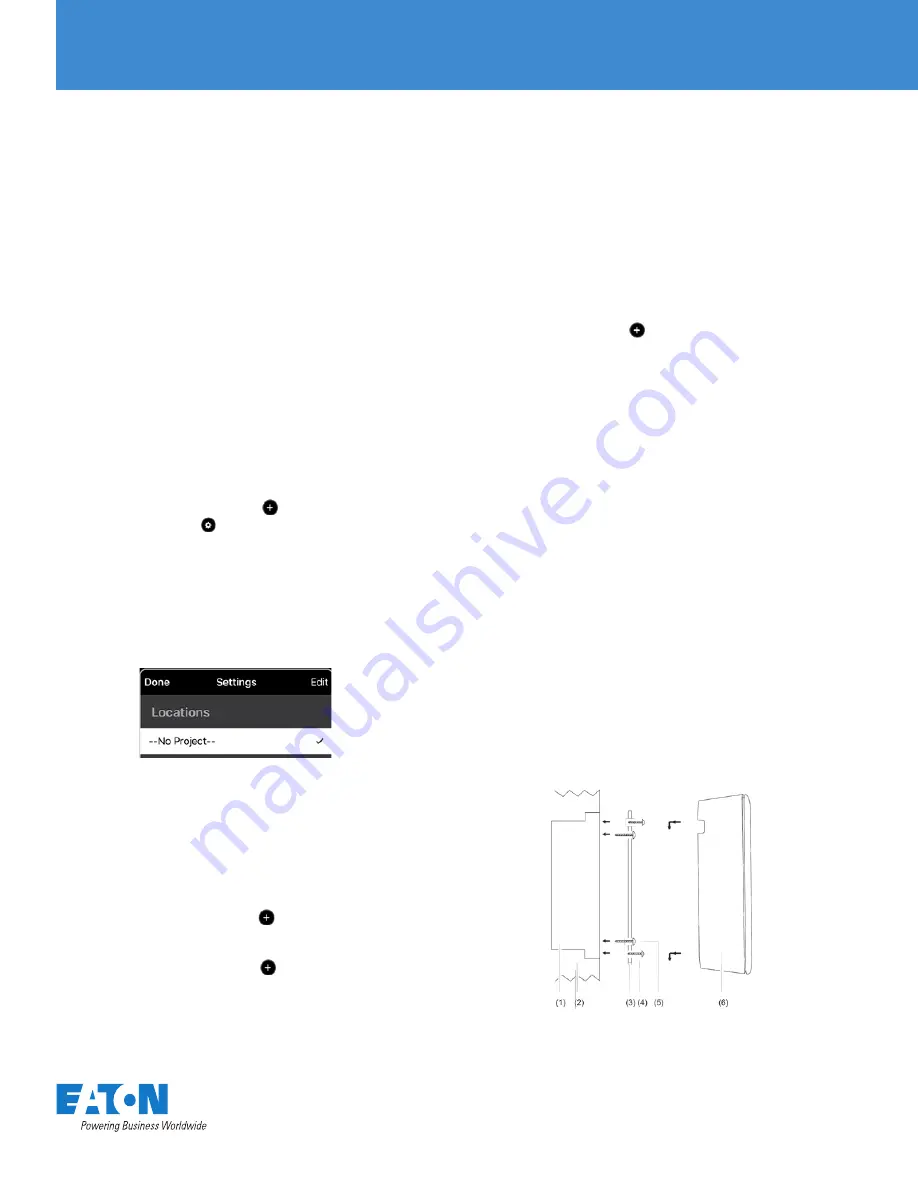
Mounting the Home automation hub on a standard
single gang box
1. Place the wall mount against a standard gang box. See
Figure 5, items 1 and 3.
2. Align the long screws in the wall mount, and then
fully screw them in. Repeat this with the short screws,
stopping with enough room remaining to support the
Home automation hub. See Figure 5, items 4 and 5.
3. Align the Home automation hub over the screws, and
then slide it down, locking it in place. See Figure 5,
item 6.
Figure 5: Home automation hub wall mounting
(1)
(2)
(3)
Gang box
Wall
Wall mount
Short screws
Long screws
Home automation hub
(4)
(5)
(6)
To connect your Home automation hub using
WiFi:
1. Download the Eaton Home App. If you are
using the app for the first time, create your login
using your email, google account or your
facebook account.
2. Ensure that the HOMECT is powered on, and
then connect your Android or iOS device to the
Eaton WiFi (EatonWifi-XXXX).
Note:
XXXX represents the last characters 4 of the
units MAC address.
3. Open the Eaton Home App, and then wait for
network dialog to display.
4. Enter your home’s WiFi SSID and password as
prompted, and then tap Next.
Note:
The SSID is case sensitive.
5. Follow the displayed instructions.
6. Wait for the LED to become solid blue, this can
take up to 90 seconds.
Note:
If the LED does not change solid blue, see
Troubleshooting on page 4.
7. Reconnect your Android or iOS device to your
home’s WiFi, and then re-open the Eaton
Home App.
8. Tap the
Inventory
icon , and then tap the
Settings
icon .
9. The Locations dialog displays. Select the project
-- No project --. See Figure 4.
10. Tap outside of the Locations dialog box, and then
enter the PIN 1234 as prompted.
You are now ready to configure the project.
• Tap ‘Start Discovery Mode’ to put the device in
inclusion mode.
• Follow the instructions with your Z-Wave device
to put that device in pairing mode. Follow the
instructions on the screen to compete the inclusion
process.
• Once the device has been included, the app will allow
you to configure the device settings. You can tap ‘<’
icon to exit to the main screen.


