Eaton’s Wiring Devices
Home automation hub
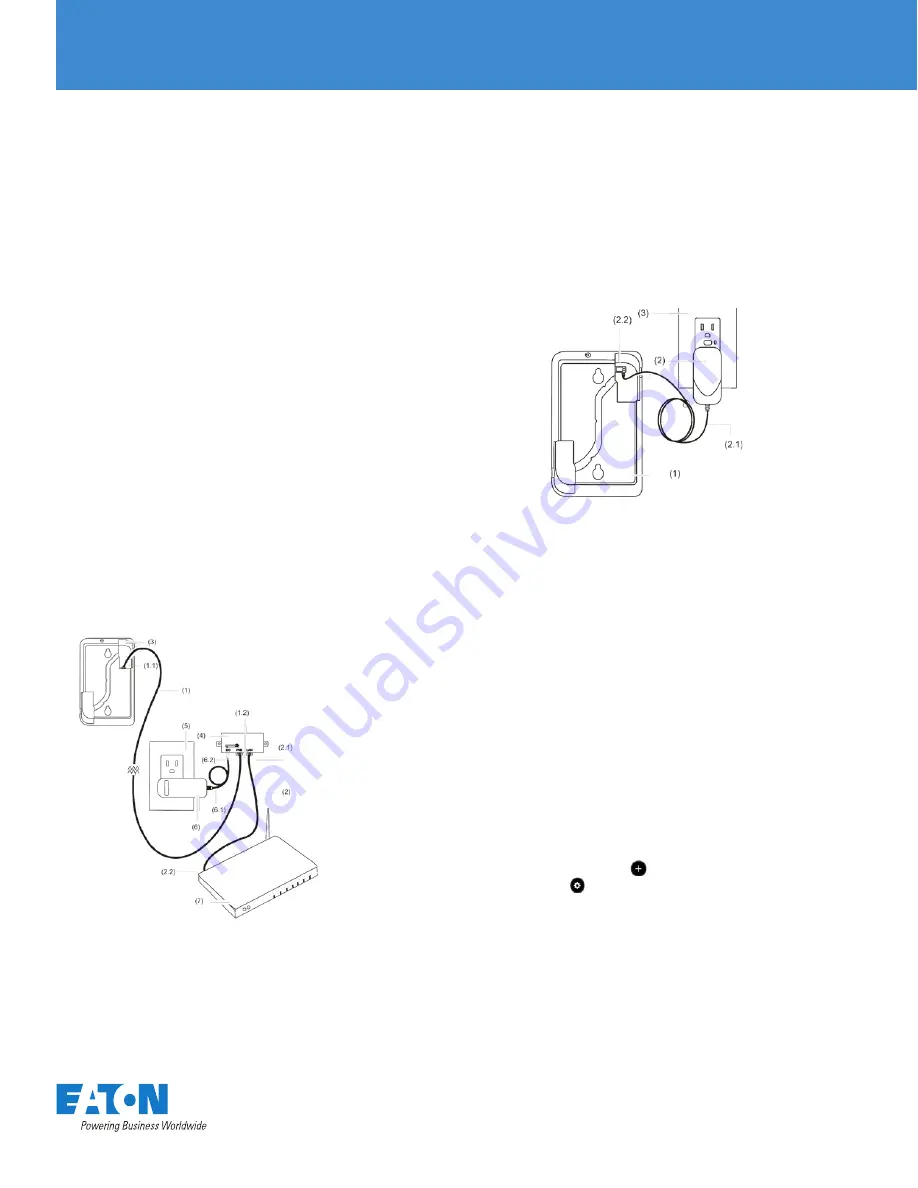
Figure 2: HOMECT PoE connection
Powering on and connecting the HOMECT
After installing the Home automation hub and
downloading the Eaton App, power on the hub.
The Home automation hub can be powered using
PoE (sold separately) or the included 5v micro USB
adapter.
WARNING:
You must follow the instructions below
to power your Home automation hub. Failure to do
so may result in bodily injury and/or damage to the
equipment.
To connect power to the HOMECT using PoE:
Note:
PoE connection requires two Ethernet cables,
they are referred to as cable #1 and cable #2.
1. Plug an Ethernet cable (#1) into the Ethernet port
on your Home automation hub. See Figure 2,
item 1.1.
2. Plug the opposite end of the cable into the PoE
injector (sold separately) port labeled POE. See,
Figure 2, item 1.2.
3. Plug a separate Ethernet cable (#2) into the LAN
port on the PoE injector. See, Figure 2, item 2.1.
4. Plug the opposite end of the Ethernet cable (#2)
into an Ethernet port on your router. See Figure
2, item 2.2.
5. Plug the PoE power supply into the D/C port on
the PoE injector. See Figure 2, item 6.2.
6. Plug the PoE power supply into a wall outlet. See
Figure 2, items 6 and 5.
(1)
(1.1)
(1.2)
(2)
(2.1)
Ethernet cable
#1
Ethernet cable
#1 connected
to the HOMECT
Ethernet port
Ethernet cable
#1 connected
to the PoE port
on the PoE
injector
Ethernet cable
#2
Ethernet cable
#2 connected
to the LAN
port of the PoE
injector
Ethernet cable #2 connected to the Ethernet port on router
HOMECT
PoE injector
Wall outlet
PoE injector power supply
PoE injector power supply cable
PoE power supply connected to the DC port
Wireless router
(2.2)
(3)
(4)
(5)
(6)
(6.1)
(6.2)
(7)
To connect power to the HOMECT using the micro
USB:
1. Plug the micro USB end of the power adapter into
the micro USB port on the upper-right rear corner of
the Home automation hub See Figure 3, item 2.2.
2. Plug the power adapter’s opposite end into a wall
outlet. See Figure 3, items 2 and 3.
3. Check the LED on the top edge of the Home
automation hub. It flashes red until WiFi is configured.
See Figure 6, item 1.
Figure 3: HOMECT 5v micro USB connection
(1)
(2)
(2.1)
(2.2)
(3)
HOMECT
5v micro USB power supply
5v micro USB power supply cable
5v micro USB plugged in to the HOMECT micro USB port
Wall outlet
Home automation hub Eaton Home setup
After the Home automation hub’s installation, setup the
connection.
There are two different setup options, PoE (Power over
Ethernet) and WiFi connection. Follow the steps according
to how the Home automation hub is powered.
To connect your HOMECT using PoE:
Notes:
• If the Home automation hub’s LED is not solid blue
after 90 seconds, see Troubleshooting on page 4.
• Your Android or iOS device must be connected to your
home network.
1. Download and open the Eaton Home App.
2. Tap the
Inventory
icon , and then tap the
Settings
icon .
3. The Locations dialog displays. Select the displayed
project.
Note:
The project displays as -- No project --.
See Figure 4.
4. Enter the
PIN 1234
as prompted.
5. Tap outside of the Locations dialog box.
You are now ready to configure the project.


