background image

1

FC6 / FC6-AU Fan controller user manual

FC6/FC6-AU FAN CONTROLLER


www.eaton.com

1. Introduction

The FC6 Fan Controller can be connected to a Cooper

analogue addressable fire alarm control panel by means

of the comms Loop utilizing only one address

There are 6 channels per Fan Controller capable of

controlling & indicating 6 individual Fans

All FC6 Fan Controllers are programmed individually by

means of the unique easy to use Cooper Site Installer

PC software

Each channel is programmed to an output device and

feedback input device that can reside on any loop on

any panel on the network to control & monitor the

status of the Fan

The CFC301 which takes 2 addresses on the loop, one

for the control output which appears as a ZMU and one

for the feedback input which appears as a technical

input

The MCIM can also be used as the feedback input

The MCOM can also be used as the control output

but is limited to 20 per loop

The MCOM-S can also be used as the control output

and is limited to 60 per loop but as it auto-learns 

and behaves like a sounder it will activate during 

an evacuation

The MCOM-FC can also be used as the control

output and is limited to 60 per loop but even though it

auto-learns as a sounder it will not react to evacuations
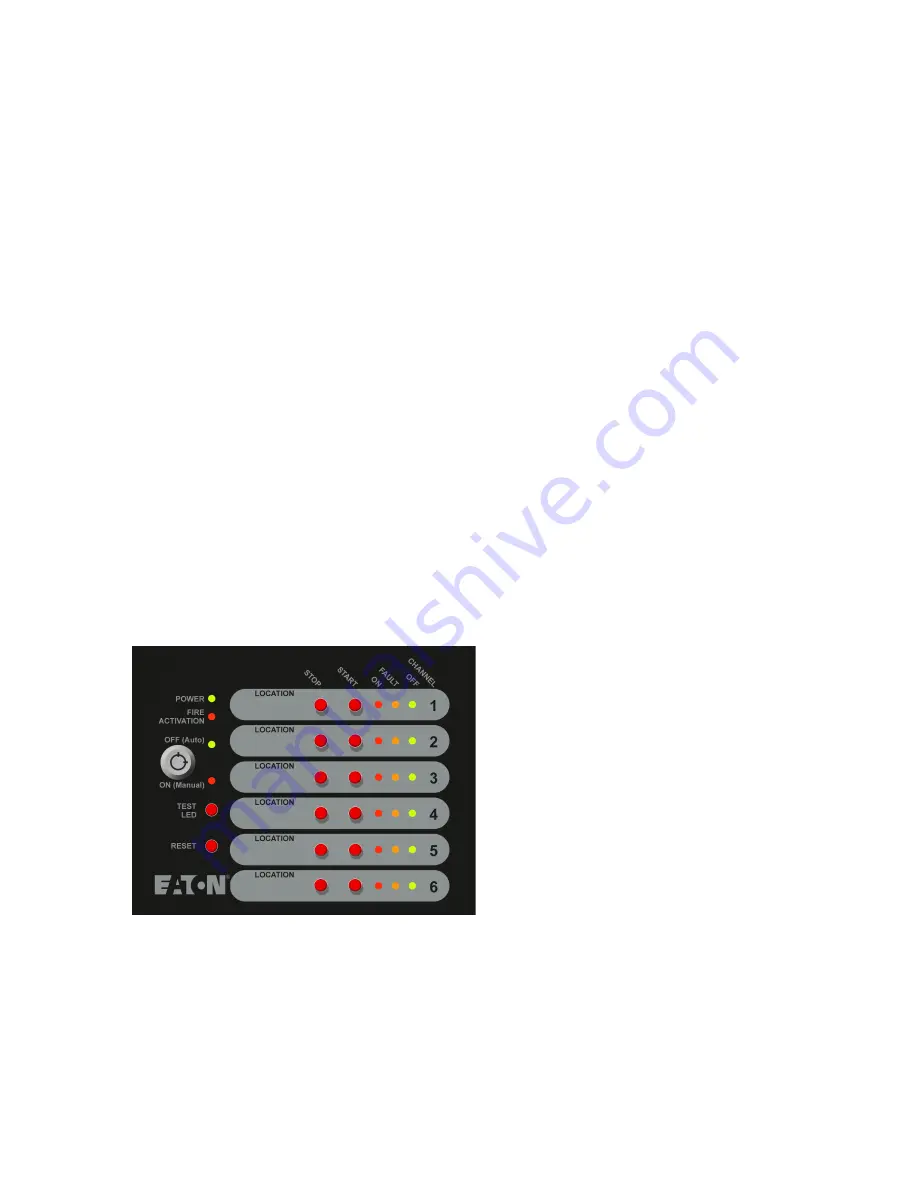
2. Overview

Status LED

Power LED (Green) when Fan Control is working

normally, the LED on

Fire Activation LED (Red) Operates when fire alarm is

received from main panel

Controls:

Key switch

Auto/Manual key switch: used to select auto or

manual control

Select Auto Mode: Green LED. The Fan Control

operation is initiated by the state of the Fire Panel

Select Manual Mode: Red LED, The Fan Control

operation is controlled by the “Stop/Start” buttons

on the individual channels

Reset button

Press the button to reset Fan Control. Reset from the

main panel will not reset the fan controller

Test LED

Pressing the test LED button will start the control panel

self-test

Channel 1-6:

Start/stop buttons

Start button: press the button, start one device.

(Requires to start two channels of the one device)

Stop button: press the button to stop one device.

(Requires to stop two channels of the one device)

LED indication

ON LED (Red) Activated when the device receives

feedback and the Start button has been pressed.

Flashes when the feedback is received during normal

operation (no button press)

Fault LED (Amber) Activated when No Feedback has

been received after Start has been pressed or Stop

button has been pressed but feedback has been

received and/or Open Circuit/Short circuit has been

reported, otherwise off

OFF LED (Green) Activated when the stop button has

been pressed and No Feedback has been received or

no feedback is being received, otherwise off

PR209-166-504-08 

January 2018


Summary of Contents for FC6

Page 1: ...FC6 FC6 AU Fan controller user manual ...

Page 2: ...NG 4 4 1 5 RESET 4 4 1 6 TEST LED 4 5 BASIC SYSTEM LAYOUT 5 5 1 FC6 AND CFC301 ON SAME PANEL AND LOOP 5 5 2 FC6 AND CFC301 ON SAME PANEL BUT DIFFERENT LOOPS 5 5 3 FC6 AND CFC301 ON DIFFERENT NETWORKED PANELS 5 5 4 FC6 AND MCOM MCIM ON SAME PANEL AND LOOP 5 5 5 FC6 AND MCOM MCIM ON SAME PANEL BUT DIFFERENT LOOPS 6 5 6 FC6 AND MCOM MCIM ON DIFFERENT NETWORKED PANELS 6 6 FC6 SPECIFICATION 7 6 1 ELECT...

Page 3: ...Overview Status LED Power LED Green when Fan Control is working normally the LED on Fire Activation LED Red Operates when fire alarm is received from main panel Controls Key switch Auto Manual key switch used to select auto or manual control Select Auto Mode Green LED The Fan Control operation is initiated by the state of the Fire Panel Select Manual Mode Red LED The Fan Control operation is contr...

Page 4: ... program Figure 1 2 Right click Fan Controller icon Figure 2 Figure 2 Fan controller icon 3 Select Edit Fan Controller to go into the configuration screen Figure 3 4 Once in the configuration screen Select Add Master Figure 4 Figure 5 3 PC software operation Site installer PR209 166 504 08 January 2018 ...

Page 5: ...COM MCOM S MCOM FC is located on the system In the Panel Loop and Address icons drop down boxes across from the Confirm select where the feedback device you are going to use CFC301 Technical Input MCIM is located on the system This only needs to be set if there is feedback from the fan itself If you use 6 channels you need to open the 6 channels which will allow you to write 6 rules 6 Select in th...

Page 6: ...to turn off to show the current status of the fan Pressing the Stop button will cause the control device for that channel to deactivate which will turn the fan off The fan controller expects to see the off signal from the feedback device within 25s If the off signal is received within the time limit the Off LED will turn on and the On LED will turn off but if the off signal isn t received then the...

Page 7: ... 5 Basic system layout 5 1 FC6 and CFC301 on same panel and loop Figure 9 5 2 FC18 and CFC301 on same panel but different loops Figure 10 5 3 FC6 and CFC301 on different networkedpanels Figure 11 5 4 FC18 and MCOM MCIM on same panel and loop Figure 12 PR209 166 504 08 January 2018 ...

Page 8: ...controller user manual FC6 FC6 AU FAN CONTROLLER www eaton com 5 5 FC6 and MCOM MCIM on same panel but different loops Figure 13 5 6 FC6 and MCOM MCIM on different networked panels Figure 14 PR209 166 504 08 January2018 ...

Page 9: ...ent 310μA Environmental Operating temperature 10 C 60 C Humidity Non condensing 95 rh External 24 volt supply 18v 24v 28v External current 150mA Compatibility Suitable for use with Cooper analogue addressable re systems 6 2 Mechanical Cable entry 2 x 20mm knockouts top 2 x 20mm knockouts bottom 48mm x 18mm slot at rear PR209 166 504 08 January 2018 ...

Page 10: ...ton Electrical Systems Ltd Wheatley Hall Road Doncaster South Yorkshire DN2 4NB United Kingdom 2017 Eaton All Rights Reserved Printed in UK Publication No PR209 166 504 08 CSSC 510 Article No January 2018 Eaton is a registered trademark All trademarks are property of their respective owners ...

Reviews: