6
Manual CEAG W 270.3 LED with charger Z 345.3
40071860171_A August 2018 www.ceag.de
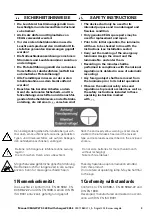
Die drei Anschlussleitungen
abziehen.
Die Leitungen am neuen LED-
Gehäuse anschließen. Dabei die
Klemmenbezeichnung auf der
Leiterkarte beachten:
YE = Gelbe Leitung
BU = Blaue Leitung
BK = Schwarze Leitung
Remove the three connection
cables.
Connect the cables to the new
LED housing.
Observe the terminal designa-
tion on the circuit board:
YE = yellow cable
BU = blue cable
BK = black cable
Das LED Gehäuse dann nach
oben kippen und mit der
Schraube verschließen.
Then tilt the LED housing
upwards and close with the
screw.
Das LED Gehäuse zuerst unten
aufsetzen.
First attach the LED housing
underneath.
Schraube lösen und das
Reflektorgehäuse abnehmen.
Loosen the screw and open
reflector housing.
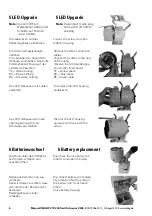
6 Batteriewechsel
6 Battery replacement
Verschluß unter dem Reflektor
nach hinten schieben und
Leuchte öffnen.
Push back the lock below the
reflector and open the lamp.
Batterie abklemmen und aus-
wechseln.
Dabei ist darauf zu achten, dass
sich die Pole der Batterie nicht
berühren!
Batteriegehäuse wieder
schließen.
Disconnect battery and replace.
Pay attention that the poles of
the battery don´t touch each
other!
Close battery housing.
5 LED Upgrade
ote:
N
Vor dem Öffnen
Netzstecker ziehen und
Schalter auf Position
„Aus“ stellen.
5 LED Upgrade
ote:
N
Disconnect mains plug
and switch off before
opening.


