2
Direct Mount:
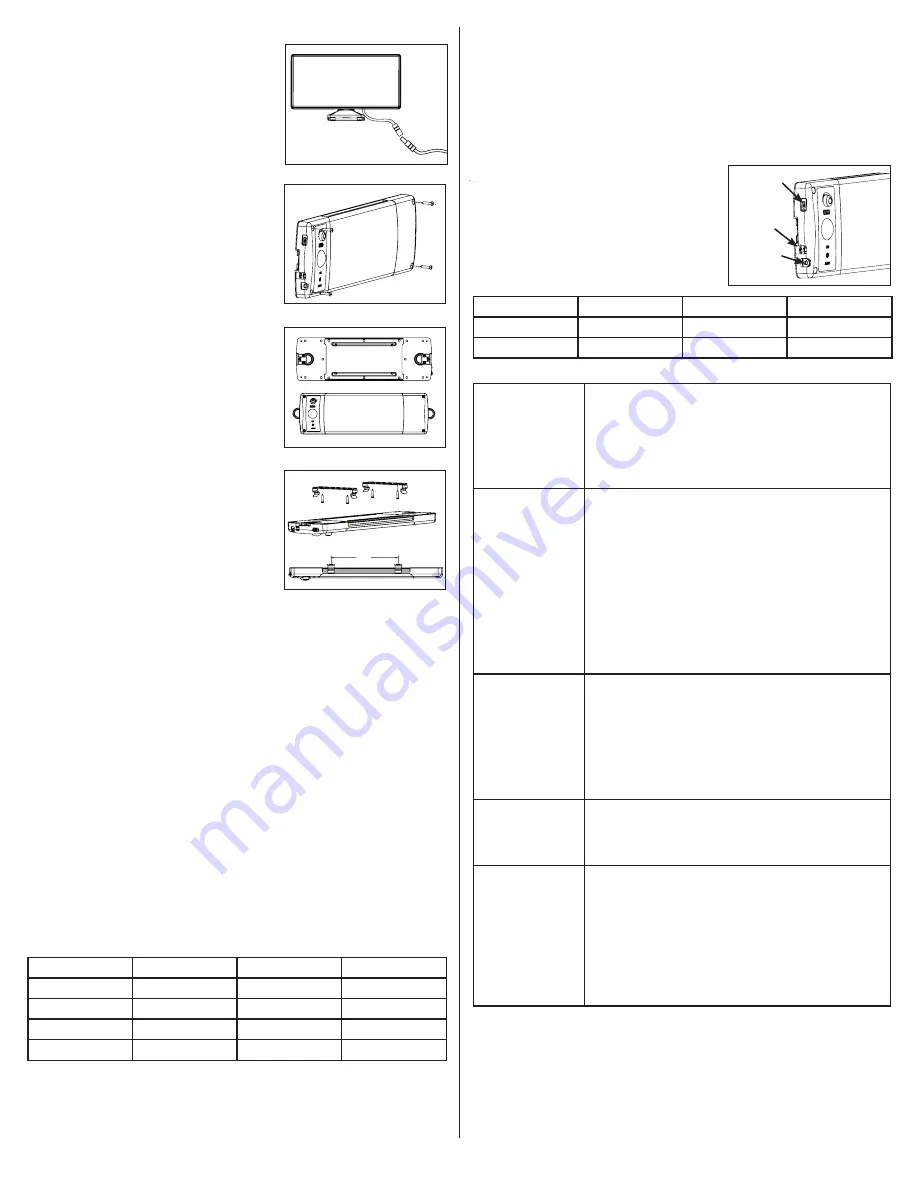
Using the 4 of the mounting screws provided(J), attach
the lighting system directly to a wall or ceiling using
the attachment points located in the corners (Fig. 7). If
anchors(K) are required, i.e. for drywall installation, use a
3/16” drill bit to create pilot holes and set the anchors in
place with a hammer.
D-Ring:
Your lighting system can be hung or suspended by one
or both of the D-Rings. Simply rotate one or both rings
out from the housing, ensure the support method used is
securely fastened to the mounting surface, and place the
system into position (Fig. 8).
Bracket Mount:
Attach the two included brackets (C) to a wall or ceiling
using the fasteners provided. Ensure the brackets are
parallel and aligned with each other, positioned no more
than 9" apart (Fig. 9). Locate the grooves on the long
sides of the fixture, rotating and snapping the fixture into
the brackets. Remove by pressing down on the tabs on
the brackets.
Outdoor Installation:
This system is designed to withstand rain and can be
installed and used outdoors, however, the following
guidelines must be adhered to:
•
Only the solar panel port can be used when the
system is exposed to moisture. The USB ports are
not designed for use in wet conditions.
•
All ports not in use must have the port covers
securely in place at all times to prevent water
intrusion.
•
The ports (in a vertical orientation) or control side
(in a horizontal orientation) of the system should
always be oriented downward to protect against
water intrusion.
•
The system is designed to operate between 0° and
104°F. To protect the Li-ion battery pack, the internal
charging circuitry will not allow the battery to charge
below 32°F.
Fig. 7
Fig. 6
Fig. 8
Fig. 9
9"
FUNCTIONS
Your fixture has three operating modes which can by selected by pressing the power button
repeatedly: ON, AUTO and OFF. As you cycle through these modes the mode text will briefly
illuminate to confirm the mode selected.
ON mode:
this mode keeps the light on indefinitely, bypassing inputs from the motion sensor
or photo sensor. Note that in ON mode the system will not shut down until you change modes
or the battery is depleted.
AUTO mode:
this mode utilizes the integrated motion sensor and photo sensor, turning the
light on, at night or in the dark, only when motion is detected. The light will deactivate once no
motion has been detected for 3 minutes. The onboard motion sensor has a detection range of
15’ with a detection zone of 360°.
OFF mode:
from AUTO mode, press the power button once more to shut the light off. The
charging and discharging functions will continue to operate in OFF mode.
Dimming:
the system is equipped with an integrated dimmer that can be used in ON or AUTO
mode. Turn the knob to the left to dim the light output and extend battery run time. Turn the
knob to the right to increase output, which will shorten battery run time. See Table 1 below
for fixture run time estimates.
USB Output:
the USB output produces 5V 2.1A, and is useful for charging and/or operating
most smart devices and accessories requiring a USB input. Note that the integrated power
supply is a 8800mAh Li-ion battery pack, and any charging from the power supply will reduce
the run time of the light fixture on a single charge.
TABLE 1
Approximate Run Times and Initial Lumens Based On Dimming Level:
All figures assume the battery pack is fully charged
Dimming Level
Full Dimming
Half Dimming
No Dimming
Light Output
10%
50%
100%
Run Time
18 Hours
9 Hours
90 minutes
Initial Lumen Output
200
1200
2400
Wattage Equivalent
15W
75W
180W
--B
--M
C
CHARGING
This system is capable of being charged with the included solar panel, or via micro USB.
See Table 2
below for approximate charge times based on power source and input power.
USB Charging:
To charge the fixture using a mini USB charging cord (L), connect the mini USB side of the
cord to the mini USB input on the fixture (Fig. 10). DO NOT use any USB power source
exceeding 5V 2.1A power supply. Once an input charge is detected, the battery indicator will
flash, indicating the battery level. Once the battery is fully charged, the indicator will remain
a solid green.
Solar Panel Charging:
Connect the solar panel cord directly into the solar panel
input port on the fixture (Fig 10); use of the 17’ exten-
sion cord (M) is optional. Please note that the battery
indicatory lights do not come on when charging with the
solar panel in order to conserve power and accelerate
charge time.
TABLE 2.
Typical Charge Times:
Power Source
USB
USB
Solar Panel
Input Power
5V 2.1A
5V 1.0A
Full Direct Sun
Charge Time
3.5 Hours
7 Hours
2-3 Days
TROUBLESHOOTING
Light does not come
on when in ON mode
•
Press the power button to cycle through the operating modes,
verifying the level of charge using the battery level indicator.
•
Ensure the battery is fully charged, using the USB input if
possible.
•
When using the solar panel, allow at least three (3) full sunny
days for the first charge or any time the battery pack becomes
completely depleted.
Light does not come
on when in AUTO
mode
•
The AUTO mode utilizes the integrated photo control and will not
allow the light to come on when ambient light levels are too high.
Ensure ambient light levels are low enough to activate the light.
Test by completely covering the motion sensor with your hand or
other opaque object.
•
Press the power button to cycle through the operating modes,
verifying the level of charge using the battery level indicator.
•
Ensure the battery is fully charged, using the USB input if
possible.
•
When using the solar panel, allow at least three (3) full sunny
days for the first charge or any time the battery pack becomes
depleted.
Motion Sensor is
malfunctioning
1. The motion sensor produces a detection zone extending 60°
from center, or 120° total angle. Ensure the motion triggering
event falls within the detection zone.
2. The motion sensor utilizes PIR (passive infrared) technology,
which detects movement and changes in relative heat. Extreme
ambient temperatures may reduce or inhibit motion detection.
3. Relocate the fixture away from trees, moving cars, standing
water or other objects that may potentially cause interference.
USB output is not
working
•
Verify battery level is full using battery level indicator lights by
cycling the power button to the ON mode.
•
Verify the USB auxiliary device is compatible with 5V 2.1A input.
•
Ensure all connections on USB ports are secure
Battery Indicator
Lights do not
come on
•
Cycle power button to ON mode.
•
Battery indicator lights work when in ON mode and may not be
on during AUTO mode when light is off.
•
If the main light is off and you are not charging or discharging
using either USB port than the battery indicator light will not be
on. This is intentional to conserve battery life.
•
Battery indicator lights do not come on during solar panel
charging and the main light is off. This is intentional to conserve
battery life.
Fig.10
USB Output
USB Input
Solar panel
input


