background image

Page 33

8-11kVA EU_EN

ENGLISH

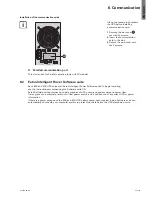
Installation of the communication cards

Parallel communication port.

This slot is used for Parallel operation (only on 9PX models).

It is not necessary to shutdown 

the UPS before installing  

a communication card.

1.

  Remove the slot cover 

4

secured by screws.

2.

  Insert the communication  

card in the slot.

3.

  Secure the card cover with  

the 2 screws. 

6.2   Eaton Intelligent Power Software suite

Each 9SX and 9PX UPS ships with Eaton Intelligent Power Software suite. To begin installing,  

see the instructions accompanying the Software suite CD.
Eaton Software suite provides up-to-date graphics of UPS power and system data and power flow. 
It also gives you a complete record of critical power events, and it notifies you of important UPS or power  

information. 
If there is a power outage and the 9SX and 9PX UPS battery power becomes low, Eaton Software suite can 

automatically shut down your computer system to protect your data before the UPS shutdown occurs.

6. Communication

Summary of Contents for 9PX 11000

Page 1: ...H 9SX 8000 9SX 11000 9PX 8000 9PX 11000 9SX EBM 240V 9PX EBM 240V Installation and user manual Copyright 2012 EATON All rights reserved Service and support Call your local service representative 8 11kVA EU_EN ...

Page 2: ...Page 2 8 11kVA EU_EN ...

Page 3: ... Certification standards Safety IEC EN 62040 1 Ed 1 2008 p UL 1778 4th edition EMC IEC EN 62040 2 Ed 2 2006 p FCC part 15 Class A Performance IEC EN 62040 3 Ed 2 0 2011 p IEC 61000 4 2 ESD level 3 p IEC 61000 4 3 Radiated field level 3 p IEC 61000 4 4 EFT level 4 p IEC 61000 4 5 Fast transients level 4 p IEC 61000 4 6 Electromagnetic field level 3 p IEC 61000 4 8 Conducted magnetic field level 4 p...

Page 4: ...th the National Electric Code ANSI NFPA 70 US installations only The upstream circuit breaker must be easily accessible The unit can be disconnected from AC power source by opening this circuit breaker Disconnection and overcurrent protection devices shall be provided by others for permanently p connected AC input output circuits Check that the indications on the rating plate correspond to your AC...

Page 5: ...t sources connection 24 4 3 Separate input source connection 25 4 4 Frequency converter connection 25 5 Operation 26 5 1 UPS startup and shutdown 26 5 2 Operating modes 27 5 3 Transferring the UPS between modes 27 5 4 Setting High Efficiency mode 28 5 5 Configuring Bypass settings 28 5 6 Configuring battery settings 28 5 7 Retrieving the Event log 29 5 8 Retrieving the Fault log 29 6 Communication...

Page 6: ...use comprises over 50 of recycled cardboard p Sacks and bags are made of polyethylene p Packing materials are recyclable and bear the appropriate identification symbol p 01 PET Materials Abbreviations Number in 01 PET the symbols Polyethylene terephthalat PET 01 High density polyethylene HDPE 02 Polyvinyl chloride PVC 03 Low density polyethylene LDPE 04 Polypropylene PP 05 Polystyrene PS 06 Follow...

Page 7: ...of your equipment Providing outstanding performance and reliability the Eaton 9SX and 9PX s unique benefits include True online double conversion technology with high power density utility frequency independence z and generator compatibility ABM technology that uses advanced battery management to increase battery service life optimize z recharge time and provide a warning before the end of useful ...

Page 8: ...b kg Dimensions inch mm D x W x H 9SX 8000 Power Module 42 19 27 6 x 17 3 x 5 1 700 x 440 x 130 9SX 11000 Power Module 46 21 27 6 x 17 3 x 5 1 700 x 440 x 130 9PX 8000 Power Module 42 19 27 6 x 17 3 x 5 1 700 x 440 x 130 9PX 11000 Power Module 46 21 27 6 x 17 3 x 5 1 700 x 440 x 130 9SX EBM 240V 128 58 26 8 x 17 3 x 5 1 680 x 440 x 130 9PX EBM 240V 143 65 26 8 x 17 3 x 5 1 680 x 440 x 130 ...

Page 9: ...tion port 4 Connector for ROO Remote On Off control 5 Connectors for automatic recognition of battery module 6 Connector for Parallel operation for 9PX only 7 Connector for RPO Remote Power Off control 8 Slot for optional communication card 9 Connector for battery module 10 Input Output terminal blocks 11 Connector for HotSwap MBP detection 9SX 9PX EBM 240V Extended Battery Module 12 13 12 Connect...

Page 10: ...11Ki 8 2 6 4 3 5 1 7 1 Input Output terminal blocks 2 Input Output cables for connection to the UPS 3 Bypass terminal blocks for connection to the UPS 4 Normal AC source switch 5 Bypass AC source switch 6 Connector for HotSwap MBP detection 7 Manual Bypass switch 8 4 16A outlets SC240RT 3 1 2 1 Input AC Output DC terminal blocks 2 Connector for battery modules to the UPS and to the battery modules...

Page 11: ...EBM 50 5 0kW 5 5kVA Efficiency 95 Escape Up Down Enter On Off button Battery mode indicator orange Bypass mode indicator orange The following table shows the indicator status and description Indicator Status Description Green On The UPS is operating normally on Online or on High Efficiency mode Orange On The UPS is on Battery mode Orange On The UPS is on Bypass mode Red On The UPS has an active al...

Page 12: ...s operating normally The UPS is powering and protecting the equipment Battery mode 1 beep every 10 seconds A utility failure has occured and the UPS is on Battery mode The UPS is powering the equipment with the battery power Prepare your equipment for shutdown End of backup time 1 beep every 3 seconds The UPS is on Battery mode and the battery is running low This warning is approximate and the act...

Page 13: ...s stored Reset fault list Clears faults Identification Product type model Part Serial number UPS NMC firmware Com card IPv4 Com card IPv6 Com card MAC Detected accessories Register product Links to Eaton registration website 2 7 User settings The following table displays the options that can be changed by the user Submenu Available settings Default settings Local settings Language English Français...

Page 14: ...n after 5 min of back up time if load is less than threshold Disabled Sleep mode Enabled Disabled If Disabled LCD and communication will turn OFF immediately after UPS is OFF If Enabled LCD and communication stays ON 1h30 min after UPS is OFF Enabled Remote command Enabled Disabled If Enabled shutdown or restart commands from software are authorized Enabled Bypass standby Enabled Disabled Define i...

Page 15: ...cking the cabinet Unpacking the cabinet in a low temperature environment may cause condensation to occur z in and on the cabinet Do not install the cabinet until the inside and outside of the cabinet are absolutely dry hazard of electric shock The cabinet is heavy see in table 6 on page 42 Use caution to unpack and move the cabinet z Unpack the equipment and remove all the packing materials and sh...

Page 16: ...instructions 9 Software CD ROM If you ordered an optional Extended Battery Module EBM verify that the following additional items are included z with the EBM 3 4 2 1 1 Battery power cable attached with battery detection cable 2 Stabilizer bracket 4 screws included 3 Rack kit for 19 inch enclosures optional 4 EBM Installation manual Discard the EBM user s guide if you are installing the EBM with a n...

Page 17: ...and firmly 1 Plug the EBM power cable s into the battery connector s Up to 12 EBMs may be connected to the UPS 2 Verify that the EBM connections are tight and that adequate bend radius and strain relief exist for each cable 3 Connect the battery detection cable s to the connector of the UPS and of the EBM s 3 5 Connecting other accessories If you ordered other UPS accessories refer to specific use...

Page 18: ... the LCD panel p If you ordered other UPS accessories refer to specific user manuals to check the tower installation with the UPS To install the cabinet 1 Place the UPS on a flat stable surface in its final location 2 Always keep 150 mm of free space behind the UPS rear panel 3 If installing additional cabinets place them next to the UPS in their final location ...

Page 19: ...emove the center cover of the front panel 2 Remove the four screws to open the front panel 3 Remove the three screws to pull out the metal protection cover of the battery 4 Pull out the plastic handle of the left and right battery packs and slide the packs out slowly on to a flat and stable surface Use two hands to support the battery packs Set them aside for reinstalling after that the EBM is rac...

Page 20: ...e 20 8 11kVA EU_EN Rack mounting of UPS EBM and accessory modules p Follow steps 1 to 4 for module mounting on the rails 1 1 3 4 4 3 2 The rails and necessary hardware are supplied by EATON 3 Installation ...

Page 21: ...aker 8000VA D curve 50A 11000VA D curve 63A 2 poles circuit breaker G N L2 L1 N L2 L1 to UPS Normal AC source 2 Recommended cable cross sections Terminal position Wire function Terminal wire size rating Minimum input wire size Tightening torque L1 Phase 4 25 mm2 12 4 AWG 10 mm2 8 AWG 105 C 16 mm2 6 AWG 90 C 18 lb in N L2 Neutral Phase Ground Copper wire solid or stranded 3 Installation ...

Page 22: ...ad 8 10 11 z UPS with separate Normal and Bypass AC inputs 8 10 11 Bypass AC Normal AC Load Main low voltage switchboard MLVS Isolation transformer Change in SEA between upstream and downstream or galvanic isolation required Isolation transformer Isolation transformer Bypass AC Normal AC Load Main low voltage switchboard MLVS 8 10 11 The transformer is not necessary if Normal and Bypass inputs are...

Page 23: ...m and downstream or galvanic isolation required 8 10 11 Bypass AC Normal AC Load MLVS1 MLVS2 Isolation transformer z Frequency converter without Bypass AC input Configuration used when the frequency of the application differs from Normal AC example marine requirements Normal AC Load Main low voltage switchboard MLVS 8 10 11 z Hot standby Configuration used to provide N 1 redundancy to critical loa...

Page 24: ...ces Normal AC source and Bypass AC source are open O Off Always connect the ground wire first If you ordered a HotSwap MBP refer to the specific user manual to check the terminal blocks connection of the UPS with the MBP L1 L1 L1 t N L2 t t L1 N L2 N L2 BYPASS AC SOURCE OUTPUT NORMAL AC SOURCE 1 Make sure the jumper is connected 2 Insert the Normal AC cable through the cable gland 3 Connect the th...

Page 25: ...to the Bypass AC source terminal blocks 6 Insert the Output cable through the cable gland 7 Connect the three cables to the Output terminal blocks 8 Put back and secure the terminal blocks cover with the screws 9 Tighten the cable glands 4 4 Frequency converter connection This type of connection must be carried out by qualified electrical personnel Before carrying out any connection check that the...

Page 26: ...alarms and restart if necessary 7 Verify that the indicator illuminates solid indicating that the UPS is operating normally and powering the output The UPS should be in Online mode The EBM charge to 90 capacity in less than 3 hours However Eaton recommends that the batteries charge for 48 hours after installation or long term storage Starting the UPS on Battery Before using this feature the UPS mu...

Page 27: ...s mode In the event of a UPS overload or internal failure the UPS transfers your equipment to utility power Battery mode is not available and your equipment is not protected however the utility power continues to be passively filtered by the UPS The indicator illuminates Depending on overload conditions the UPS remains in Bypass mode for at least 5 seconds and will stay in this mode if three trans...

Page 28: ...ding on output mode If Disabled the UPS output is shutdown Interrupt time This setting is displayed to define the break duration during transfer to Bypass only if transfer out of tolerance is enabled 10 ms or 20 ms can be selected 5 6 Configuring battery settings Automatic battery test Automatic battery tests are done every week in constant charging mode and at each cycle in ABM mode The tests fre...

Page 29: ...ough the display 1 Press any button to activate the menu options then select Event log 2 Scroll through the listed events 5 8 Retrieving the Fault log To retrieve the Fault log through the display 1 Press any button to activate the menu options then select Fault log 2 Scroll through the listed faults ...

Page 30: ...otected Pin 3 not low battery Pin 4 not on Battery Pin 5 user common Pin 6 on Bypass Pin 7 low battery Pin 8 load protected Pin 9 on Battery n o contact normally open n c contact normally closed The relay output contacts must not be connected to any utility connected circuits Reinforced insulation to the utility is required The relay output contacts have a maximum rating of 250 Vac 5A 16 17 1 Conn...

Page 31: ...tage SELV circuit This circuit must be separated from any hazardous voltage circuits by reinforced insulation The RPO must not be connected to any utility connected circuits Reinforced insulation to the z utility is required The RPO switch must have a minimum rating of 27 Vdc and 20 mA and be a dedicated latching type switch not tied into any other circuit The RPO signal must remain active for at ...

Page 32: ... avoid accidental load loss z Connectivity Cards Connectivity cards allow the UPS to communicate in a variety of networking environments and with different types of devices The 9SX and 9PX models have one available communication bay for the following connectivity cards Network MS card z has SNMP and HTTP capabilities as well as monitoring through a Web browser interface connects to Ethernet networ...

Page 33: ...ower Software suite Each 9SX and 9PX UPS ships with Eaton Intelligent Power Software suite To begin installing see the instructions accompanying the Software suite CD Eaton Software suite provides up to date graphics of UPS power and system data and power flow It also gives you a complete record of critical power events and it notifies you of important UPS or power information If there is a power ...

Page 34: ...runtimes Replace batteries at least every 4 years to keep units running at peak efficiency 7 2 Storing the equipment If you store the equipment for a long period recharge the battery every 6 months by connecting the UPS to utility power The EBM charge to 90 capacity in less than 3 hours However Eaton recommends that the batteries charge for 48 hours after long term storage Check the battery rechar...

Page 35: ...placing batteries replace with the same type and number of batteries or battery packs z Contact your service representative to order new batteries Proper disposal of batteries is required Refer to your local codes for disposal requirements z Never dispose of batteries in a fire Batteries may explode when exposed to flame z Do not open or mutilate the battery or batteries Released electrolyte is ha...

Page 36: ... Plug the EBM cable s into the battery connector s Up to twelve EBMs may be connected to the UPS 4 Verify that the EBM connections are tight and that adequate bend radius and strain relief exist for each cable 5 Connect the battery detection cable s to the connector of the UPS and of the EBM s Testing new batteries z To test new batteries 1 Charge the batteries for 48 hours 2 Press any button to a...

Page 37: ...e UPS 4 Select Control then Go to Bypass 5 Turn the HotSwap MBP switch to the Normal position the red LED on the HotSwap MBP goes Off indicating that the load is now powered by the UPS Bypass LED should be On 6 Select Control then Go back normal 7 Check that the UPS is in Online mode the load is now protected by the UPS Online LED should be On 7 6 Recycling the used equipment Contact your local re...

Page 38: ...A utility failure has occurred and the UPS is in Battery mode The UPS is powering the equipment with battery power Prepare your equipment for shutdown Battery low The UPS is in Battery mode and the battery is running low This warning is approximate and the actual time to shutdown may vary significantly Depending on the UPS load and number of Extended Battery Modules EBMs the Battery Low warning ma...

Page 39: ...rn to normal operation when the temperature drops 5 C below the warning level If the condition persists shut down the UPS Clear vents and remove any heat sources Allow the UPS to cool Ensure the airflow around the UPS is not restricted Restart the UPS If the condition continues to persist contact your service representative LED is On 1 beep every 3 seconds The UPS does not start The input source i...

Page 40: ... Model number z Serial number z Firmware version number z Date of failure or problem z Symptoms of failure or problem z Customer return address and contact information z If repair is required you will be given a Returned Material Authorization RMA number This number must appear on the outside of the package and on the Bill Of Lading if applicable Use the original packaging or request packaging fro...

Page 41: ...PM 700 x 440 x 130 27 6 x 17 3 x 5 1 46 21 9PX11KiPM 700 x 440 x 130 27 6 x 17 3 x 5 1 46 21 Model EBM Dimensions D x W x H mm inch Weight lb kg 9SXEBM240 680 x 440 x 130 26 8 x 17 3 x 5 1 128 58 9PXEBM240 680 x 440 x 130 26 8 x 17 3 x 5 1 143 65 Table 4 Electrical input Nominal frequency 50 60Hz auto sensing Frequency range 50Hz 40 60Hz before transfer to battery 60Hz 50 70Hz before transfer to b...

Page 42: ...arm 125 150 UPS shuts down after 1 minute 150 UPS shuts down after 1s Voltage waveform Sinewave Harmonic distortion 2 THDV on linear load 5 THDV on non linear load Transfer time Online mode 0 ms no break High Efficiency mode 10ms maximum due to loss of utility Power factor 0 9 Load crest ratio 3 to 1 200 208 250V are derated at 10000VA 9000W 220V is derated at 9900W for 11kVA models Table 7 Electr...

Page 43: ...er configuration 9SXEBM240 240Vdc 20 x 12V 7Ah 9PXEBM240 240Vdc 20 x 12V 9Ah Fuses 63A for 8kVA models 80A for 11kVA models and EBM Type Sealed maintenance free valve regulated lead acid with minimum 3 year float service life at 25 C 77 F Monitoring Advanced monitoring for earlier failure detection and warning Battery port External three pole SBS75G White connector on Power Module for connection t...

Page 44: ...attery power Load Devices or equipment connected to the UPS output HE mode Operating mode by which the load is supplied directly by the AC source if it is within the tolerances defined by the user This mode reduces the consumption of electrical power Manual bypass Rotary switch controlled by the user used to connect the loads directly to the AC source Transfer of the load to the manual bypass enab...

Reviews: