
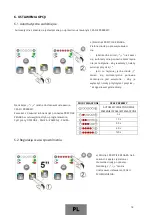


It is recommended not to choose significantly different A and B values: it affects the smooth movement of
the leaf and reduces the
actuator’s power usage
;
- Distance A: increasing this value also increases the opening angle and therefore decreases the
leaf’s thrust
while simultaneously increasing the peripheral speed.
- Distance B: increasing this value reduces the opening angle and therefore increases the thrust on
the leaf while decreasing the peripheral speed.
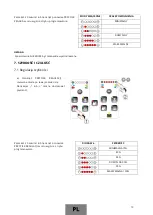
2.3 Position of the rear bracket on brick or block posts
a)
Set the position of the rear bracket.
The A, B and C distances are in the table above.
b)
Ensure that the electrical cables hole is below the
bracket (2).
c)
If the manufacturer provided holes for the front
connector, attach it in the middle of the long-slotted
holes to maintain an adjustment range.
d)
Make sure the rear bracket is level before attaching
it.
e)
Use bolts or dowel pins to attach it to the post in the
desired position.
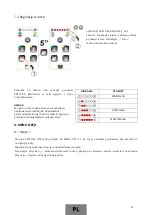
2.4 Position of the front connector (if the
manufacturer didn’t provide
holes for the front
connector)
f)
Place both halves of the gate in the
closed position. They should rest
against the mechanical limiter.
g)
Place the front connector (1) at D (630
mm) distance from the rear bracket.
h)
Place the front connector (1) 54 mm
lower than the rear bracket (distance
E).
i)
Temporarily attach the front connector
(1) to the gate in the proper position.
j)
Check if the connector is level before
securing it in place.
Max distance (D) = 650 mm
Distance (E) = 54 mm
31
Summary of Contents for 210
Page 1: ......
Page 13: ...3 INSTRUKCJA MONTAŻU JEDNOSTKI STEROWNICZEJ 12 ...
Page 15: ...3 3 Połączenie elektryczne 14 ...
Page 39: ...3 CONTROL UNIT INSTALLATION INSTRUCTIONS 38 ...
Page 41: ...3 3 Electrical connections 40 ...
Page 65: ...3 MONTAGEANLEITUNG FÜR DIE STEUERUNG 64 ...
Page 67: ...3 3 Elektrische Verbindung 66 ...
Page 91: ...3 NÁVOD NA MONTÁŽ OVLÁDACÍ JEDNOTKY 90 ...
Page 93: ...3 3 Elektrické připojení 92 ...
Page 117: ...3 MONTÁŽ RIADIACEJ JEDNOTKY 116 ...
Page 119: ...3 3 Elektrické zapojenie 118 ...
Page 143: ...3 VEZÉRLŐ EGYSÉG SZERELÉSI UTASÍTÁSA 142 ...
Page 145: ...3 3 Elektromos bekötés 144 ...


