background image


The Full Screen button causes the video image to fill the entire screen area. No other


windows will be visible. Press the 'Esc' button on the computer keyboard to cancel full


screen view. 


The Manual Trigger button activat


The Remote Focus button 


The Smart Focus button readjust


3) 

Video Streams 
The Network Camera provides several imag
properties of your network will determine the type you use.


The Live View page in the Network Camera
streams, and to the list of available video 
video streams/images directly, without going via the Live View page. 

 
4) 

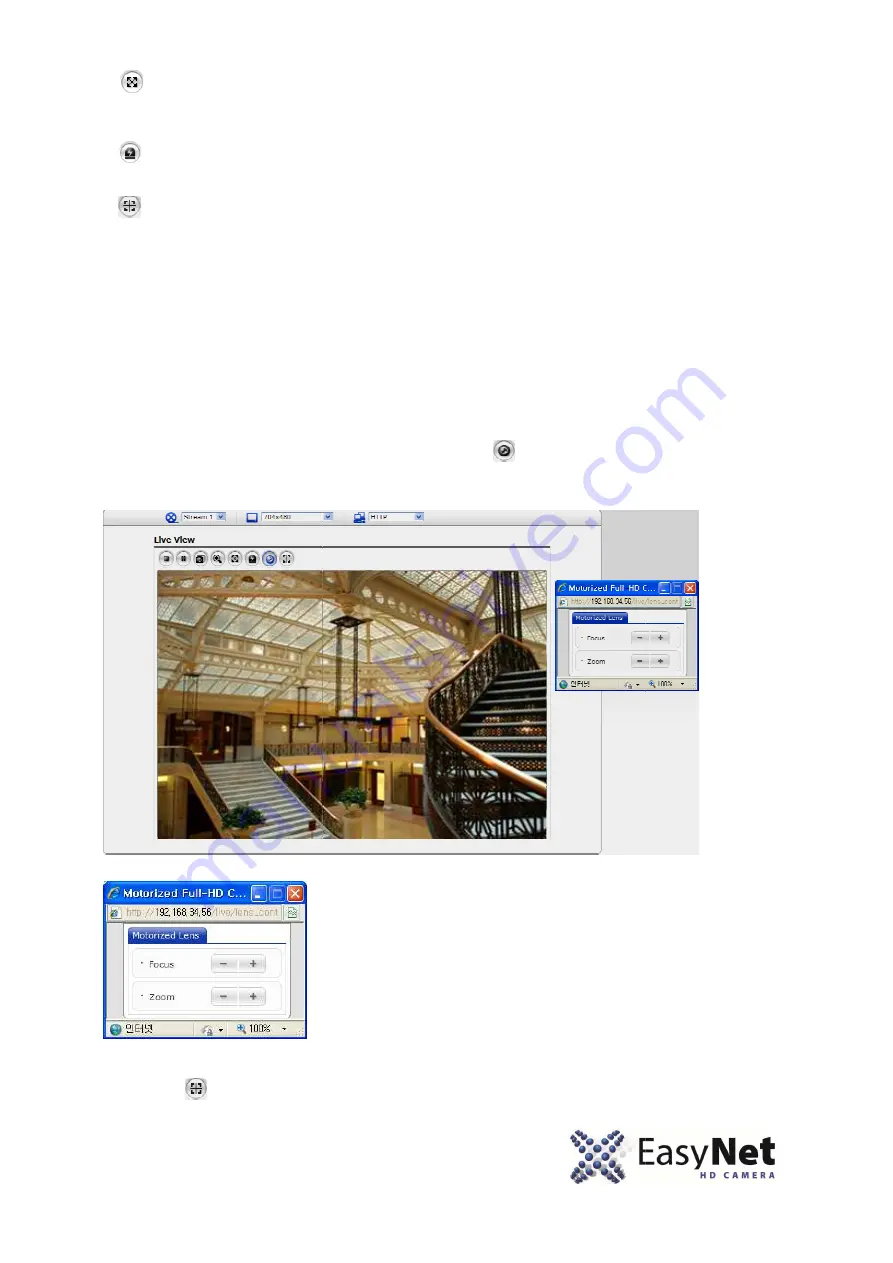
Focus and Zoom Control 

 
You can control Zoom and Focus in the live screen. Press the 
activate the Zoom & Focus control panel.


•   Adjusting Zoom:


     Click “


Adjusting Focus:


    Click “


Note: Click the         button in the live screen to set the focus to the optimum position.

The Full Screen button causes the video image to fill the entire screen area. No other

windows will be visible. Press the 'Esc' button on the computer keyboard to cancel full

The Manual Trigger button activates a pop-up window to manually start or stop the event.

The Remote Focus button enables users to adjust focus and zoom remotely via network

readjusts focus automatically. 

provides several images and video stream formats. Your requirements and the 

properties of your network will determine the type you use. 

Network Camera provides access to H.264, MPEG-4 and Motion JPEG video 

streams, and to the list of available video streams. Other applications and clients can also access these 
video streams/images directly, without going via the Live View page.  

in the live screen. Press the         button on the left top in the live screen to 

control panel. 

•   Adjusting Zoom: 

Click “–“ button to zoom out and click “+” button to zoom in.

The focus is moved slightly after adjusting zoom;
as necessary. 

Adjusting Focus: 

Click “–“ button for far focus and click “+” button to near focus.

button in the live screen to set the focus to the optimum position. 


17


The Full Screen button causes the video image to fill the entire screen area. No other 

windows will be visible. Press the 'Esc' button on the computer keyboard to cancel full 

up window to manually start or stop the event. 

focus and zoom remotely via network. 

es and video stream formats. Your requirements and the 

4 and Motion JPEG video 

streams. Other applications and clients can also access these 

button on the left top in the live screen to 

“ button to zoom out and click “+” button to zoom in. 

The focus is moved slightly after adjusting zoom; adjust the focus again, 

“ button for far focus and click “+” button to near focus. 


Summary of Contents for EC-2M-OV39N-ONV

Page 1: ...a mistaken operation or malfunction of the cameras peripheral devices or unapproved unsupported devices Warning and Caution WARNING TO REDUCE THE RISK OF FIRE OR ELECTRIC SHOCK DO NOT EXPOSE THIS PRO...

Page 2: ...Y CAUSE HARMFUL INTERFERENCE TO RADIO COMMUNICATIONS OPERATION OF THIS EQUIPMENT IN A RESIDENTIAL AREA IS LIKELY TO CAUSE HARMFUL INTERFERENCE IN WHICH CASE THE USER WILL BE REQUIRED TO CORRECT THE IN...

Page 3: ...t of the obsolete outlet Protect the power cord from being walked on or pinched particularly at plugs convenience receptacles and the point where they exit from the equipment Only use attachments acce...

Page 4: ...Adjusting 3 Axis Gimbal 9 2 3 Connection Cable 10 2 4 Using Service Monitor Port and Wire Controller 11 2 5 Resetting to the Factory Default Settings 12 3 Program and Operation 133 3 1 Detecting IP C...

Page 5: ...352x240 for increased flexibility depending on the various environments Motorized lens where it is capable of adjusting zoom and focus without ever touching the knob of the lens module Smart Focus whe...

Page 6: ...ion Before installing the camera please make sure that all of the following items are included in the box 1 EC 2M OV39N ONV HD Camera 2 Installation Guide 3 Mounting Template Sheet 4 Service Monitor C...

Page 7: ...7 1 Introduction 1 3 EC 2M OV39N HD Camera Dimensions...

Page 8: ...n surface or pendent mounting applications and the mounting member must be capable of supporting loads of up to 3 3lb 1 5kg Pendent mounting must use pendent mount accessory The dome camera s mounting...

Page 9: ...yields maximum rotation and placement as shown below Z Axis Rotation 355 Y Axis Tilting 70 X Axis Panning 355 2 Installation and Configuration Axis Gimbal mechanism yields maximum rotation and placeme...

Page 10: ...r supply must be connected to this dedicated input 3 Pink Alarm In Yellowish Green GND Yellow AD Key Brown GND Light Blue Alarm Out Gray GND Alarm Input AD Key Input Alarm Output 6pin terminal Disable...

Page 11: ...controller to the service monitor port then using your own handheld service monitor press buttons to zoom in or zoom out to desired focal length Lastly use the buttons to adjust the focus 2 Change Cam...

Page 12: ...adapter or Cat5e Cat6 network cable if it is connected to Power over Ethernet 2 Open the lens cover 3 Press and hold the Reset button SW1 on the board with your finger while reconnecting the power 4...

Page 13: ...inder utility automatically discovers and displays NUVICO IP Cameras on your network So please http www nuvico com downloadfile htm id 430 default IP is 192 168 30 220 Connect the Network Camera to th...

Page 14: ...Windows operating system and web browsers browsers are Internet Explorer Safari Firefox Opera and Google Chrome with Windows To view streaming video in Microsoft Internet Explorer set your browser to...

Page 15: ...which is displayed when the network camera is accessed for the setup at the first time Enter your admin name and password set by the administrator Note The default administrator username and password...

Page 16: ...resolution drop down list allows you to select the most suitable one out of video resolutions to be displayed on live view page The protocol drop down list allows you to select which combination of pr...

Page 17: ...atically provides several images and video stream formats Your requirements and the properties of your network will determine the type you use Network Camera provides access to H 264 MPEG 4 and Motion...

Page 18: ...tup in the top right hand corner of the Live View page Click on this page to access the online help that explains the setup tools When accessing the Network Camera for the first time the Admin Passwor...

Reviews: