background image

HD-TVI DVR User Manual 

38 

5


Search, Playback & Backup 

Search configuration includes four submenus: time search, event search, file management and 
image. 
 

5.1  Time Search   


Go to Main Menu

Search

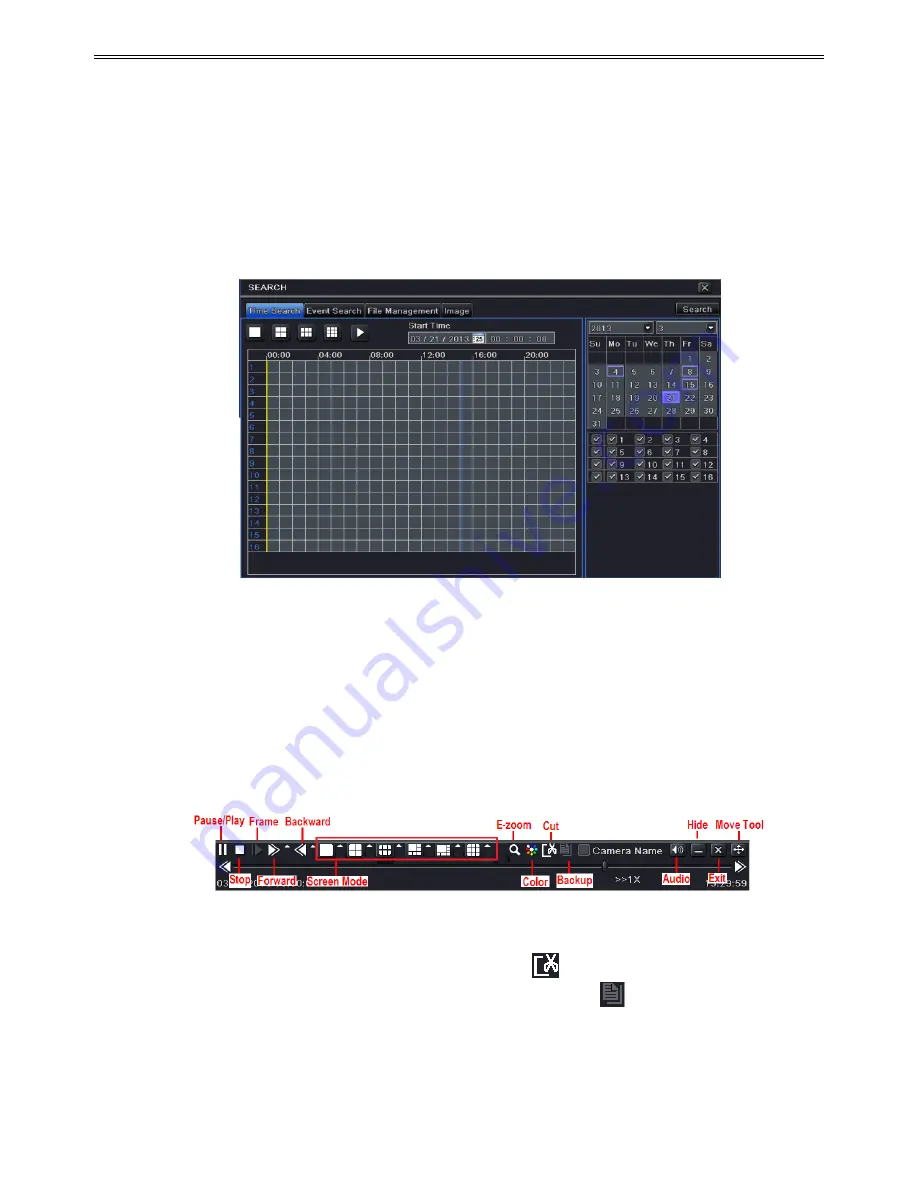
Time Search. Refer to Fig 5-1. 


Fig 5-1 Search Configuration-Time Search 


Select date and channels on the right hand side and press the ‘Search’ button. A date with 

highlighted borderline indicates presence of data. 


Set  the  start  time  by  clicking  a  particular  grid  or  by  entering  the  specific  value  in  the 

start time field. 


Select the channel display mode and click Play button to play record. Use the playback 

toolbar to control the playback. 


To set backup during a certain period in the playback interface: 

Select the start time by dragging the slider and click 

  icon. Then select the end time and 

click this icon again to confirm the record period. Next, click 

  icon to backup the record 

during this period. 
 

Summary of Contents for ED7632TDL

Page 1: ...DVR User Manual For H 264 16 32 channel digital video recorder All rights reserved...

Page 2: ...th a dry cloth Place the device in a well ventilated area Do not power off the DVR at normal recording condition This machine is indoor using equipment Do not expose the machine in rain or moist envir...

Page 3: ...sic Function Instruction 9 3 1 Power On Off 9 3 1 1 Power On 9 3 1 2 Power Off 9 3 2 Login 9 3 3 Live Preview 10 3 4 Live Playback 10 4 Main Menu Setup Guide 12 4 1 Basic Configuration 12 4 1 1 System...

Page 4: ...List 37 5 Search Playback Backup 38 5 1 Time Search 38 5 2 Event Search 39 5 3 File Management 39 5 4 Search by Image 40 5 5 Backup 40 6 Manage DVR 42 6 1 Check System Information 42 6 1 1 System Inf...

Page 5: ...eview 49 7 5 Remote Playback Backup 51 7 5 1 Remote Playback 51 7 5 2 Remote Backup 54 7 6 Remote System Configuration 54 7 7 Tools 55 7 8 Remote Management 55 Appendix A FAQ 56 Appendix B Calculate R...

Page 6: ...I signal 1080P 720P analog signal 960H D1 video inputs Supports channel security by hiding live display Display the local record state and basic information Supports USB to make full control RECORD ME...

Page 7: ...ng events unlimited NETWORK Supports TCP IP DHCP PPPoE DDNS protocol Supports NAT technology Supports IE browser to do remote view Supports QRCODE scanning through mobile phone client Supports setup c...

Page 8: ...drive the manufacturers recommend specially for security and safe field 2 Please calculate HDD capacity according to the recording setting Please refer to Appendix B Calculate Recording Capacity Open...

Page 9: ...brace please skip this step And then install the DVD Writer Connect the power and data cables and then install the HDDs as shown below Install back the mounting bar and fix the other two HDDs under i...

Page 10: ...e 2 Decrease the value in setup MENU Enter Menu in live INFO Check the information of the device BACKUP Enter backup mode in live SEARCH Enter search mode in live Exit Exit the current interface Manua...

Page 11: ...DVR The default device ID of the DVR is 0 It s not necessary to reset the device ID when a remote is to be used to control a single DVR However when controlling multiple DVRs with multiple Name Descri...

Page 12: ...reen display mode Next Button To switch the live image SEQ To go to auto dwell mode Audio To enable audio output in live mode Switch To switch the output between BNC and VGA Direction button To move c...

Page 13: ...order to input a value in a particular screen move cursor to the input box and click An input window will appear as below It supports digits alphabets and symbols input Click Shift button to input Ca...

Page 14: ...k Exit button to exit Press and hold FN ESC key to switch the resolution of VGA and HDMI output 3 1 2 Power Off You can power off the device by using remote controller keyboard or mouse Go to Main Men...

Page 15: ...nterface 3 4 Live Playback Click Playback button to playback the record Refer to Fig 3 3 User can do complete operation by clicking the buttons on screen Symbol Meaning Green Manual record Yellow Moti...

Page 16: ...HD TVI DVR User Manual 11 Fig 3 3 Live Playback...

Page 17: ...ailable cameras E Zoom Single channel large screen electronic amplification Audio Enable sound PTZ Click the PTZ button to control rotation position speed and auto scan of the PTZ Snap Click this butt...

Page 18: ...r name and the password for performing corresponding operations Show System Time If selected the current time will be displayed during live monitoring Max Online Users To set the max number of concurr...

Page 19: ...pply button to save the setting 4 1 3 DST Go to Main Menu Setup Basic DST interface Refer to Fig 4 5 Fig 4 5 Basic Configuration DST In this interface enable daylight saving time time offset mode star...

Page 20: ...w the camera name by checking All checkbox Click Apply to save the setting 4 2 2 Main Monitor The main monitor settings allow you to set camera sequence in live display mode Operate the following step...

Page 21: ...to go to live image Press and drag the left mouse button to set mask area as shown below Right click to exit the mask setting interface Click Apply button to save the setting To delete mask area Clic...

Page 22: ...Fig 4 10 Record Configuration Enable Checkmark record and audio Select All to set up the same settings for all channels 4 3 2 Record Bitrate Go to Main Menu Setup Record Record Bitrate Refer to Fig 4...

Page 23: ...120s 180s and 300s Expire Time Set the expiration time for recorded video If the set date is overdue the recorded files will be deleted automatically Click Apply to save the setting 4 3 4 Stamp This...

Page 24: ...once it is full If enabled the system will automatically delete the old records and recycle the space if it is completely utilized The setting steps are as follows Go to Main Menu Setup Record Recycl...

Page 25: ...ected schedule If you want to apply the schedule setting of a certain channel to other or all channels you need to select channel and click Copy button Fig 4 14 Schedule Configuration Schedule You can...

Page 26: ...The setup steps for schedule for sensor based recording are similar to normal schedule setup see Chapter 4 4 1 Schedule for details Note The default schedule of sensor based recording is 24 7 If you...

Page 27: ...ed on an alarm Show Full Screen If selected there will pop up the chosen channel on the monitor on an alarm trigger To Alarm Out If selected this would trigger external relay output on an alarm Email...

Page 28: ...of motion e g If the holding time is set to 10 seconds once the system detects a motion it will go to alarm but would not detect any other motion alarm specific to channel until 10 seconds If there i...

Page 29: ...up see Chapter 4 4 1 for more details Note Prior to setting motion detection field it is recommended that you click icon to clear the existing field and set afresh 4 5 3 Video Loss This DVR can be set...

Page 30: ...igger options If the selected event is Disk Full then use the drop down box for Disk Shortage Alarm to choose a threshold value for remaining HDD space If the threshold value is reached the system wil...

Page 31: ...twork sub stream email server NAT and other settings Network settings must be configured if DVR is used for monitoring over network 4 6 1 Network To set up network Go to Main Menu Setup Network Networ...

Page 32: ...by clicking Test button after you set up the network If the network is well connected please click Apply button to save the setting 4 6 2 Sub Stream To set up sub stream Go to Main Menu Setup Network...

Page 33: ...setting steps are as follows In the server interface select Enable as shown in the Fig 4 27 Fig 4 27 Network Configuration Server Check the IP address and port of the transfer media server in the ECM...

Page 34: ...ed in connection The setting steps are as follows Enable DDNS server Select DDNS server Enter user name password and host domain name of the registered website Click Test button to test the effectiven...

Page 35: ...Input www dvrdydns com in the IE address bar to visit its website Then click Registration button to register as shown below 2 Create domain name 3 After you successfully request your domain name you...

Page 36: ...orward your IP address and port in your router or enable UPnP function both in router and DVR Then you can use the domain name plus HTTP port to access your DVR DDNS server DDNS server Website provide...

Page 37: ...PC MAC Address and input this address Click OK to save the setting Note When the default value of binding PC MAC Address is 0 the user is not bound with the specified computer If the bind option is us...

Page 38: ...t to modify and then click Modify button to do the relevant operation To change user password Go to Main Menu Setup Users interface Select the added user you want to change its password and then click...

Page 39: ...p preset In the Advanced interface click preset Setting button to see a dialog box as Fig 4 35 Fig 4 35 Advanced Preset Setting Parameter Meaning Address The address of the PTZ device Baud rate Baud r...

Page 40: ...reset point Click button to enable the PTZ wiper and click button to enable the PTZ light Note PTZ must support wiper and light button and these two buttons are just available when selecting PELCOP or...

Page 41: ...n click those icons to adjust the position of preset point Click Preview button to preview the cruise line Click OK button to save the setting To set up track In the Advanced interface click track Set...

Page 42: ...List Here authorized user can prohibit computer users within a certain IP address range from accessing to DVR or allow computer users within a certain IP address range to access DVR E g if an admin u...

Page 43: ...ith highlighted borderline indicates presence of data Set the start time by clicking a particular grid or by entering the specific value in the start time field Select the channel display mode and cli...

Page 44: ...rline indicates presence of data Checkmark Motion Sensor or All accordingly Click Search button to display the searched event information in the event list box Double check a certain record file to pl...

Page 45: ...nnels on the right hand side Press Search button to search for a recorded image Once an alarm image has been identified the user can double click the image to play recording Fig 5 4 Search Configurati...

Page 46: ...he backup information interface you can check the relevant information of backup files storage type save file type etc Then click Start button to start backup Note If the backup files are saved in DVR...

Page 47: ...ent which includes Operation Setup Playback Backup Search Check Information and Error This report can further be saved on a USB flash drive as an html file using the export button 6 1 4 Network Inform...

Page 48: ...Note please format the hard disk before record Click Refresh button to refresh the disk information in the list box Select a hard disk and click Format button to start format Note All recorded files i...

Page 49: ...orage device Connect the USB flash drive to the USB port Go to Main Menu Upgrade tab You will see the upgrade software name displaying in the upgrade list box Select that software and then click Upgra...

Page 50: ...at com Click Apply to save the parameters Please refer to 4 6 5 NAT for details 7 1 2 NAT Access After finishing the NAT settings you can enter the NAT Server on the PC Input http www autonat com to g...

Page 51: ...Network interface to input IP address Subnet Mask etc If using DHCP please enable DHCP in both the DVR and router Forward IP address and port number in Virtual Server setup of the router or virtual s...

Page 52: ...all start 32 bit mode If the browser is the earlier MACOS version the default setting is 32 bit mode and the setting can be skipped The setting steps are as follows Right click safari icon and select...

Page 53: ...f DVR and click button Then the browser will download Active X control as shown below Click icon and then select the Active X control the welcome interface will be shown Click Continue Install button...

Page 54: ...remote surveillance Enter WAN IP and HTTP port in the Safari browser to install the Active control The concrete steps are the same as and of Chapter 7 3 1 7 4 The Remote Live Preview Fig 7 1 Remote L...

Page 55: ...left to rotate the dome diagonally up right to rotate the dome downwards to rotate the dome diagonally down left to rotate the dome diagonally down right to rotate the dome towards left to rotate the...

Page 56: ...nable audio Enable or disenable audio Full screen The live preview picture will display with full screen and the tool bar will be hid Double click left mouse or click right mouse to return Zoom in Sin...

Page 57: ...Select the date in area and record channels in area Click Search button The record data will be displayed in the data information list box Set the data playing time and display mode in the area as req...

Page 58: ...rch button Double click certain item to play Fig 7 6 Event Search Interface File Management Go to Search File Management interface Refer to Fig 7 7 Fig 7 7 File Management Interface Select highlighted...

Page 59: ...Then click Backup button to start backup The backup files will be saved on user s PC 7 6 Remote System Configuration You can do remote setup of the device which includes functions like basic configur...

Page 60: ...also format the hard drive s 7 8 Remote Management The Info interface provides a web based interface to access the general information pertaining to the DVR s settings The interface includes five subm...

Page 61: ...hat the channels are not programmed as hidden channels and check the status from admin login Q4 The HDD cannot be found a The power from the adapter may be not enough for operating the DVR Please use...

Page 62: ...ig 7 2 Q8 DVR displays please wait all the time a HDD power cable and data cable may not be well connected Please check the connections for HDD b It is also possible that the DVR was forced to stop be...

Page 63: ...nded Q11 What is the minimum configuration required for remote monitoring PC Module Parameters CPU Intel Celeron 2 4G Motherboard Intel 845 HDD 80G RAM 512M VGA NVIDIA GeForce MX440 FX5200 ATIRADEON 7...

Page 64: ...en double click to open your USB disk to find your backup files and backup player Double click icon to install backup player After you install it open this player and click Open Path button to open yo...

Page 65: ...st 1 5M 675 1080P 12 PAL 15 NTSC Highest 12M 2700 Higher 9M 2025 Medium 7M 1575 Low 6M 1350 Lower 4M 900 The calculation format is Total Recording capacity Used space per hour MB h coverage rate of ha...

Page 66: ...GB 2 Compatible SATA CD DVD writers after test Brand Model TECLAST GH22NP20 TL 22XD BENQ DW220S 0K4 LITEON DH 20A6S01C LITEON DH 20A4P02C SAMSUNG TS H653B 3 Compatible HDD list Brand Capacity Seagate...

Page 67: ...e 720P WD1 D1 16CH 25 fps PAL 30 fps NTSC 1080P 16CH 12 fps PAL 15 fps NTSC 8CH 25 fps PAL 30 fps NTSC Audio Input RCA 1 Audio output RCA 1 Record Mode Manual Timer Sensor Motion detection Simplex Dup...

Page 68: ...720P WD1 D1 32CH 25 fps PAL 30 fps NTSC 1080P 32CH 12 fps PAL 15 fps NTSC 16CH 25 fps PAL 30 fps NTSC Audio Input RCA 1 Audio output RCA 1 Record Mode Manual Timer Sensor Motion detection Simplex Dup...

Page 69: ...450011000612 A0...

Reviews: