background image

9

1. 

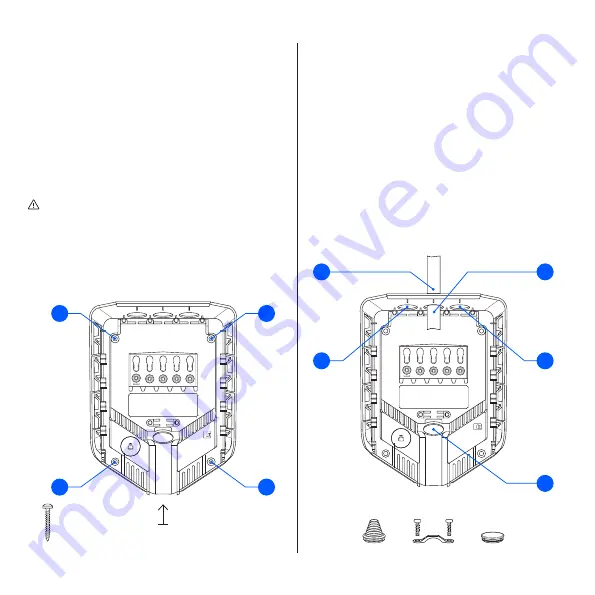
Turn off the power before proceeding with the 

installation.

2. 

Fix the backplate to a wall or structure with 

sufficient load-bearing capacity using the 4 screws 

provided in the mounting kit. Use suitable wall 

plugs for mounting and observe the recommended 

installation height.

CAUTION

The installation wall must cover the entire back of the 

product.

NOTE

If you are going to install multiple backplates, now would 

be a good time to mount them as well.

2

Backplate

Mounting

2

130–140 cm

Recommended installation height

2

2

2

2

Backplate

Preparing

3

1. 

Shorten the sealing plug to fit the cable. The hole 

should be slightly smaller to ensure a good seal.

2. 

Insert the cable through one of the 4 cable entries 

and secure it to the backplate with the strain relief 

provided.

3. 

Close all cable entries that are not in use with the 

blind sealing plugs supplied.

1

2

3

3

3

1

2

3

Summary of Contents for Charging Robot

Page 1: ...Easee Home Easee Charge EN Installer guide ...

Page 2: ...ous personal injury or death A Caution indicates a condition hazard or unsafe practice that can result in minor personal injury or damage to the product WARNING This product shall only be installed repaired or serviced by an authorised electrician All applicable local regional and national regulations for electrical installations must be respected NOTE PIN code The PIN code is required for install...

Page 3: ...aling plug x 2 Blind plug x 3 x 4 Strain relief x 2 x 1 Front cover Protects the electronics from external influences Chargeberry Contains the electronics for charging the vehicle Backplate For attaching and connecting to the charging infrastructure ...

Page 4: ...sors in all main contacts Charging Charging power 1 4 22 kW 6 A 1 phase 32 A 3 phase automatically adjusted in relation to available capacity Up to 7 36 kW at 32 A 1 phase Up to 22 kW at 32 A 3 phase Connection point Type 2 socket IEC 62196 2 Number of phases 1 or 3 fully dynamic Voltage 3x 230 400V AC 10 Mains frequency 50 60 Hz Easee Home Load balancing of up to 3 units per circuit Easee Charge ...

Page 5: ...ion 30 mA AC 6 mA DC according to EN 61008 1 and IEC 62955 Degree of protection IP54 the backplate is IP22 without cover Impact resistance IK10 Insulation class II Overvoltage category III Installation Installation network TN IT or TT detected automatically Installation circuit breaker Max 40 A Easee Home and 80 A Easee Charge Wire cross section up to 16 mm2 single cable up to 10 mm2 parallel conn...

Page 6: ...aster of its circuit If more than 2 units are installed the master unit should be located in the middle of the installation if possible for an optimal Easee Link communication Site Key During installation a Site Key must be used to assign the Charging Robots to the correct location in the Easee Cloud A Site Key will automatically be generated when creating a new charging site using the Easee Insta...

Page 7: ... including cable junction boxes etc includes components with only basic insulation Class I Any other electrical equipment apart from Easee Home Charge including lamps and socket outlets is connected to the circuit Any other conditions identified by the authorized installer requiring an external RCD The internal RCD is considered to provide the required RCD protection for both AC and DC leakage fau...

Page 8: ... and insert the two ends of the supplied tool into the two openings at the bottom of the front cover 2 Pull the tool until the front cover comes loose and remove the cover 3 Grasp the Type 2 socket and push upwards with good force until the Chargeberry disconnects 1 1 1 2 1 3 Opening Charging Robot We recommend that you watch the installation videos available on our website easee support ...

Page 9: ...ck of the product NOTE If you are going to install multiple backplates now would be a good time to mount them as well 2 Backplate Mounting 2 130 140 cm Recommended installation height 2 2 2 2 Backplate Preparing 3 1 Shorten the sealing plug to fit the cable The hole should be slightly smaller to ensure a good seal 2 Insert the cable through one of the 4 cable entries and secure it to the backplate...

Page 10: ... sequence External junction boxes or flat cables can be used if it is more convenient It s recommended to follow the existing colour codes used in the installation Depending on national standards the colours of the cables can vary from the illustrations The illustrations in this manual follow the IEC 60446 standard Before turning on the power make sure the wires are properly connected and tightene...

Page 11: ... already has one or more Charging Robots installed or if it has been created by an operator Easee Charge select Update existing site and search for the site address On Site overview select the circuit that you want the backplate to be part of and select Add another backplate Follow the on screen instructions and return to this guide afterwards NOTE If the charging circuits include more than one Ch...

Page 12: ...ckplate may damage the electronics or impact the reading negatively Chargeberry Attaching 6 3 2 CLICK 1 Turn on the power The terminals of the backplates are now electrically live 2 Position the Chargeberry to fit into the slots on the backplate located in the center of the installation 3 When the Chargeberry is in the track press it forcefully down until you hear a click ...

Page 13: ...and let it fall into place 2 Press the bottom of the front cover until you hear a click 3 Bend the lower part of the rubber cover down 4 Screw in the locking screw at the bottom of the charger to secure the front cover 5 Close the rubber cover If the cable is inserted from the bottom you can cut a corresponding hole in the rubber cover to ensure a neat installation Your Charging Robot is now ready...

Page 14: ...ce 3 RFID area The integrated RFID reader enables access control of the Charging Robot and identification of different users You can use it to unlock the charger with an Easee Key Check our knowledge base at easee support for more details on how to add and manage your Easee Keys 4 Type 2 socket The Type 2 socket is completely universal and allows you to charge any type of electric vehicle using th...

Page 15: ...ite fast flashing light RFID tag received awaiting key verification Red flashing light with warning sounds WARNING Critical error Turn off the power and remove the charging cable from the Charging Robot The power can then be turned back on if necessary The flashing red light will continue but the warning sound will stop when the charging cable is disconnected The charger is blocked from further us...

Page 16: ...ormation White flashing light only at the bottom The Charging Robot is searching for its master unit Please check the status of the master unit For further information please check our knowledge base2 Yellow flashing light only at the bottom The Charging Robot is waiting to be configured Consult an authorised electrician 2 Easee public knowledge base can be found at easee support ...

Page 17: ...n any other form by any means or in any form for your own or any third party s use unless otherwise agreed with Easee or its subsidiaries in writing Any permitted use shall always be done in accordance with good practice and ensure that no harm may be caused to Easee or by misleading the consumer Easee and Easee products product names trademarks and slogans whether registered or not are Easee s in...

Reviews: