background image

5

For chase enclosures, install the chase top cover (supplied 
by others) to the chase enclosure. Cut a hole in the chase 
top cover the same diameter as the base of the cone on 

the flashing. Attach the Flashing to the top of the chase 

cover, sealing with a non-hardening waterproof sealant. 


Secure in place with screws or rivets. See 

FIG. 10

.

FIG. 8

FIG. 9

Attach the storm collar around the chimney above the 

screen  of  the  flashing.  Secure  in  place  with  the  locking 

tab and button. Seal around the storm collar with a non-
hardening waterproof sealant. Attach the Termination 
Cap to the chimney by sliding the male to female joint 
connection together and secure in place with (4) sheet 
metal screws provided. See 

FIG. 11

.

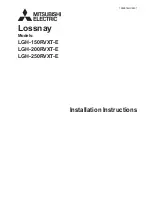
Attic Insulation Shield:

 The Attic Insulation Shield must 

be installed where the chimney passes into an attic. Its 

purpose  is  to  maintain  clearances  from  loose  packed  or 

blown insulation from the chimney. If an Attic Shield is not 
used the chimney needs to be enclosed within a framed 
enclosure. Always maintain a 2” air-space clearance to 

combustibles. Install the shield as follows:

• 

Remove any insulation or debris from attic floor around 

the framed opening.

• 

Assemble chimney sections above the Firestop to 
a height that extends beyond the height of the attic 
insulation shield.

• 

Slip the Attic Insulation Shield over the chimney until 

the base sits squarely on the framed opening.

• 

Secure the Attic Insulation Shield to the top of the 
framed opening using nails or screws.  See 

FIG. 8

.

Termination:

 NFPA 211, “Standard for Chimneys, 

Fireplaces, Vents, and Solid Fuel-Burning Appliances”, 
states that chimneys shall extend at least three feet above 
the highest point where it passes through the roof of a 
building, and at least two feet higher than any portion of a 
building within ten feet. See 

FIG. 9

.

CHIMNEY

ATTIC

INSULATION 

SHIELD

NAILS OR 

SCREWS

FLOOR/

CEILING

FIRESTOP

FIG. 10

SCREW OR 

RIVET STRAPS 

TO FLASHING

CHASE COVER 

(SUPPLIED

BY OTHERS)

RADIATION SHIELD

FLASHING

SCREW OR RIVET 

TO CHASE COVER

APPLY SEALANT 

NAIL TO CHASE

CHASE

CHIMNEY 

2 FEET ABOVE ANY POINT WITHIN

10 FEET HORIZONTALLY

3 FEET

MINIMUM

ABOVE 

ROOFLINE

FIG. 11

SELF-TAPPING

SCREWS

APPLY SEALANT

FLASHING

STORM COLLAR

TERMINATION

Summary of Contents for ECO-Steel

Page 1: ...th exception of the top portion of the chimney cap can be painted with a high temperature rust proof paint Wash the metal surface with a vinegar and water solution to remove any residue before painting Painting the chimney will help to increase chimney life Earthcore assumes no liability for structural damage or roof contamination as the result of creosote formation It is the owner s responsibilit...

Page 2: ...nd safety Do not over fire Any damage to the fireplace or chimney can possibly void the warranty Do not burn driftwood plastic or chemically treated wood such as railroad ties They are corrosive to your chimney system Follow the fireplace manufacturer s instructions regarding fuel ISOKERN FIREPLACE INSTALLATION Place Fireplace Position according to the fireplace manufacturer s installation instruc...

Page 3: ...9 5 AttachChimney Attachthefirstsectionofchimney on the Anchor Plate The joint assembly is a male to female slip fit and held together with button lock tabs See FIG 2 Maintain a 2 inch clearance to combustibles Do not fill the clearance space with any materials If an offset is required refer to Elbow Offset Installation Section CAP STORM COLLAR FLASHING ATTIC INSULATION SHIELD FIRESTOP CHIMNEY ANC...

Page 4: ... Supports which will support 30 feet of chimney FIG 5 Slide the Angle Support around the chimney and align over framed opening Secure to casing with 4 sheet metal screws and assemble brackets per FIG 6 Nail the brackets to the framing using a minimum of 2 nails or screws per bracket A Support Band may be required by some fireplace manufacturers to keep the chimney vertical and help maintain cleara...

Page 5: ...osure Always maintain a 2 air space clearance to combustibles Install the shield as follows Remove any insulation or debris from attic floor around the framed opening Assemble chimney sections above the Firestop to a height that extends beyond the height of the attic insulation shield Slip the Attic Insulation Shield over the chimney until the base sits squarely on the framed opening Secure the At...

Page 6: ...et chart add chimney sections between elbows total pipe length not to exceed 96 inches A Support Band or plumbers strap is required for every 4 foot interval between elbows to support the load as shown in FIG 12 Attach the upper elbow to bring the chimney back to vertical See TABLE 2 and FIG 13 for offset combinations FIG 13 FIG 12 TABLE 2 PLUMBER S STRAP SUPPORT BAND FIRESTOP W RADIATION SHIELD E...

Page 7: ...his transaction and shall not apply 2 The sole and exclusive remedy against Earthcore shall be for the repair or replacement of defective parts as provided herein above NO OTHER REMEDY Including but not limited to incidental or consequential loss shall be available The sole purpose of the stipulated exclusive remedy provided for herein shall be the repair and replacement of defective parts in the ...

Page 8: ...ECO36 36 Pipe 13ACECO48 13INECO48 48 Pipe 13ACECOAP 13INECOAP Anchor Plate 13ACECOAPD 13INECOAPD Anchor Plate w In Line Damper 13ACECOCC Chimney Cap 13ACECO15OS 13INECO15OS 15 Degree Elbow 13ACECO30OS 13INECO30OS 30 Degree Elbow 13ACECOWB Wall Band 2017 Earthcore Industries L L C Form No L2809 08 17 9670 13ACECOFS Firestop Assembly 13ACECOIS Insulation Shield 13ACECOFT Tall Cone Flashing 13ACECOFC...

Reviews: