background image

4

2

 Setting Up

You will need a 3.5 inch SATA Hard Drive. Carefully follow the procedure to 
install the hard drive into the enclosure. 

Note:

 For pre-installed Hard Drive EAGLE | CONSUS enclosure, please skip this 

chapter and proceed to 

Chapter 3: 

Connecting the Drive. 

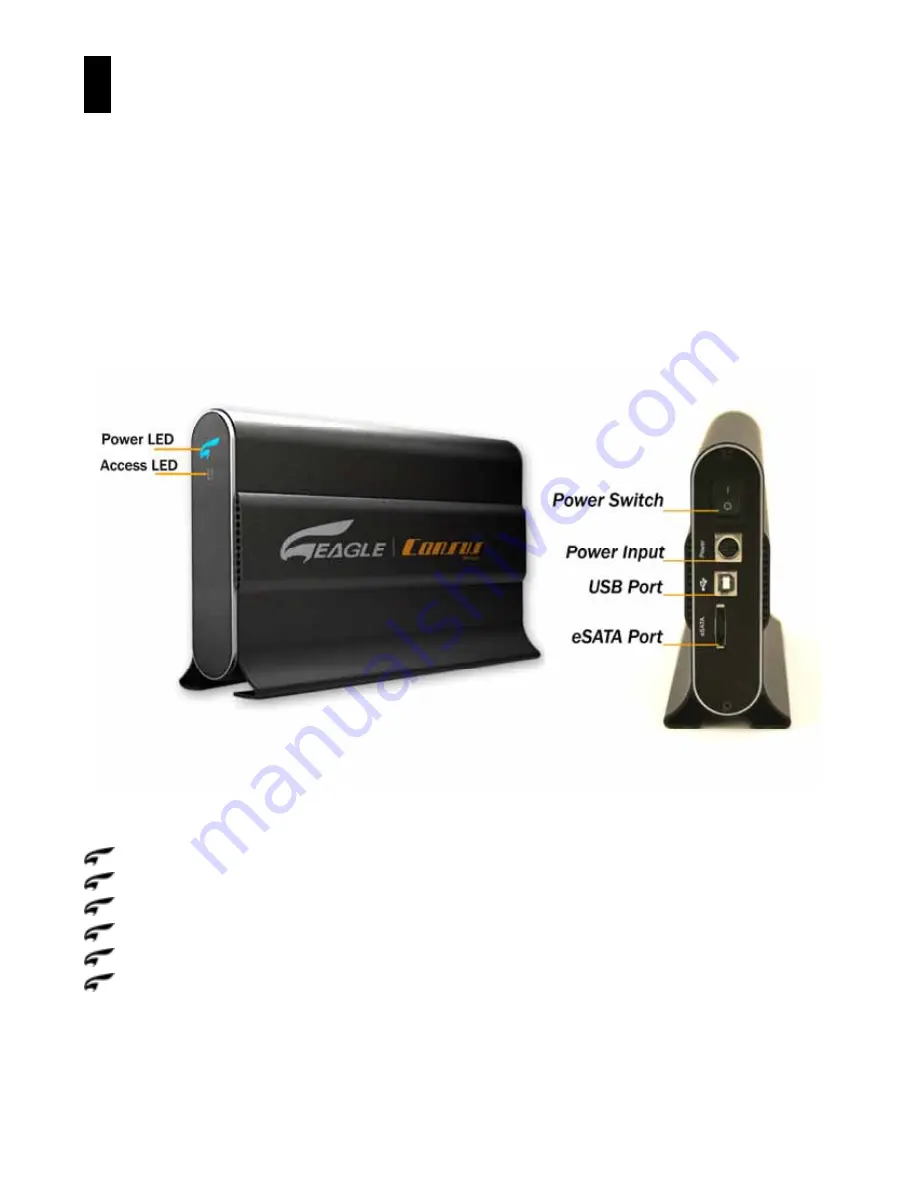
EAGLE | CONSUS W-SERIES Front and Rear View 

Power Switch – 

Turns the W-SERIES on / off

Hard Drive access light – 

Indicates hard drive activity

Power light – 

Indicates device is on

USB 2.0 port – 

Connects to a computer USB port or USB hub

eSATA port – 

Connects to a computer eSATA port

Power Input – 

Connects to the AC/DC power adapter

Summary of Contents for Consus ET-CSWESU2-BK

Page 1: ... ET CSWESU2 BK Eagle Consus W Series SATA to USB2 0 eSATA External Storage System User Manual www eagle techusa com ...

Page 2: ...ting the External Hard Drive Connecting the Cables 09 Powering Up the Hard Drive 10 4 Partition Format the Hard Drive Windows 11 Mac OS v 10 2 14 5 Disconnecting the Hard Drive Windows 17 Mac 18 6 Troubleshooting FAQ USB Firewire RAID Information 19 FAQ Installation 20 7 Appendix Regulatory Compliance 23 Warranty Information 27 EAGLE CONSUS Service and Support 28 Understand EAGLE TECH Sub Brand 29...

Page 3: ...st EAGLE CONSUS product information and news visit our Web Site at www eagle techusa com Package Contents Eagle Consus W Series SATA to USB2 0 eSATA External Storage System USB 2 0 cable eSATA eSATA cable Installation CD AC power adapter User Manual USB 2 0 host required for Hi Speed USB 2 0 performance USB 2 0 is highly recommended because of the significant reduction in file transfer time compar...

Page 4: ...ndows Go to the Start menu and select Windows updates For more information regarding updating your system visit windowsupdate microsoft com Macintosh Go to the Apple menu and select Software Update For more information regarding updating your system visit apple com macosx Handling Precautions EAGLE CONSUS products are precision instruments and must be handled with care during unpacking and install...

Page 5: ... please skip this chapter and proceed to Chapter 3 Connecting the Drive EAGLE CONSUS W SERIES Front and Rear View Power Switch Turns the W SERIES on off Hard Drive access light Indicates hard drive activity Power light Indicates device is on USB 2 0 port Connects to a computer USB port or USB hub eSATA port Connects to a computer eSATA port Power Input Connects to the AC DC power adapter ...

Page 6: ...5 Hard Drive Installation 1 Remove 2 screws from the rear 2 Unplug D1A Red Black cable HDD Access LED Connector and unplug D2A Blue Black cable Power LED Connector from controller board ...

Page 7: ...6 3 Pull out the Disk Mounting Tray and slice in the SATA hard drive to the SATA connector on the controller board 4 Tighten up Hard Drives with 4 screws ...

Page 8: ...7 5 Plug in the Red Black Cable HDD Access LED Connector to D1A and Blue Black Cable Power LED Connector to D2A on the controller board 6 Slide the Disk Mounting Tray into the Enclosure ...

Page 9: ...8 7 Put the bezel back and tighten up with 2 screws at the rear 8 External Hard Drive Installation Process Completed ...

Page 10: ... interface functioning at the same time in one PC or multiple PC This may cause damage of the device or hard drive Connecting the Cables 1 Connect the AC adapter cord to the DC power supply socket at the rear of the external hard drive 2 Connect one end of the power cord to the AC adapter 3 Connect the other end of the power cord to an electric outlet 4 Connect one end of the USB 2 0 or eSATA cabl...

Page 11: ...d activate Hardware Wizard then Click Next 3 Select Search for the Best Driver for your Device Click Next to continue 4 Insert the CD Driver in your CD ROM then Browse the CD Driver Contain and chose Win Folder Click Next 5 After installation Click Finish to restart your computer 6 Once installation completes you ll find USB Safe Remove icon in icon tray If the new hard drive doesn t appear in My ...

Page 12: ...strative Tools and then double click the Computer Management 2 Click the Disk Management under Storage Your new Hard Drive should have the right capacity shown E g figure above Disk 1 is showing approximately 160GB Right click the Disk 1 and choose Initialize Disk Note If your Disk 1 is shown as Basic and Online skip this step 3 After New Partition Wizard launched then click Next ...

Page 13: ... On the next page choose your partition size then click Next 5 After that please assign a drive letter for the new Hard Drive and go to Next 6 To format a Hard Drive Choose the NTFS as File System Leave the ...

Page 14: ... a name in Volume label Check the Perform a quick format to reduce format time Click Next 7 Confirm your setting and click Finish 8 It would show the status as Formatting 9 When the status change to Healthy your new Hard Drive is ready to use ...

Page 15: ...and ready to use Mac OS X Note If the warning does not show up start at step 2 1 A warning window will pop up for new and unformatted hard drive Click Initialize Skip Step 2 and continue at Step 3 2 Click Go on the desk bar and choose Utilities click Disk Utility ...

Page 16: ...Extended 3 refer to Figure 1 at page 16 Choose the number of partition you want by clicking on the scroll bar 4 Name the new hard drive 5 Choose the Format 6 refer to Figure 2 at page 16 Define the Size if you want more than one partition or else leave it as default 7 Make sure the configuration is right and click Partition 8 ...

Page 17: ...ition for you hard drive Click OK Figure 2 6 Format Choose the format for your hard drive 4 After the partitioning is done an icon with the Name you assigned should appear on your Desktop Just double click the icon to access the hard drive ...

Page 18: ...lect USB Mass Storage Device from the list and click Stop 3 The following window is displayed Select the drive to be disconnected and click OK Important If other USB devices such as a portable flash drive are connected to your computer there may be multiple for USB Mass Storage Device Be sure to select the Eagle Consus device 4 Click Close and turn the Power switch to OFF the devices 5 Now you can...

Page 19: ...omputer Mac 1 Find the Removable Disk icon associated with drive you to disconnect and drag it to the Trash icon on your desktop it would turn to Eject icon 2 After the disk icon disappears from the desktop press the Power button to turn off your drive Now you can safely disconnect the USB or FireWire cable from your computer and the power cord from the electric outlet ...

Page 20: ... is built in the motherboard be sure to install the appropriate chipset support for your motherboard Refer to your motherboard or system manual for more information Q What happens when a USB 2 0 device is plugged into a USB 1 1 port or hub A USB 2 0 is backward compatible with USB 1 1 When connected to a USB 1 1 port or hub a USB 2 0 device operates at the USB 1 1 full speed of up to 12Mbps Q Can ...

Page 21: ...rive The same problem might occur if the hard drive is not formatted to the recognizable format of the operating system Reformatting the hard drive will normally fix this issue See Formatting the Drive A If your system has USB 2 0 or FireWire PCI adapter card be sure that the appropriate drivers are installed before connecting your EAGLE CONSUS external storage product The drive is not recognized ...

Page 22: ... being accessed from the outside This firewall feature is enabled by default when you install Service Pack 2 and it can block transfers from to the external drive This normally happens on the 1394 port but has also been seen on the USB port As a troubleshooting step TEMPORARILY disable the firewall and transfer data to and from the drive This will confirm if the firewall is the cause of the delaye...

Page 23: ... from the USB or 1394 port That will open the USB 1394 ports Be sure to pay close attention to what you are allowing through your firewall you may not want to allow some programs access to your computer or the internet Important Be sure to enable the firewall after troubleshooting is complete ...

Page 24: ...ent things depending on the context in which it is used Obviously this can and often does result in confusion especially in respect to hard disk size measurements where both measurements are often used Name Abbr Binary Power Binary Value Decimal Power Decimal Value Kilobyte KB 210 1 024 103 1 000 Megabyte MB 220 1 048 576 106 1 000 000 Gigabyte GB 230 1 073 741 824 109 1 000 000 000 TeraByte TB 24...

Page 25: ...bove space shown is for reference purpose only Please check with hard drive manufacturer for more details on drive space Q My Hard Drive is showing 2 drives which are 191GB one is 45GB respectively but I ordered a single 250GB hard drive A This is common because the hard drive is formatted to FAT32 files system which only supports the maximum capacity of 200GB per partition Therefore a 250GB hard ...

Page 26: ...ment off and on the user is encouraged to try to correct the interference by one or more of the following measures 1 Reorient or relocate the receiving antenna 2 Increase the separation between the equipment and receiver 3 Connect the equipment into an outlet on a circuit different from that to which the receiver is connected 4 Consult the dealer or an experienced radio television technician for h...

Page 27: ...gle Tech product Your warranty will be void if your returned Product is shipped in anything other than the original packaging or Eagle Tech approved materials To conclusively establish the period of warranty check the warranty expiration serial number required via www eagle techusa com Eagle Tech is not liable lost data regardless of the cause recovery of lost data or data contained in any Product...

Page 28: ... including but not limited to accidental consequential or special damages or any financial loss lost profits or expenses or lost data arising out of or in connection with the purchase use or performance of the Product even if EAGLE CONSUS has been advised of the possibility of such damages This warranty gives you specific legal rights and you may also have other rights which vary from state to sta...

Page 29: ...ation or help during installation or normal use of this product visit out product support Web site at www eagle techusa com and choose from these topics Support Obtain warranty information warranty status RMA status access product specifications and technical tips Downloads Download installation software and drivers Contact Contact a support representative by email or phone When contacting Eagle T...

Page 30: ...29 8 Understand Eagle Tech Brand ...

Reviews: