background image

23

MOVE CURSOR TO

LOCATION

PRESS ENT, SELECT

ICON, PRESS ENT

PRESS EXIT TO

ERASE CURSOR

ICONS
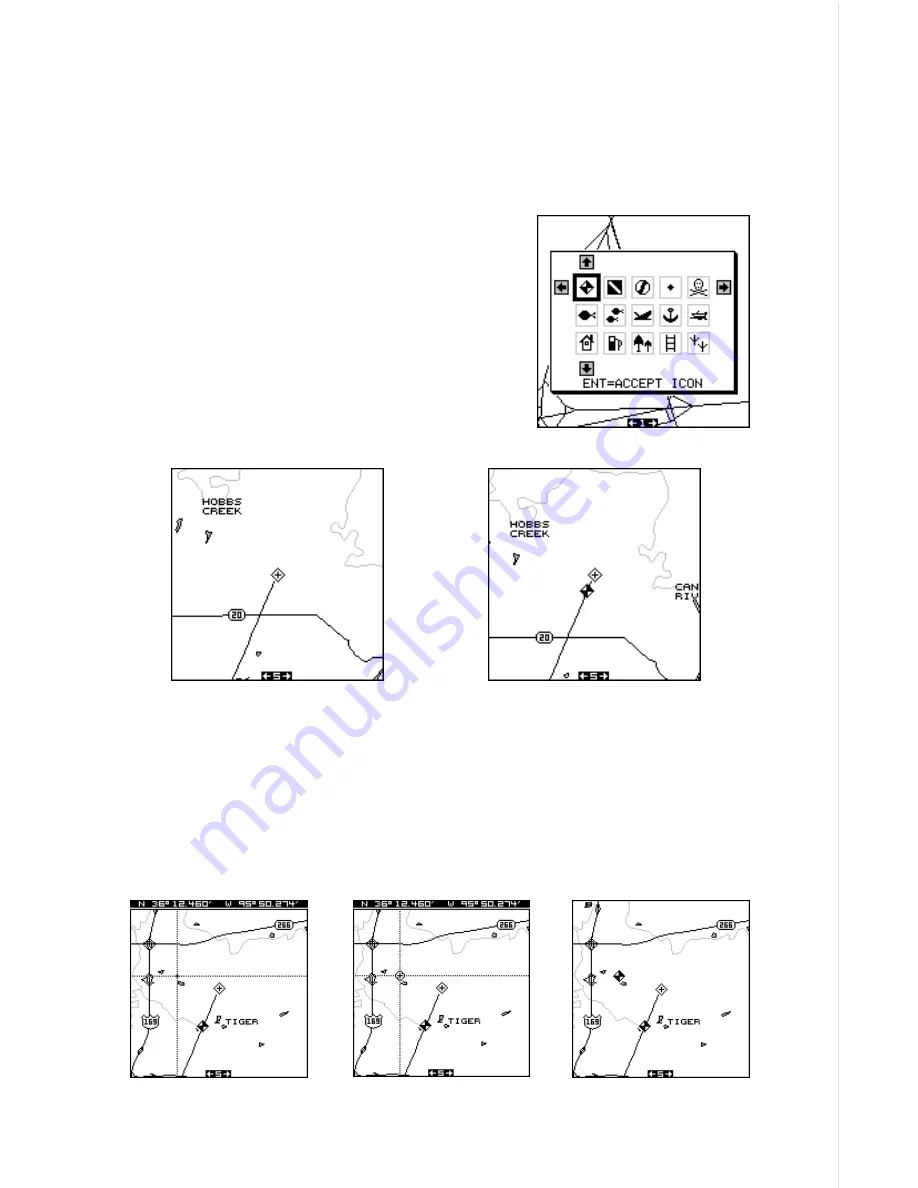
The AccuMap 12 has fifteen symbols or “icons” available. These icons
can be placed anywhere on the mapping screens. These can be used to
mark fishing spots, boat ramps, rest stops, airports, or whatever. You can
place an icon at your present position, or at the cursor location.

Place Icon - Present Position
To place an icon at your present position, sim-
ply press the ENT key. The screen shown at
right appears. Use the arrow keys to highlight
the desired icon. Now press the ENT key. The
mapping screen appears with the icon you se-
lected placed at your position when you first
pressed the ENT key, not your present posi-
tion.

MAP - AFTER PLACING

ICON

MAP - BEFORE PLACING

ICON

Place Icon - Cursor Location
To place an icon at cursor's location, first use the arrow keys to move the
cursor to the position that you want to place the icon. Next, press the ENT
key. Now select the desired icon using the arrow keys. When it's selected,
press the ENT key. The mapping screen reappears with the icon at the
cursor's location. Press the EXIT key to erase the cursor.

Summary of Contents for AccuMap 12

Page 1: ...INSTALLATION AND OPERATION INSTRUCTIONS AccuMap 12 TM ...

Page 2: ...en using this product CAUTION When showing navigation data to a position waypoint this unit will show the shortest most direct path to the waypoint It provides navigation data to the waypoint regardless of obstructions Therefore the prudent naviga tor will not only take advantage of all available navigation tools when trav elling to a waypoint but will also visually check to make certain a clear s...

Page 3: ...4 DUAL MAPPING 25 CLOCK 26 TIMERS 27 REPROGRAM BOXES 28 DATABASE WAYPOINTS 30 SAVING PRESENT POSITION AS A WAYPOINT QUICK SAVE 30 SAVING CURSOR POSITION AS A WAYPOINT 30 SAVING PRESENT POSITION AS A WAYPOINT SELECT WAYPOINT 31 SAVING CURSOR POSITION AS A WAYPOINT SELECT WAYPOINT 31 EDIT WAYPOINT LAT LON 32 WAYPOINT NAMES 32 WAYPOINT ICONS 33 DELETE A WAYPOINT 33 MOVE A WAYPOINT 33 DISTANCE BETWEEN...

Page 4: ...E 50 EXECUTE GPS SELF TEST 50 EXECUTE GPS COLD START 50 ALARMS 51 MESSAGES 52 BACKLIGHT 52 CONTRAST 53 SPEAKER ON OFF 53 SIMULATOR 53 BATTERIES 55 DEFINITION OF TERMS ABBREVIATIONS 55 WINDOW BOXES 56 WINDOW GROUPS 58 UPS RETURN POLICY 60 ACCUMAP 12 WARRANTY 62 DATABASE LICENSE AGREEMENT 63 DATABASES LIMITED WARRANTY 64 ACCESSORY ORDERING INFORMATION 65 HOW TO OBTAIN SERVICE INTERNATIONAL INSIDE BA...

Page 5: ...vision If you don t have a clear view of the sky or if you re inside a metal building the unit probably won t be able to pick up the signals from the satellites This is common among all GPS receivers We have found that using this product inside a car is usually sufficiently close to the windows and windshield that it works well However there is an optional remote antenna bracket and cable model PA...

Page 6: ...attery pack model RBP E has a nickle metal hydride battery and charger built into a pack that s almost identical to the alkaline battery pack that slides onto the bottom of the AccuMap 12 An external antenna kit is also available model PA 2 that allows the re movable antenna to be mounted on a suction cup bracket up to four feet away from the GPS receiver tions The AccuMap 12 takes these correctio...

Page 7: ...th alkaline and ni cad batteries at the same time To install the batteries first turn the AccuMap 12 so that it is facing you Now grasp the bottom part of the case and push it to the right until it comes completely off the unit The bottom part of the case holds the batteries Next push the battery holder out the bottom of the battery cover as shown below Install each battery with the negative end a...

Page 8: ...ears the AirMap s right side 3 To replace the antenna reverse the above steps Make certain to align the antenna with the AccuMap 12 until the antenna slides into place to the left by itself When it does the antenna has mated with the connec tor inside the unit and it s ready for use 1 2 3 IMPORTANT There are arrows molded into the bottom of the battery cover and battery holder Make certain the arr...

Page 9: ...dMap cartridges cover all other areas of the world showing more detail than the background map but not as much as the SmartMap areas The Navionics and C Map cartridges cover most of the world with de tailed views of coastal and some inland waters Over 600 cartridges are available LEI IMS TEXAS NORTH LEI IMS OKLAHOMA EAST LEI IMS TEXAS NORTH LEI IMS OKLAHOMA EAST To install a cartridge into the Acc...

Page 10: ...ke selections from menus and other tasks The WPT key lets you create save and recall waypoints and routes The PAGES key switches the unit between the three major displays windows navigation and mapping To select different features or to modify func tions press the MENU key The Z OUT and Z IN keys zoom out and zoom in your view on the mapping screen The ENT and EXIT keys let you enter or erase sele...

Page 11: ... first time the GPS receiver doesn t know where it is nor what the local time or date is If you tell it your position time and date the unit will take less time to lock on to the satellites and give you a fix or position However if you don t want to push buttons at this time that s fine The AccuMap 12 will lock onto the satellites and give you a position without any input from you This is called a...

Page 12: ...ood That s all you have to do to find your position The time display may not be correct when the cold start method is used See the manual initialization section for details on changing the time FindingYour Position Initialization A cold start as described above can take up to 5 minutes to find your position There is another method to initialize the AccuMap 12 that may let it acquire the satellites...

Page 13: ... will speed the position lock To change the position highlight the EDIT LAT LON label then press the right arrow key A screen similar to the one at right appears With the INPUT FROM MAP label highlighted press the right arrow key The screen below appears The mapping screen appears with two lines that intersect at the center These lines are the cursor Using the arrow keys move the cursor to your pr...

Page 14: ... set press the right arrow key once to move to the next number in the latitude Keep pressing the arrow keys until the latitude and longitude are set to your local position Note This position does not have to be very accurate If you can get it within one degree of your actual position that will be fine When it s set press the ENT key The AccuMap 12 accepts your entry and returns to the GPS setup me...

Page 15: ...reens were designed to show data that is used most often Many of the navigation mapping and windows screens can be customized to show data other than the ones chosen by the factory See the Reprogram Groups section for more details The three default displays are shown below To change displays simply press the PAGES key A screen similar to the one at right appears Now press the up or down arrow keys...

Page 16: ... like this when you re not navigating to a waypoint See page 39 for information on waypoint navigation If you navigate to a waypoint the screen looks like the one below The bearing to the destination waypoint is shown in the upper left corner of the screen Bearing is also shown by the large arrow point ing up to the compass The numbers on either side of the center ar row show the cross track error...

Page 17: ... digital dis play boxes showing your track TRK and ground speed GS The other boxes show navigation data when a waypoint is recalled including bearing to the waypoint BRG dis tance to waypoint DIS velocity made good VMG estimated time en route ETE local time CLOCK and a CDI The CDI is a course deviation indicator showing your distance to the left or right of the desired course You can reprogram all...

Page 18: ... the left of the desired course line and vice versa The CDI indicator shown above shows that we are about 02 miles to the left of the desired course With the CDI range of 10 miles each vertical dotted line represents 02 mile You can adjust the CDI s range through the Alarms CDI menu Using the CDI with a mapping screen helps you visualize your position in relation to the course The screen below lef...

Page 19: ... extending from your position shows the path you ve taken Use the Z OUT and Z IN keys to enlarge or reduce the mapping area If you have an IMS SmartMap cartridge installed it s detail typically be gins showing when you zoom in to the 10 mile range Map Cursor Pressing an arrow key while a map is on shows two dotted lines that intersect at your present position These dotted lines are called a cursor...

Page 20: ... AccuMap 12 begins zooming out showing more of your course to the waypoint After you cross the halfway point to your destination the AccuMap 12 zooms in closer one zoom range at a time keeping the destination on the screen Nearly every time it zooms in you can see more detail This is a benefit for two reasons Number one you want to see more detail as you get closer to the destination especially if...

Page 21: ...River off or on The default is on Press the left arrow key to turn them off Map Boundaries If you have a IMS SmartMap Navionics or a C MAP cartridge plugged into the back of the AccuMap 12 this feature will show the bound aries of the cartridge on the map This lets you know the exact area cov ered by your cartridge The example at the top of the next page shows the To use the autozoom feature first...

Page 22: ...rtMap Navionics or C MAP cartridge The unit can only show detail from one type of cartridge at a time In other words you can t show detail from an IMS SmartMap and a C MAP cartridge at the same time You must select one or the other The Detail Cartridge menu lets you select the type of cartridge to display When you install a mapping car tridge and wish to use it switch the Detail Cartridge to the d...

Page 23: ...ess the left arrow key Press the EXIT key to return to the mapping screen Normally you ll want to fill water with gray when you re using the GPS receiver on land and fill land with gray when you re using it on the water Map Orientation By default the AccuMap 12 shows the map with north always at the top of the screen This is the way most maps and charts are printed on paper This is fine if you re ...

Page 24: ...s as you change direction It always keeps your direction of travel track heading towards the top of the screen In the course up mode the screen is locked into your original bearing to the recalled way point regardless of your track Note the track up and course up modes do not work when the unit is zoomed in on an area covered by a C Map or Navionics cartridge To select the desired mode first press...

Page 25: ...Plot trail flashing s default is on Set Visible PlotTrails The plot trail can be turned off if desired To turn it off press the up or down arrow key until the SetVisible PlotTrails menu is highlighted Now press the right arrow key The screen at right appears Use the up or down arrow keys to select the desired plot trail then press the left or right arrow key Press the EXIT key to return to the Plo...

Page 26: ... section Set Plotter Update Criteria The plotter places a dot on your trail as you move It determines when to place a dot de pending on two things time and distance By default it places a dot every three seconds To change the update highlight the Set Plot ter Update Criteria menu item then press the right arrow key The screen at right appears To change the update to distance press the right arrow ...

Page 27: ...screen shown at right appears Use the arrow keys to highlight the desired icon Now press the ENT key The mapping screen appears with the icon you se lected placed at your position when you first pressed the ENT key not your present posi tion MAP AFTER PLACING ICON MAP BEFORE PLACING ICON Place Icon Cursor Location To place an icon at cursor s location first use the arrow keys to move the cursor to...

Page 28: ...ss the ENT key when you re ready to erase the icons A message appears asking you if you want to delete the icons of that type Press the left arrow key to erase them The unit returns to the mapping screen with all icons of the type you selected erased To remove only certain icons highlight the Delete Icons From Map label Press the right arrow key The unit returns to the mapping screen with the curs...

Page 29: ... channel The TRK column shows a T if the channel is track ing the satellite or a S if the receiver is searching for it ELV is the elevation of the satellite above the horizon AZM is the azimuth or direction of the satellite from your location SNR is the signal to noise ratio The higher the SNR the better If you look at row one in the satellite info screen above channel 1 is tracking satellite numb...

Page 30: ...he list when you press the MENU key These items let you set the clock s time set alarms and change the unit of mea sure The clock and timers can be used on win dows mapping or the navigation mode Clock Set If the time shown on the clock display is not your local time change it using the Clock Set function To do this press the MENU key then press the up or down arrow keys until the Clock Set label ...

Page 31: ...ss the ENT key The unit returns to the navigation mapping or win dows display To turn the alarm on press the MENU key then select the CLK ALM menu Press the right arrow key The alarm is now activated When the alarm goes off an audible tone sounds along with a flashing message on the screen Press the EXIT key to turn the alarm off Note The AccuMap 12 must be on in order for the alarms to work In ot...

Page 32: ...bel it will sound a tone when it reaches the time you entered in the up timer set menu Press the EXIT key to silence the alarm You can reset either alarm to the time you origi nally set by pressing the MENU key then mov ing the black box to either the Up Timer Re set or DN Timer Reset label then press the right arrow key REPROGRAM BOXES The digital boxes on the MAP 3 and NAV 1 screens can be repro...

Page 33: ...D AT THE TOP AFTER MESSAGES ERASE THEMSELVES YOU RE RETURNED TO THE BOX SELECTION SCREEN SHOWN IN STEP 2 WE CHOSE THIS WINDOW AS THE SECOND ONE FOR THIS GROUP REPEAT STEPS 2 AND 3 AGAIN vOLTS IS THE LAST BOX CHOSEN FOR THIS SCREEN THIS MESSAGE APPEARS AFTER THE LAST BOX IS SELECTED IT AUTOMATI CALLY ERASES THE FINISHED SCREEN REPROGRAMMING BOXES 1 2 3 4 5 6 7 8 See the back of this manual for a co...

Page 34: ...point You can edit the icon symbol if you wish See the ICONS sec tion in this manual for more information Saving The Cursor Position as a Waypoint When the cursor is showing on the map and you press the WPT key twice the AccuMap 12 puts the cursor s position into the first available waypoint number A message appears on the display telling you the way The first window appears on this screen A descr...

Page 35: ...oing to store a position as way point number 6 Now press the down arrow key until the OTHER OPTIONS label is highlighted Press the right ar row key The screen shown at right appears This is the second waypoint menu page The Save Position As label is highlighted at the top of the list on this page When you re at the lo cation you wish to save press the right arrow key This saves your present positi...

Page 36: ... then press the up or down arrow keys until the desired number appears If you make a mistake simply move the black box back to the number you need to change and change it If you want to change the entire lati tude number press the WPT key to erase it and start over To exit com pletely out of this screen without saving the position press the EXIT key When the latitude is the way you want it press t...

Page 37: ...he EDIT ICON label Now press the right arrow key The screen shown at right appears Press the arrow keys to highlight the desired icon then press the ENT key to assign it to your way point The unit returns to the waypoint screen with the icon you selected assigned to the waypoint Delete a Waypoint To remove all information from a waypoint loca tion first select the waypoint number on the way point ...

Page 38: ...that you wish to move the information to In this ex ample we selected waypoint number 10 When everything on this screen is correct press the WPT key In this example the name icon and position were moved from waypoint number 1 to waypoint number 10 Press the EXIT key to erase this screen when you re finished Distance BetweenWaypoints The AccuMap 12 can easily give you the distance between two user ...

Page 39: ...points an icon Waypoint Symbols it s name Waypoint Names or it s number Waypoint Num bers Press the up or down arrow keys to move the black box to the desired menu then press the right arrow key to turn it on Press the EXIT key to erase this menu ROUTES You can connect several user waypoints together to form a route When you recall the route the AccuMap 12 will show you navigation information to t...

Page 40: ...Waypoint list Select the first waypoint either by using the way point name or waypoint number menus As you move through the list of saved waypoints their date and time saved icon position distance and bear ing from your present position show at the bottom of the screen When the desired waypoint appears that you want to use as the first waypoint on the route move the black box to the Add WPT To Rou...

Page 41: ...en with the cursor on See below Move the cursor using the arrow keys until it s on the exact location that you want to add to the route list When it s there press the ENT key As you move the cursor a line moves with it as shown in the screen at right This line shows you the path from the last waypoint on the list You can continue to save waypoints on the map by moving the cursor and pressing the E...

Page 42: ...your present posi tion To use it simply highlight the START AUTO label and press the right arrow key To start the route using the nearest waypoint to your location simply press the ENT key You can start at any waypoint in the route by high lighting the desired waypoint then pressing right arrow key A new menu appears as shown at right The DIRECT TO label is highlighted Press the right arrow key to...

Page 43: ...steps First select the des tination from the database then press the key next to the NAV GO TO label The unit immediately shows navigation information to the selected loca tion In this example we recalled waypoint number 12 It s 6 17 miles away from our present position on a bearing of 233 magnetic which is roughly southwest The mapping navigation and windows screens below show samples of the thre...

Page 44: ...eye view used by the mapping screen gives you an easy way to navigate to a waypoint On the map screen shown at right the diamond with a cross in it is your present position The box with the S in it was your starting location when you recalled the waypoint The dotted line is called a track line and is the shortest path from the starting location to the destination The D is the destination which can...

Page 45: ...gation screens when you re travelling less than 3 miles per hour These random numbers are mostly caused by S A Selective Availability S A is random errors introduced into the GPS satellite network by the government to degrade the system s accuracy to the general public The error can be as bad as 100 meters and 5 m p h which is within the government s GPS specifi cations You can see this happening ...

Page 46: ...RRECTIONS DATUM Maps and charts are based on a survey of the area that s covered by the map or chart These surveys are called Datums Maps that are created using different datums will show the same latitude longitude in slightly different locations All datums are named The GPS system is based on the WGS 84 datum which covers the entire world Other datums may also cover the entire world or just a sm...

Page 47: ...h the chart you re using If you move the unit will continuously add the change to all posi tion navigation and mapping displays This makes it more closely match the datum used by the chart For this reason you should be careful when entering the PCF offset It s saved in memory and doesn t change when the unit is turned off However resetting the unit does erase the PCF offset To set the PCF offset h...

Page 48: ...highlight the desired selection then press the left or right arrow key You can change one or all of the settings on this page When you re finished press the EXIT key Position Format The AccuMap 12 can show the position in degrees minutes and hun dredths of a minute 36 28 700 or degrees minutes and seconds 36 28 40 9 It can also show position in UTM s or Universal Transverse Mer cator projection UT...

Page 49: ... this service You can attach the DGPS Beacon Receiver to your AccuMap 12 and start using it immediately However please note that the Eagle DGPS Beacon Receiver is designed for permanent mount on a boat or other vehicle It requires a four to eight foot whip antenna See the sample wiring diagrams on the next page for general wiring pro cedures You ll need to purchase a NDC 1 adapter cable for your A...

Page 50: ...menu and press the left arrow key Press the EXIT key when everything on this screen is the way you want it DGPS The AccuMap 12 will recognize Starlink and Magnavox DGPS receivers and compatibles If you have either one of these receivers simply high light the Starlink DGPS or Magnavox DGPS la bel on the NMEA DGPS menu and press the right arrow key to turn it on Note If you have a Magnavox DGPS rece...

Page 51: ...CUMAP S WIRES OTHER DEVICE S WIRES ACCUMAP 12 TRANSMITTING NMEA DATA TO ANOTHER DEVICE NDC 1 TO ACCUMAP 12 DGPS RECEIVER POWER IF NEEDED SHIELD WIRE GROUNDWIRES WHITE WIRE RED WIRE TO 12V DGPS RECEIVER S RECEIVE DATA WIRE IF NEEDED ACCUMAP S WIRES ACCUMAP 12 RECEIVING DATA FROM A DGPS RECEIVER GREEN WIRE DGPS RECEIVER S TRANSMIT DATA WIRE ...

Page 52: ... Now press the right arrow key A message appears asking if you want to restore the original options Press the left arrow key if you do the right arrow key to quit If you restore the unit to the factory settings all options such as battery level and delay contrast alarms and other system choices are returned to their default values However no waypoints routes or icons are erased RESET BOXES To retu...

Page 53: ...od as shown above When it s the way you want it press the ENT key You I D is saved in permanent memory IMPORTANT The name or number you save is written into the AccuMap 12 Sport s permanent memory You won t be able to change it once you enter it unless you return the unit to the factory Make certain the name or I D is exactly the way you want it before pressing the ENT key To see your I D see the ...

Page 54: ... to the one at right appears after several seconds Messages on the display will tell you if the unit passed the self test or failed If the unit fails the self test contact the Eagle customer service department Execute GPS Cold Start When the AccuMap 12 is turned on for the first time out of the box it automatically does a cold start A cold start means the unit doesn t have any information that hel...

Page 55: ...warning when you drift outside of a preset radius Again using the 1 mile as an example if you re anchored and your boat moves more than 1 of a mile the alarm will sound To use any of these alarms first press the MENU key then select the GPS ALARMS menu A screen similar to the one shown at the top of the next page appears Highlight the desired alarm then press the right arrow key to turn it on To a...

Page 56: ...essage log To do this simply press the MENU key then highlight the MESSAGES label and press the right arrow key A screen similar to the one below ap pears If there are more messages than this screen can hold press the left or right arrow keys to view more pages When you re finished with this screen press the EXIT key to erase it BACKLIGHT The AirMap s display and keyboard have lights that can be t...

Page 57: ...io Screen menu and press the right arrow key Now press the left arrow key to turn the speaker off Repeat these steps to turn the speaker on Press the EXIT key to erase this menu SIMULATOR A simulator is built into the AccuMap 12 that has several options You can use nearly all of the unit s features even save and recall waypoints This is useful for trip planning To use the simulator press the MENU ...

Page 58: ...teer This option lets you change both the course and speed on the screen as the simulator is running To do this highlight the User Arrow Keys to Steer label then press the right arrow key The screen shown at right appears Use the up and down ar row keys to increase or decrease the speed Use the right and left arrow keys to change the track Press the EXIT key to erase these menus If you hold the le...

Page 59: ... displays use abbreviations for some names They are as follows ALT Altitude Your height above sea level BRG Bearing The direction from your position to a waypoint CDI Course Deviation Indicator A display that shows the dis tance to the side of the desired course called cross track error to a waypoint CLOCK Your local time TRK Track The direction you re travelling DIS Distance Distance remaining be...

Page 60: ...56 WINDOW BOXES These boxes are used on Map 3 and Nav 1 only 1 2 3 4 5 6 7 8 9 10 11 12 ...

Page 61: ...57 13 14 15 16 ...

Page 62: ...58 WINDOW GROUPS This is a listing of window groups A through T A B C D E F G H I J K L ...

Page 63: ...59 M N O P Q R S T ...

Page 64: ...rief note detailing the problem you re having with the unit Please include your name address and daytime telephone number 4 Please include payment for non warranty repairs Check money order Visa or MasterCard may be used 5 Fill in your name address zip code date and RA number in the blanks provided on the UPS form included with your unit 6 Attach the label to the shipping box tear off the tab for ...

Page 65: ... dealer Most quality dealers that handle marine elec tronic equipment should be able to assist you with these items Consult your local telephone directory for listings 2 LEI Extras Inc P O Box 129 Catoosa OK 74015 0129 or call 800 324 0045 USA orders only Eagle Electronics may find it necessary to change or end our shipping policies regulations and special offers at any time We reserve the right t...

Page 66: ...PLACEMENT OR REFUND AS JUST DESCRIBED IS THE EXCLUSIVE REMEDY AVAILABLE TO YOU AGAINST US FOR ANY DEFECT MALFUNCTION OR NON CON FORMITY CONCERNING THE PRODUCT OR FOR ANY LOSS OR DAMAGE RESULT ING FROM ANY OTHER CAUSE WHATSOEVER WE WILL NOT UNDER ANY CIR CUMSTANCES BE LIABLE TO ANYONE FOR ANY SPECIAL CONSEQUENTIAL INCI DENTAL OR OTHER INDIRECT DAMAGE OF ANY KIND Some states do not allow the exclusi...

Page 67: ...ence purposes but only as long as you comply with the terms and conditions of this License Agreement We reserve the right to terminate this license if you violate any aspect of this License Agreement You are responsible for using offical government charts and prudent navigation for safe travel 3 The Databases housed in your porduct are protected by the copy right notices appearing on the product o...

Page 68: ...T UNDER ANY CIRCUMSTNACES BE LIABLE TO ANYONE FOR ANY SPECIAL CONSEQUENTIAL INCIDENTAL OR OTHER INDIRECT DAMAGE OF ANY KIND Some states do not allow the exclusion or limitation of incidental or consequential damages so the above limitations or exclusions may not apply to you This warranty does NOT apply in the following circumstances 1 when the product has been serviced or repaired by anyone other...

Page 69: ... brief note with the product describing the problem Be sure to include your name return shipping address and a daytime telephone number How to Obtain Service International Customers Only Except Canada If you need service or repairs contact the dealer in the country you purchased your unit WARRANTY REPAIR WILL BE HONORED ONLY IN THE COUNTRY UNIT WAS PURCHASED Please follow the shipping instructions...

Page 70: ...See page 62 inside this manual for complete warranty details If your unit fails and the failure is not covered by the original warranty Eagle has a flat rate repair policy that covers your unit and accessories packed with the unit at the factory There is a 180 day warranty on all non warranty repairs from the factory which is similar to the original warranty but is for 180 days rather than one yea...

Reviews: