background image

 Version     1.1 

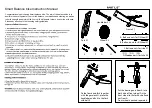
 5.8     Button     and     Display 


Headlight     Button 


Bell 


Shifter 


LED     Control     Unit 


Throttle 

 5.9     Control     Unit 

 The     throttle     and     pedal     assist     will     not     work     when     the     display     is     just     on. 
 The  throttle  is   activated  by  twisting  the  right  handlebar,  while  the  pedal  assist  is  activated  when  you  set  the 
 controller     to     step     1     (low),     2     (medium),     or     3     (high). 

 6.     Maintenance     and     repairs 

 IMPORTANT! 

 • 

 Do   not  attempt  to  open  the  battery  casing,  motor  or  control  unit.  Failure  to  do  so  may  result  in 
 personal     injury     and     will     void     the     warranty. 

 • 

 Your  bike  is  equipped  with  a  derailleur  which  tightens  the  chain  automatically.  If  the  chain  starts 
 to  look  slack  and/or  jumps  off  the  front  plateau,  you  can  manually  tighten  the  chain  by  loosening 
 first  the  rear   axle  nuts  slightly,  adjusting  the  tension  on  the  chain.  Make  sure   that  the  chain  is 
 rotating  freely  and  tighten  the  rear   axle  nuts  back  on.  Take  the  bike  for  service  in  a  specialized 
 bike     shop     in     your     area     if     you     are     unsure     about     those     steps. 

 7 

Summary of Contents for FB-NOVABIKE FBNB2201

Page 1: ...Version 1 1 User Manual FB NOVABIKE FBNB2201 1 ...

Page 2: ... The handlebar and seatpost 8 8 4 The seatpost and saddle 9 8 5 The pedals 9 8 6 The battery 10 8 7 The front light 1 1 1 Warranty conditions Our products are guaranteed for one year against manufacturingdefects The warranty does not cover labor normal wear and tear accidental breakage or breakage due to lack of maintenance or improper use The main components of the bicycle are covered by the warr...

Page 3: ... bicycle s tire pressure at regular intervals Having the correct tire inflation pressure is 3 5bar Incorrect tire pressure can lead to tire damage and shorten operating distance significantly 2 1 Electrical Safety CAUTION Keep electrical appliances out of the reach of children The utilization of the battery and battery charger should be done only under adult supervision To avoid injury and or dama...

Page 4: ...olt lithium ion Li ion 10 4 Ah Engine 48 V 750W brushless The electrical assistance system is controlled by the speed sensor installed in the pedal system Top speed 42 km h limited Range Up to 47km in ideal conditions 4 Parts of the Bicycle 4 1 Parts 1 Frame 2 Changeable battery 3 Seat lock lever 4 Brake lever 5 Tyre 6 36V 350W motor 7 Pedal 8 Headlight 4 2 The saddle and seatpost You may want to ...

Page 5: ...edal without pedal assist This means that you can save battery by pedaling more or you can still operate your bike even though the battery is empty Tum off the ignition and remove the key whenever you stop using your bike Please make sure that you turn off the power first from the control panel for preventing unintended acceleration 5 3 Battery and Charger Do not touch the battery terminals when t...

Page 6: ...he charging plug on the battery and then plug the charger into an AC outlet 5 6 Battery level You can easily check directly from the battery by pressing the button located on the battery 5 7 Brakes Do not brake too sharply or abruptly Otherwise you may fall from the bicycle The left brake lever controls the front wheel brake and the right brake lever controls the rear wheel brake To reduce the eff...

Page 7: ...ttempt to open the battery casing motor or control unit Failure to do so may result in personal injury and will void the warranty Your bike is equipped with a derailleur which tightens the chain automatically If the chain starts to look slack and or jumps off the front plateau you can manually tightenthe chain by loosening first the rear axle nuts slightly adjusting the tension on the chain Make s...

Page 8: ...t or the motor might need to be replaced The bike goes away by itself Check that the throttle is not jammed Lubricate or replace the throttle grip The bike does not start after stop Check that the brake lever is released completely The charger is connected the signal light does not turn on Make sure that the AC outlet is powered correctly The charger connected to the battery but the battery is not...

Page 9: ... as the disc brake On the other side install the spring and nut Tighten the nut and turn the quick release handle upward tightly Make sure that the quick release handle is firmly in place and that the front wheel is locked After the front wheel is assembled turn the front wheel manually to check whether the front wheel rotates smoothly 8 3 The handlebar and seatpost Hold the seatpost upright and p...

Page 10: ...l drive side and a letter L on the left pedal non drive side Place the right pedal on the drive side crank and thread the pedal spindle clockwise Place the left pedal on the non drive side crank and thread the pedal spindle counterclockwise Make sure both pedals are locked into position using a 15 mm wrench 8 6 The battery Take out the battery align it with the notch on the left and slide it in to...

Page 11: ...d pass the screw through the center hole of the front light correspondingto the front fork gantry paying attention to the gasket on the screw head Take 4 mm hex key fix the front screw and lock the screw pay attention to the position of the front light 11 ...

Reviews: