20
8.1.1.
Physical Installation
Step 1
The e-Clear must only operate when the pool
pump is running.
Step 2
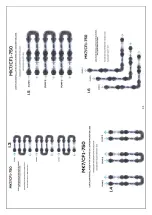
The e-Clear system must be installed as last
piece of equipment before water returns to the
pool. (See diagrams above)
Step 3
The chamber should be fitted in a vertical
orientation, not sideways, preferably as a "I"
Step 4
Water must flow through the ultraviolet
chamber first (if installed) then the oxygen
chamber and finally the ionization chamber.
Step 5
The white electrode cable attaches to the
black oxygen plates. The black electrode cable
attaches to the pink ionization plates. Undo
cable ties and plug cable into ebox.
Step 6
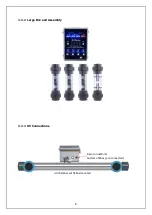
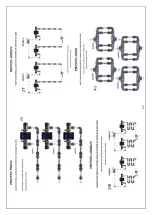
Large assembly type units must be installed
according to technical installation drawings
guidelines.
Step 7
The entire pool volume should flow through
the pool filters every 4 hours, according to
international DIN standard
Step 8
e-Clear's natural oxygen process requires good
water movement in your pool with no "dead"
spots and deep glass media filter beds
We HIGHLY recommend only using recycled
glass filter media or consol glass media, not
Silica course glass media.
Step 9
All pools, whether run on chlorine, salt or e-
Clear, may lose water quality from time to
time under extreme load, adverse weather or
other circumstances. We recommend using a
hydrogen peroxide shock, non-metal based
algaecide or Polysheen clarifier.
Warning
Do not add Chlorine to your pool while the e-
Clear system is powered. This will damage the
e-Clear system. Do not add metal based
algaecide or metal remover. Whenever adding
any chemicals to your water make sure the e-
Clear is powered off.
Summary of Contents for MK7/CF1-75
Page 7: ...6 UV ON OFF OxidationON OFF IonizationON OFF ...
Page 8: ...7 3 3 Connections 3 3 1 Electrodes connections UV ON OFF Switch ...
Page 21: ...19 8 1 INSTALLATION GUIDE ...
Page 24: ...0 ...
Page 26: ...23 8 1 4 TECHNICAL INSTALLATION GUIDELIES FOR e CLEAR WATER SANITIZERS ...
Page 27: ...24 TECHNICAL INSTALLATION DRAWINGS ...
Page 28: ...25 ...
Page 29: ...26 ...
Page 30: ...27 ...
Page 31: ...28 ...
Page 32: ...29 ...
Page 33: ...30 ...
Page 34: ...31 ...
Page 35: ...32 ...
Page 36: ...33 ...
Page 37: ...34 ...
Page 38: ...35 ...
Page 39: ...36 ...
Page 40: ...37 8 2 MAINTENANCE GUIDE ...
Page 45: ...42 PROBLEM SOLVING GUIDE SECTION 9 _____________________________________________________ ...
Page 51: ...48 SECTION 10 _____________________________________________________ SPARE PARTS ...
Page 54: ...51 SECTION 11 _____________________________________________________ ...
Page 56: ...53 ECO FUSION ONE TAP DRINKING WATER SYSTEM ...
Page 60: ...57 ECO FUSION WHOLE HOUSE DRINKING WATER SYSTEMS ...
Page 61: ...58 C B 11 3 ECO FUSION WHOLE HOUSE DRINKING WATER SYSTEMS A ...
Page 70: ...67 SCIENCE EXPLANTION 11 3 6 e CLEARTM HIGH OUTPUT OXYGEN COPPER IONIZATION CHAMBER ...
Page 71: ...68 E CLEAR ECO FUSIONTM RAINWATER HARVESTING KIT ...
Page 72: ...69 11 4 E CLEAR ECO FUSIONTM RAINWATER HARVESTING KIT ...
Page 76: ......
Page 77: ......
Page 78: ......
Page 79: ......
Page 80: ......
Page 81: ......
Page 82: ......
Page 83: ......
Page 84: ......
Page 85: ......
Page 86: ......
Page 87: ......
Page 88: ......


