background image

8

DX-DRTVM102

Need help? Call 800-305-2204

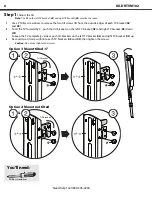
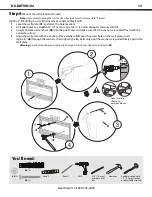
Step 3:

 Select screws and spacers

1

Select the hardware for your TV (screws, washers, and spacers). See the documentation that came with your TV 

for screw length and diameter.
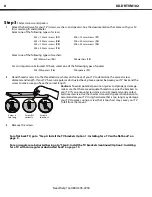
Select one of the following types of screws:

Select one of the following types of washers:

For an irregular or obstructed TV back, select one of the following types of spacers:

2

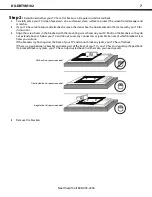
Hand thread screws into the threaded screw holes on the back of your TV to determine the correct screw 
diameter and length. If your TV has an irregular or obstructed back, place a spacer between your TV back and the 
screw to make sure you have the correct length.

Caution:

 To avoid potential personal injuries and property damage, 

make sure that there are adequate threads to secure the brackets to 
your TV. If you encounter resistance, stop immediately and contact 
customer service. Use the shortest screw and spacer combination to 
accommodate your TV. Using hardware that is too long may damage 
your TV. However, using a screw that is too short may cause your TV 
to fall from the mount.

3

Remove the screws.

For a flat back TV, go to “Step 4: Install the TV brackets Option 1: Installing for a TV with a flat back” on 
page 9.

For an irregular or obstructed back, go to “Step 4: Install the TV brackets (continued) Option 2: Installing 
for a TV with an irregular or obstructed back”
 on page 10.

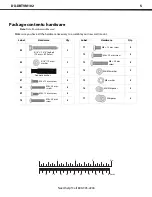
M4 × 12 mm screws (

07

)

M6 × 12 mm  screws  (

11

)

M4 × 30 mm screws (

08

)

M6 × 20 mm  screws  (

12

)

M5 × 12 mm screws (

09

)

M6 × 35 mm  screws  (

13

)

M5 × 30 mm screws (

10

)

M4/M5 washers (

14

)

M6 washers (

15

)

M4/M5 spacers (

16

)

M6 spacers (

17

)

Screw is 
too long

Screw fits 
correctly

Screw is 
too short

Summary of Contents for DX-DRTVM102

Page 1: ... Medium Low Profile Wall Mount with Optional 5 Tilt Safety information and specifications 2 TVs the wall mount fits 3 Tools needed 3 Parts 4 Hardware 5 Assembly instructions 6 For wood stud concrete wall or concrete bloack installation ...

Page 2: ...ct installation or use The weight of your TV must not exceed 50 lbs 22 6 kg The wall must be capable of supporting five times the weight of the TV and wall mount combined This product contains small items that could be a choking hazard if swallowed Keep these items away from young children This product is not designed for use in metal stud walls Model DX DRTVM102 Distributed by Best Buy Purchasing...

Page 3: ...maximum horizontal distance 9 06 230 mm vertical distance Tools needed You will need the following tools to assemble your new wall mount Edge to edge stud finder Pencil Tape measure Hammer Level Phillips screwdriver Socket wrench with 1 2 13 mm socket or adjustable wrench Drill 7 32 5 5 mm wood drill bit for wood stud wall 3 8 10 mm masonry drill bit for concrete wall OR ...

Page 4: ...X DRTVM102 Need help Call 800 305 2204 Parts Package contents parts Make sure you have all the parts necessary to assemble your new TV wall mount 03 Right TV bracket 1 01 Wall plate 1 02 Left TV bracket 1 ...

Page 5: ...all mount Label Hardware Qty 04 2 05 2 06 2 07 4 08 4 09 4 10 4 5 16 2 3 4 lag bolt 7 9 mm 69 9 mm 5 16 7 9 mm washer Concrete anchor M4 12 mm screw M4 30 mm screw M5 12 mm screw M5 30 mm screw Label Hardware Qty 11 4 12 4 13 4 14 8 15 4 16 4 17 4 M6 12 mm screw M6 20 mm screw M6 35 mm screw M4 M5 washer M6 washer M4 M5 spacer M6 spacer 10 20 30 40 50 60 70 80 90 100mm 1 2 3 4in ...

Page 6: ...2 To tilt the TV forward by 5 push the tilt brackets on the left TV bracket 02 and right TV bracket 03 down OR To keep the TV completely vertical push tilt brackets on the left TV bracket 02 and right TV bracket 03 up 3 Re insert two tilt screws S into each TV brackets 02 and 03 then tighten the screws Caution Do not over tighten the screws You ll need S S 02 03 02 03 S S 02 03 02 03 Option 1 Moun...

Page 7: ...the mounting screw holes on your TV Position the brackets so they do not extend above or below your TV and do not cover any connectors or jacks Make note of which bracket screw holes you will use If the brackets lay flush against the back of your TV and do not block any jacks your TV has a flat back If there is a gap between a bracket and some part of the back of your TV your TV has an irregularly...

Page 8: ...y damage make sure that there are adequate threads to secure the brackets to your TV If you encounter resistance stop immediately and contact customer service Use the shortest screw and spacer combination to accommodate your TV Using hardware that is too long may damage your TV However using a screw that is too short may cause your TV to fall from the mount 3 Remove the screws For a flat back TV g...

Page 9: ...rked R for the right bracket and L for the left bracket 2 Place the M4 M5 washers 14 or M6 washers 15 over the holes in the TV brackets that align with the screw holes on the back of your TV then insert the M4 screws 07 M5 screws 09 or M6 screws 11 or 12 3 Tighten the screws until they are snug against the TV bracket Do not over tighten You ll need 02 03 14 15 11 12 7 9 03 02 OR OR 07 4 09 4 Phill...

Page 10: ... the holes you noted on the left TV bracket 02 and right TV bracket 03 with the spacers The brackets are marked R for the right bracket and L for the left bracket 4 Place M4 M5 washers 14 or M6 washers 15 over the holes in the TV brackets then insert M4 screws 08 M5 screws 10 or M6 screws 13 5 Tighten the screws until they are snug against the TV bracket Do not over tighten You ll need 02 03 16 14...

Page 11: ...en the middle of one of the TV brackets and the bottom of your TV This measurement is A 2 If you plan to place furniture such as an entertainment center or TV stand under your TV measure the height of the furniture and any items on top of the furniture This measurement is B 3 Measure the distance between the top of the furniture and where you want the bottom of your TV This measurement is C 4 Add ...

Page 12: ...the screw hole locations then remove the wall plate 3 Drill pilot holes to a depth of 3 75 mm using a 7 32 5 5 mm diameter drill bit 4 Align the wall plate with the pilot holes then place the washers 05 over the holes in the wall plate Insert the lag bolts 04 through the washers then tighten the lag bolts only until the washers are pulled firmly against the wall plate Caution Avoid potential injur...

Page 13: ...pilot holes and make sure that the anchors are seated flush with the concrete surface 4 Align the wall plate with the anchors Place washers 05 over the screw holes in the wall plate insert lag bolts 04 through the washers then tighten the lag bolts only until the washers are pulled firmly against the wall plate Warning Avoid potential injuries or property damage DO NOT over tighten the lag bolts 0...

Page 14: ...g sure that the hooks on the top of the left and right TV brackets 02 and 03 slide over the top of the wall plate and the hooks on the bottom of the TV brackets slide under the bottom of the wall plate Make sure that the TV is securely attached to the wall plate 03 01 The TV is heavy You will need assistance with this step ...

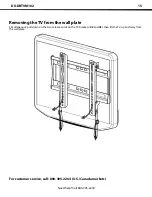
Page 15: ...00 305 2204 Removing the TV from the wall plate Simultaneously pull down on the two release cords on the TV brackets 02 and 03 then lift the TV up and away from the wall plate For customer service call 800 305 2204 U S Canada markets ...

Page 16: ... LLC 7601 Penn Ave South Richfield MN 55423 U S A 2011 BBY Solutions Inc All rights reserved DYNEX is a trademark of BBY Solutions Inc Registered in some countries All other products and brand names are trademarks of their respective owners 6907 002033 01 12 0552 ENGLISH ...

Reviews: