background image

DI100ST2  User  Manual    6 

Getting Started 


Contents 

 
Confirm that the accessories below are shipped along with the display.    If any item is missing, please 
contact your dealer.    The color and shape of the accessories may vary with the products. 


DI100ST2 Professional LCD. 


Remote Control    x 1 pc. 


Batteries (1.5V / AAA)    x2 pcs. 


Power cable    x1 pc. 


Quick Start Guide    x1 pc. 


ESK302    x1 pc. 

 
Attention:

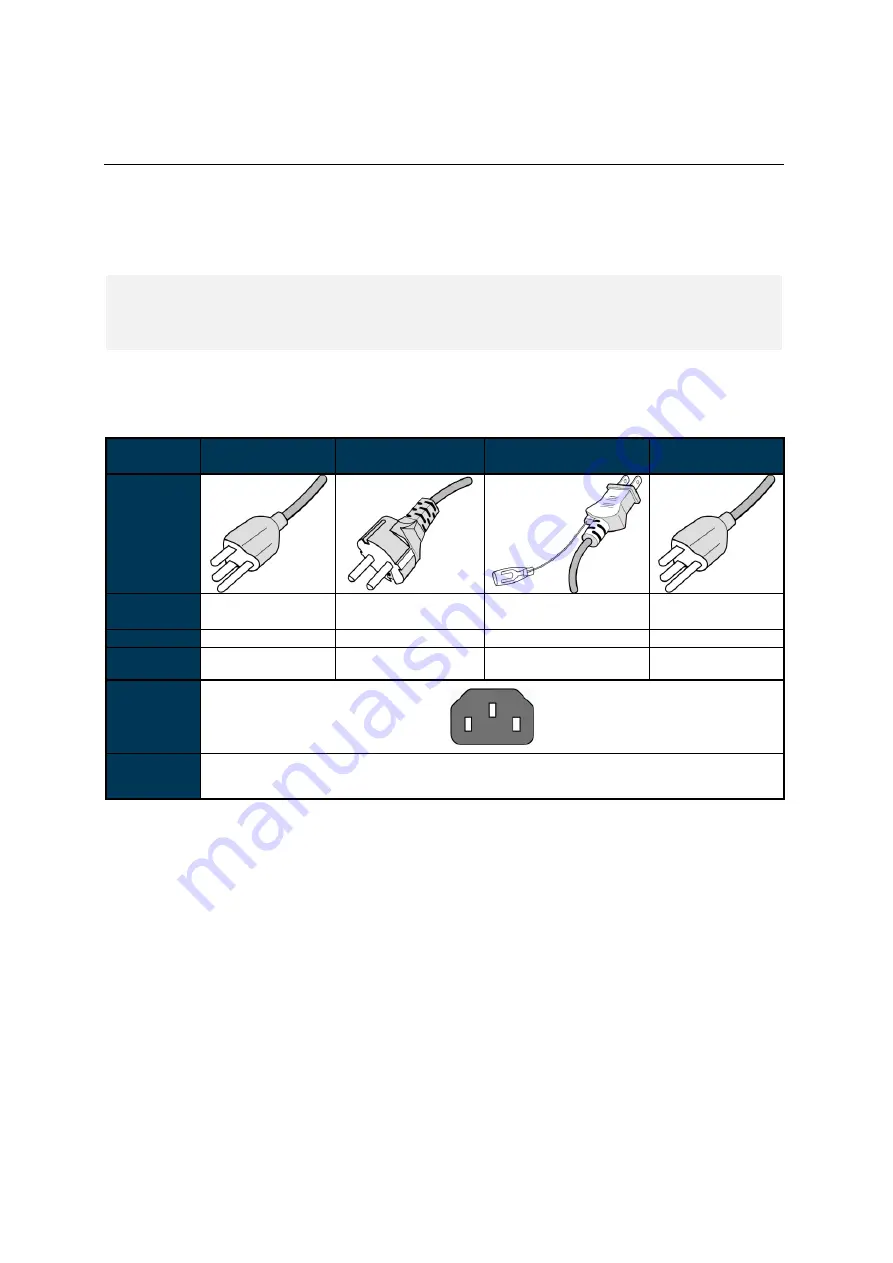
 Please use the following table to check whether the included power cord is suitable for your 

region.    If the power cord does not match your region, please contact your local supplier.    Please 
use matching AC socket in order to meet your local safety regulations. 
 

Plug Type 

North America 

European 

Continental 

Japan 

Taiwan 

Plug 

Shape 


Region 

U.S.A. / Canada 

EU 

(Except U.K.) 

Japan 

Taiwan 

Voltage 

120V 

230V 

100V 

110V 

NEMA 

TYPE 

NEMA 5-15 

CEE 7/7 

NEMA 1-15 

NEMA 5-15 

IEC Display 

Plug 


IEC Plug 

TYPE 

IEC320 C13 


Installing and Replacing Remote Control Batteries 


1. 

Open the battery compartment cover. 

2. 

Insert 2 new AAA batteries. 

3. 

Close the battery compartment cover. 

 
Warning:


Incorrect usage of batteries may cause leakage or explosion. 


Pay attention to the polarity when installing the batteries. 


Do not mix different types of batteries or new and used batteries.    Doing so may shorten the 
battery life or cause leakage. 


Remove or replace the batteries when they are empty in order to prevent acid leaking in the 
battery compartment. 


Do not touch the leaked substance from the batteries in case of a battery leakage.    Doing so 
may hurt human skin. 

 
Note:

 If the remote control is not going to be used for a long time, we recommend removing the 

batteries from the remote control. 

Summary of Contents for DI100ST2

Page 1: ...ual DI100ST2 Version 2 06 The use of diagrams and illustrations in the manual are for reference only The actual product may be different Product design and specifications are subject to change without...

Page 2: ...Control Batteries 6 Installation 7 Mounting 7 Wall Mounting 10 Connecting to a Power Source 10 Connecting an External Video Source 11 Input Output Terminals 12 Operating Instructions 12 Powering On O...

Page 3: ...can is firmly committed to its environmental protection efforts and we believe that reducing our products impact on the environment is of the utmost importance We are dedicated to meet the latest envi...

Page 4: ...g measures Reorient or relocate the receiving antenna Increase the separation between the equipment and receiver Connect the equipment into an outlet on a circuit different from that to which the rece...

Page 5: ...not use chemical liquids and unplug while cleaning Do not use extreme force or any sharp or pointed objects to touch the display Do not drop or allow any object to fall to the display Do not operate t...

Page 6: ...nd other particles Unplug the LCD immediately and contact a DynaScan certified service professional as soon as possible when any of the following situations occurs Damaged power cord or power plug If...

Page 7: ...S A Canada EU Except U K Japan Taiwan Voltage 120V 230V 100V 110V NEMA TYPE NEMA 5 15 CEE 7 7 NEMA 1 15 NEMA 5 15 IEC Display Plug IEC Plug TYPE IEC320 C13 Installing and Replacing Remote Control Batt...

Page 8: ...ers DynaScan recommends having certified professionals to evaluate the installation site and perform the mounting operation Do not to cover the vent and or the heat sink in order to ensure proper heat...

Page 9: ...king at the front of the display such that the left edge becomes the top edge Front Portrait mode Rotate the set clockwise 90 mandatory Rear Portrait mode Rotate the set counterclockwise 90 mandatory...

Page 10: ...d the outer edge of the LCD or video wall matrix from other objects to ensure proper ventilation For installations with screens inset into the wall refer to section Enclosures for cooling and ventilat...

Page 11: ...tion angle must be within 15 degrees of the vertical axis Do not install the wall mount while the power is turned on as it may cause serious injury from electrical shock Connecting to a Power Source U...

Page 12: ...Using the DP cable or HDMI cable provided insert one end into the DP IN or HDMI 1 IN HDMI 2 IN on the back of the display shown the in the diagram below Connect the other end of the DP cable HDMI cabl...

Page 13: ...DMI 2 IN Connect the HDMI output of a PC or an AV device via a HDMI cable H DP IN Connect the DP output of a PC or an AV device via a DP cable I Audio OUT Connect the audio signal output from Audio IN...

Page 14: ...erating Instructions Powering On Off the Display To turn on off the display press the power switch on the back of the display as shown in the diagram below NOTE The remote control only works when the...

Page 15: ...e left and right The IR receiver configurations of the model are shown in the figure below The operating range of the remote control is 2 5 meters 8 feet Ambient light may affect the performance of th...

Page 16: ...On Off MENU OSD On Off UP Move the cursor up or change the setting of selected item LEFT Exit the current selection RIGHT Select the highlighted item DOWN Move the cursor down or change the setting o...

Page 17: ...eypad ITEM DESCRIPTION MENU OSD On Off Power On Off UP Move the cursor up or change the setting of selected item DOWN Move the cursor down or change the setting of selected item LEFT Exit the current...

Page 18: ...he menu items The change of each setting can only enable when you press LEFT refer to p 15 to back to the last menu layer 1 Input Source ITEM 1 ITEM 2 DEFAULT DESCRIPTION Input Source Main HDMI 1 Set...

Page 19: ...djusts the Gamma value Native 2 2 2 4 and sGamma Black Level RGB Full Selects the black level to adjust the screen gray scale Limited for video source uses 16 to 235 levels for R G B such as HDMI RGB...

Page 20: ...cording to the ambient light When ambient light is bright the screen will adjust to the HIGH LEVEL brightness value set when ambient light is dark the screen will adjust to the LOW LEVEL brightness va...

Page 21: ...ntrol panel on the display or through the DynaScan Display Manager application Volume 100 Set volume Range 100 0 Reset to Default Setting Off Restore all settings to default Note It does not modify CU...

Page 22: ...he brightness of ambience monitoring Ambience Light Sensor Over Heat Protection Inactive It will enter into protection mode when the display internal temperature is over heat 65 C Brightness 75 67 C B...

Page 23: ...PECS Bezel Width T B L R 21 0 21 0 22 3 22 3 mm Cabinet Color Black Monitor Dimension LxHxD 2251 8 x 1285 1 x 89 3 mm Monitor Weight set package 93 kg 119 kg VESA Mounting Dimension 4 Holes 400x800 mm...

Page 24: ...resh Rate H Pixels V Lines 640 480 60 Hz 800 600 60 Hz 1024 768 60 Hz 1280 768 60 Hz 1280 800 60 Hz 1280 960 60 Hz 1280 1024 60 Hz 1366 768 60 Hz 1440 900 60 Hz 1600 1200 60 Hz 1920 1080 60 Hz 1920 12...

Page 25: ...Connected to 7 8 02 RXD 03 TXD 04 Connected to 6 05 GND 06 Connected to 4 07 Connected to 1 8 08 Connected to 1 7 09 NC RS 232 Input PIN No NAME 01 Connected to 7 8 02 TXD 03 RXD 04 Connected to 6 05...

Page 26: ...If yes content needs to be fixed Ensure resolution output of video signal is one of the recommended resolution types refer to section Input Mode p 22 The remote control does not work Check whether th...

Page 27: ...which can install the applications via USB flash drive storage SD card or Internet How to Switch to DSM365 Press the MENU button on either the rear panel control or remote control to show the OSD Use...

Page 28: ...DI100ST2 User Manual 27 ITEM DESCRIPTION APPS Show the Installed APPS SETTINGS Enter the setting menu...

Page 29: ...DI100ST2 User Manual 28 www dynascandisplay com Copyright DynaScan Technology Inc All Rights Reserved...

Reviews: