


6
Copyright © 2014 - 2022 by Dynamic Projection Institute GmbH. All rights reserved. http://www.dynamicprojection.com
Weights and dimensions shown are approximate. Specifications and appearance are subject to change without notice.
DMX OUT
DMX IN
ARTNET / LAN
RS 232
MENU
ENTER
AC OUT
AC IN
Mirror Head
Model: MHE01
DMX OUT
DMX IN
ARTNET / LAN
RS 232
MENU
ENTER
AC OUT
AC IN
Mirror Head
Model: MHE01
Art-Net™
Art-Net™
RS232
RS232
DMX
DMX Light Table
Power
Power
Power
Power
Media Server
Mirror Head control unit
Mirror Head control unit
Media Player
Projector
Projector
Video
Video
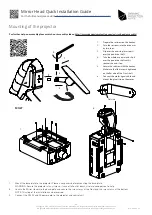
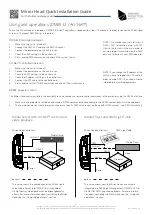
This setup shows the combination of the Mirror Head
and a Media Server (e.g. MDC-X) that is capable of
Art-Net control, video playback and optional geometry
effects. For more information about controlling the Mirror
Head see the „Using and operations“ section.
This setup shows how the Mirror Head can easily be
integrated into DMX-Light Management (DMX512-XLR or
Art-Net DMX512) and Media-playback. For more informa-
tion about controlling the Mirror Head see the „Using and
operations“ section.
Media Server with Art-Net™ control and
video playback
Media Player and DMX Light Table
optional
optional
Using and operations (DMX512 / Art-Net™)
To use the Mirror Head as intended, a DMX512/Art-Net™ controller is needed with at least 14 channels.
In order to control the Mirror Head
at least a 14 channel DMX Master is required.
DMX-512 controlled operation
1.
Make sure the unit is turned off.
2.
Connect the DMX XLR cable to the DMX-IN socket.
3.
Connect the power-cord so the unit turns on.
4.
Check the DMX settings in the control unit.
5.
Start sending DMX commands and check if the system reacts.
Art-Net
™
controlled operation
1.
Make sure the unit is turned off.
2.
Connect the power-cord so the unit turns on.
3.
Check the DMX settings in the control unit.
4.
Check the IP address settings in the control unit.
5.
Connect the CAT cable to the control board.
6.
Start sending Art-Net™ DMX commands and check if the system reacts.
RS232 projector control
The Mirror Head control unit offers the possibility to send some basic remote control commands to the projector using the RS232 interface.
1.
Make sure the projector is turned on and accepts RS232 commands corresponding to the RS232 compatibility list in the appendix.
2.
The commands are sent to the projector whenever a specific DMX value is sent on the specific DMX channel – see DMX fixture chart.
NOTE: It is maybe necessary to insert a
DMX / XLR termination plug (with 120
Ohm) in the last unit in the link in order to
ensure proper transmission on the DMX
data link – please ask your DMX operator.
NOTE: If you change the IP address of the
unit you have to replug the CAT cable in
order to avoid ARP / IP caching of some
intermediate switching equipment
QIG - Version 2.6
Mirror Head Quick Installation Guide
For the full manual please visit
http://dynamicprojection.com/mirror-head-assembly


