


2
Copyright © 2014 - 2022 Dynamic Projection Institute GmbH. All rights reserved. http://www.dynamicprojection.com
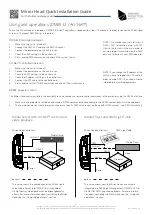
Weights and dimensions shown are approximate. Specifications and appearance are subject to change without notice.
Introduction
Thank you for having chosen a Mirror Head unit. If you follow the instructions given in this Quick Installation Guide, we are sure you will enjoy this device for
a long period of time.
For your own safety, please read this document carefully before you initially start-up.
Every person involved with the installation, operation and maintenance of this device has to:
-
be qualified
-
follow the instructions of this manual
-
consider this manual to be part of the total product
-
keep this manual for the entire service life of the product
-
pass this manual on to every further owner or user of the product
-
download the latest version of the user manual from our website
Warning and Safety Information
NOTE: Damages caused by the disregard of this user manual are not subject to warranty. The dealer will not accept liability for any resulting defects or problems.
Never look directly into the light source of an attached projector!
Keep away children!
There are no user serviceable parts (fuse) inside this unit.
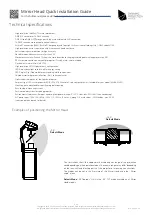
The Mirror Head is is a projector add-on device for creating decorative effects. This product is only allowed to be operated with:
-
the voltage labeled on the device
-
the projector that the product is specified for
-
the original accessories and add-on parts
The device is designed for indoor use only. This device is designed for professional use only.
Save the carton and all packing materials. In the event that a fixture must be returned to the factory, it is important that the fixture be returned in the original
factory box and packing with all safety clamps mounted.
The installation must always be secured with a secondary safety attachment, e.g. an appropriate catch net. This secondary safety attachment must be
constructed in a way that no part of the installation can fall down if the main attachment fails.
WARNING: OVERHEAD RIGGING REQUIRES EXTENSIVE EXPERIENCE, including (but not limited to) calculating working load limits, installation material
being used, and periodic safety inspection of all installation material and the device. If you lack these qualifications, do not attempt the installation yourself, but
instead use a professional structural rigger. Improper installation can result in bodily injury and or damage to property.
CAUTION: Never project directly onto people or animals - the light of the projector can cause blindness.
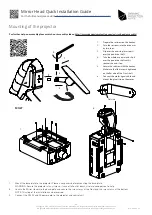
Before starting to mount the Mirror Head make sure:
-
the installation-spot is suited for the Mirror Head.
-
the mirror can move freely.
-
there are no vibrations by ventilation systems of any kind.
-
all screws are secured.
WARNING: The Mirror Head and the projector can be very heavy – use a second person for help
NOTE: This device is only allowed for an installation via the original mounting brackets, clamps or stands.
NOTE: The manufacturer cannot be made liable for damages caused by incorrect installations, unauthorized parts or insufficient safety precautions!
In case you have questions about our product or need support during assembly and installation please contact our support!
Dynamic Projection Institute, Herstellungs und Vertriebs GmbH
Herzgasse 9 / 5, A-1100 Vienna
Email: [email protected], Web: www.dynamicprojection.com, Phone: +43 1 996 2028 (Mon. – Fri. 9:00 – 18:00h)
Commercial Register: FN400806x
QIG - Version 2.6
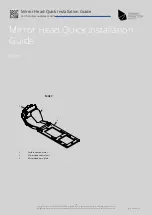
Mirror Head Quick Installation Guide
For the full manual please visit
http://dynamicprojection.com/mirror-head-assembly


