background image


8


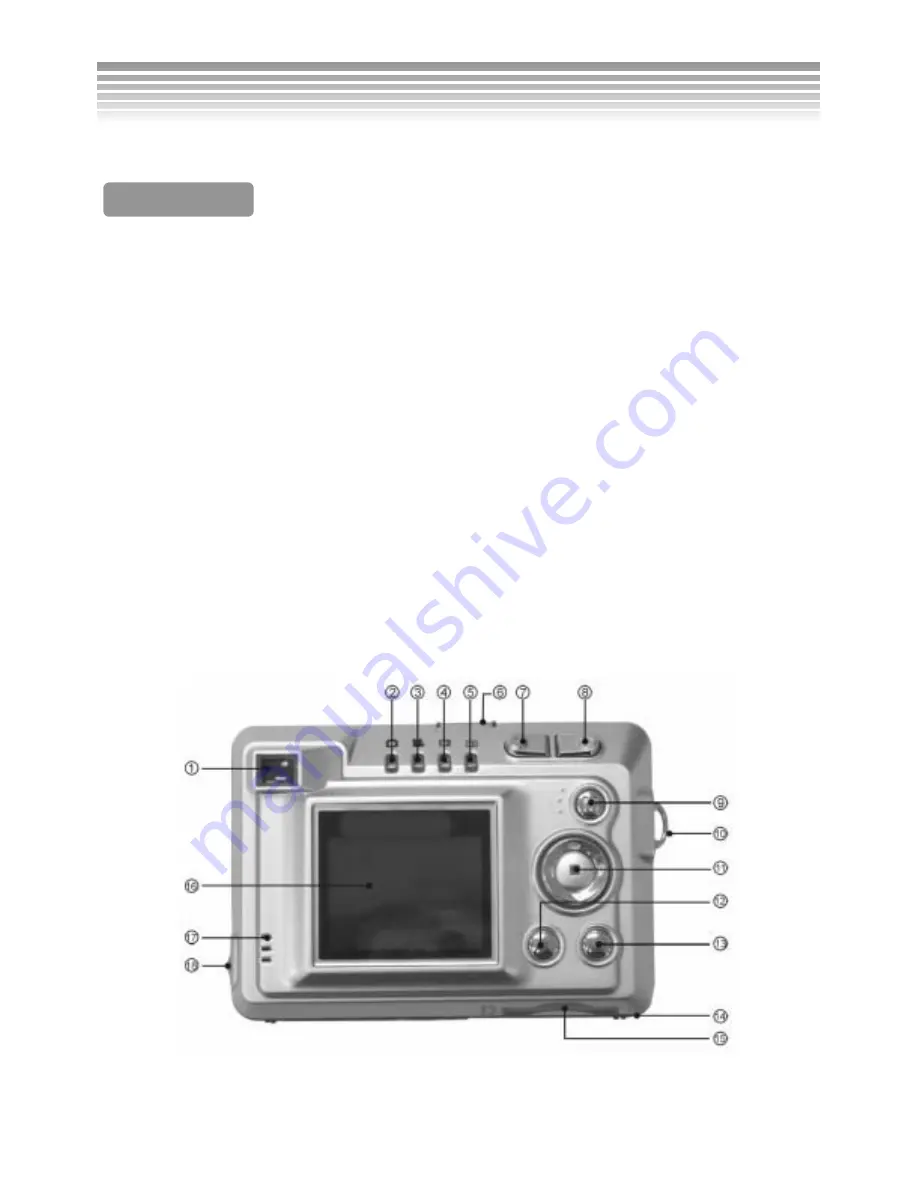
(1)


Viewfinder  

(2)


Photo Mode 

(3)


Video Mode 

(4)


Review Mode 

(5)


Setup Mode 

(6)


Power Switch 

(7)


Reduction Key 

(8)


Magnifier Key 

(9)


Mode dial 

(10)


Wrist Strap Buckle   

(11)


Confirm/Function Button 

(12)


Flash Button 

(13)


Menu button 

(14)


Battery Cover 

(15)


Memory Card Slot 

(16)


LCD Screen 

(17)


Speaker 

(18)


USB/TV-OUT Slot 


Back View


Digital Camera Overview 

(Continued)


Summary of Contents for DXG-502

Page 1: ...1 DXG 502 User s Manual ...

Page 2: ...ory Card 11 Using the Built in Memory 13 Adjusting the Wrist Lens Straps Turning on the Camera and Lights Power 15 Battery Capacity Meter 15 Lights 16 Setting the Date Time and Language Setting Date and Time 17 Setting Language 17 Basic Operations LCD Monitor 18 Info Hint 18 Description of Button Functions 19 Menu 19 Setup Mode Advanced Settings 20 Menu Index 21 Photo Mode Auto Mode 25 Manual Mode...

Page 3: ... 37 Off 38 Black and White 38 Vivid 38 Sepia 38 Advanced Settings 38 Self Timer 38 Burst Number of Pictures in Succession 38 Self Portrait Flash Unit 38 Sound Effect of Shutter 38 Menu Index 39 Video Mode Recording Videos 44 Description on Menu 45 Image Resolution 45 White Balance 45 Record 45 Menu Index 46 Review Mode Picture 47 Video 49 Thumbnail Display 49 Playing Video 50 Picture Magnification...

Page 4: ...e Show 55 DPOF 55 Setting Single 55 Setting All 55 Direct Printing 55 Printing a Single Picture 55 Printing All Pictures 55 Paper Size 55 Menu Index 56 Printing Notices 62 PC Mode Removable HDD Hard Drive 63 Data 64 Video Out Installing the Software Installing the Software on a PC 66 Installing Application Programs Installing Application Programs on a PC 68 Appendix Product Specifications 72 Syste...

Page 5: ...formance improvisation or exhibit even for personal use Any transfer of pictures or memory card data must be conducted under the constraints of copyright law LCD Liquid Crystal Display Monitor Notes on the LCD Liquid Crystal Display monitor Be extra careful with the LCD monitor If it is damaged and begins to leak do the following 1 If the liquid touches the skin wipe the skin dry with a cloth and ...

Page 6: ...nitor or viewfinder surface is dirty use a lens brush or soft cloth to wipe it clean Do not touch the lens with your fingers 2 To avoid scratching the lens LCD monitor or viewfinder surface do not use any hard or abrasive object to touch the camera 3 Do not use any detergents or volatile solutions to clean the camera This may harm the camera and or paint Use a soft cloth only Precautions ...

Page 7: ...ents Please contact your dealer right away in case of any item missed 1 Digital Camera 2 User Manual 3 Wrist Strap 4 Lens Cap 5 USB TV OUT CABLE 6 Camera Leather Case 7 Software CD 8 AA NiMH Batteries x2 with Charger Package Contents ...

Page 8: ...cape before turning on the camera Refit the cape when the camera is powered off to protect the lens and keep dust out USB Cover Open the USB cover which has a slot for both USB and TV Out cables Front View 1 Self timer Programmer Timer 2 Shutter Button 3 Flash 4 Image Sensor 5 Viewfinder 6 Lens Digital Camera Overview ...

Page 9: ...de 6 Power Switch 7 Reduction Key 8 Magnifier Key 9 Mode dial 10 Wrist Strap Buckle 11 Confirm Function Button 12 Flash Button 13 Menu button 14 Battery Cover 15 Memory Card Slot 16 LCD Screen 17 Speaker 18 USB TV OUT Slot Back View Digital Camera Overview Continued ...

Page 10: ...s For details please refer to menu descriptions in each mode Flash Button There are six selections for the flash mode Refer to the flash setting for greater detail Multiple Controller Besides the menu selection the Multiple Controller has a quick function Select Hint of Info in the Info to read the function of each button Zoom Button The Zoom button is used to adjust the size of the subject Digita...

Page 11: ...ttery cover Slide the battery cover in the direction of the arrow and lift it open as shown Follow the instruction labeled on the inside of the battery compartment door and insert the batteries as indicated To avoid any possible damage be gentle when opening and closing the battery compatment Battery Usage ...

Page 12: ... Memory Card Turn the digital camera off and follow the instructions below Orient the memoray card as shown and insert it into the slot Press the memory card in all the way Gently push the card in and it will eject automatically Pull the memory card out as shown Memory Card and Built in Memory ...

Page 13: ... into a memory card socket too much force could cause damage If the memory card is unreadable wipe its metal side with a soft dry cloth and install it again Make sure to unlock the memory card before inserting Otherwise the camera will display an icon and be unable to save images Notice Use FAT16 or FAT32 when formating the memory card with PC Memory Card and Built in Memory Continued ...

Page 14: ...e to function Contact the memory card company for repair or replacement The memory card slot is damaged and unable to read data Contact the dealer for repair or replacement Usage of Built in Memory When the memory card capacity is full the camera s built in 16MB flash memory offers a temporary space for storage Due to internal firmware storage the actual memory capacity is slightly less than 16MB ...

Page 15: ...f the strap through the other and tighten it Put the lens strap through the lens strap post Pull the other end of the strap through the other side of the lens strap post and tighten it Put one end of the lens strap through the camera strap post Finally pull the lens cap through and tighten it Adjusting the Wrist Lens Straps ...

Page 16: ... seconds after entering the mode Low The icon changes to yellow and remains Exhausted The icon changes to red and keeps blinking This camera features a power saving mode it switchs off automatically when there is no action within a preset time Please refer to the Setup mode Power Saving for details When replacing batteries the date and time need to be reset Other settings of the menu will be resto...

Page 17: ...hoto Mode or Video Mode Programmer Timer Four lights change and blink Blink When turning on the camera it blinks When using the self timer it blinks Low battery level adversley affects the recharge of the flash Use fully charged batteries for best results The camera cannot opperate under a certain power level Use fully charged batteries to make sure the camera doesn t shut off Turning on the Camer...

Page 18: ... on pictures Be sure to set the correct date and time before taking pictures Please refer to Setup Mode on page 21 for more details Setting Language Select the language of your choice the options include English Traditional Chinese French German Italian Japanese and Spanish Setting the Date Time and Language ...

Page 19: ...s normal that the LCD screen looks darker under direct sunlight or bright light Info Hint Press the button to enter the Info page Press the botton again to provide a Hint that offers descriptions of functions of buttons For example Current status of settings Description of each active function Basic Operations ...

Page 20: ...o Video Review Modes press the button to enter the Mode Menu for relevant settings Icons Description Center of the Multiple controller Up down left right of the multiple controller Flash Button Menu button Zoom button Zoom in Zoom out Sound Recording Mode Sound Recording Menu Set Enter Delete Back Increase Decrease Play Stop Volume Print Basic Operations ...

Page 21: ...s you to display pictures videos on the camera screen or TV Use this option to tranfer images to a TV Advanced Settings Button audio Activates the sound effects when buttons are pressed Startup Light Activates the front LED light effect when the camera is turned on Four options are available OFF Effect 1 Effect 2 and Effect 3 Startup Sound Offers an opening sound effect when turning the camera on ...

Page 22: ...21 Menu Index Setup Mode Continued ...

Page 23: ...22 Setup Mode Continued ...

Page 24: ...23 Setup Mode Continued ...

Page 25: ...24 The selected picture will be saved to become the startup picture Setup Mode Continued ...

Page 26: ...de dial to switch to the Photo Mode The Photo Mode has following options Auto Manual and Scene Mode Auto Mode Icon Description Focus Zone Information on the current settings Indication of the current mode Photo Mode ...

Page 27: ...ry Built in memory half full Built in memory full red light blinks Burst Mode Number of pictures Self Portrait Number of pictures taken Maximum number of pictures Flash Mode Portrait Mode Effect Mode Time and date This icon disappears 5 seconds after entering the mode Info Battery Info Optical Zoom Digital Zoom Image Resolution Picture Quality Photo Mode Auto Photo Mode Continued ...

Page 28: ...27 Manual Mode Icon Description Focus Zone Information on the current settings Indication of the current mode Photo Mode Continued ...

Page 29: ...pictures Flash Mode Portrait Mode Effect Mode Time and date this icon disappears 5 seconds after entering the mode Info Battery Info Except for other sttings are the same as in the Auto Mode Optical Focus Digital Focus Image Resolution Picture Quality White Balance EV Compensation Metering Mode ISO Sensitivity Photo Mode Continued ...

Page 30: ...ene Mode Icon Description Focus Zone Information on the current settings Indication of the current mode Photo Mode Scene Mode Except for other resttings are the same as in the Auto Mode Photo Mode Continued ...

Page 31: ...preference Please refer to Picture Quality Auto The Auto Mode offers users a simple fast capture mode Except for Image Resolution and Picture Quality other settings are default values which cannot be adjusted Eg White Balance Exposure Compensation Metering ISO and Focus Selection will be modified automatically by the camera This setting is suitable for most users Manual The Manual Mode offers sett...

Page 32: ...om 3X Optical Zoom and 4X Digital Zoom Activate the Flash when there are insufficient light sources refer to the Flash Mode for details Refer to the Review Mode for viewing the pictures LCD Screen Use the key to switch screen display types Standard Screen LCD screen turned off Optical Zoom Digital Zoom Use the Zoom button to zoom out in on the subject This camera has a maximum 12X zoom 3X Optical ...

Page 33: ...to Flash is suitable for portraits Forced Flash plus Red Eye Reduction Always flashes with red eye reduction flash Slow Sync Keeps the shutter open longer Used at night and in low light to lighten the background and foreground A tripod is advised Burst Self Portrait Close up Use the button to switch among Burst Self Portrait Close up Mode Continuous Photography Mode When entering the Burst Mode th...

Page 34: ...atically Close Up Mode Macro The icon appears on the right side of the screen when entering the Close Up Mode or Macro Mode Take pictures with short distance under the following ranges Mode Icon on the screen Description Close Up An ideal close up picture will be shot within 6 20 inches Basic None For general picture taking a suitable shooting distance ranges from 20 in to infinity the picture wil...

Page 35: ...s for White Balance Exposure Compensation Metering and other functions are set at default values and cannot be adjusted in these scenes Choose the scene according to your preference Press the button to enter the Quick Menu and choose the scene The twelve scenes are described below Portrait For people and other subjects in the daytime Landscape For landscapes in the daytime The Focus is set at dist...

Page 36: ... in the second photo the button should be pressed within 3 seconds otherwise the camera shoots automatically as soon as the timer counts down to zero Fireworks For taking pictures of fireworks at night Focus is set at a distance with a slower shutter speed To avoid blurred images use a tripod Copy For duplicating images Backlight For taking pictures of subjects with bright light behind them Sports...

Page 37: ...e you ever wondered why pictures taken indoors sometimes come out looking yellow The reason is that different lighting sources produce different colors of light a flash bulb produces a very white light while a 100 watt incandescent bulb produces a very yellow looking light Our brain automatically adjusts the color so that a white object always appears white regardless of the lighting condition but...

Page 38: ...t photography Spot Metering This measures a spot in the center which is about 1 25th of the viewfinder s area to determine the exposure of the entire image Spot Metering is suitable for extremely bright and dark backgrounds Auto Focus Metering This metering technique is applied to the current focus zone ISO ISO is the speed of the camera s response to light Use a higher ISO setting in low light sc...

Page 39: ...n time from 2 sec to 10 sec The default value is 10 sec Burst Number of Pictures in succession Choose this to set the Burst Mode and number of pictures taken in succession from 3 to 5 pictures The default value is 5 Self Portrait Flash Unit Use this to set the Self Portrait mode and the front light effect which has three modes available Sound Effect of Shutter Use this to set the sound effect when...

Page 40: ...39 Menu Index Record Mode Photo Mode Continued ...

Page 41: ...40 Advanced Settings Photo Mode Continued ...

Page 42: ...41 Photo Mode Photo Mode Continued ...

Page 43: ...42 Photo Mode Twelve built in scenes are provided Photo Mode Continued ...

Page 44: ...43 Advanced Settings Photo Mode Continued ...

Page 45: ...The length of video recording is subject to the memory capacity as well as the image resolution and quality Video clips with higher resolution and quality will take up more memory Icon Description Video Mode Status of Memory Card Audio Recording Status Number of Videos Recorded Time of Video Recorded Time and Date This icon disappears 5 seconds after entering the mode Info Battery Info Optical Zoo...

Page 46: ...ant to review the video check the Review Mode Please refer to Review Mode Descriptions on Menu Use the Menu button to display hide the menu The following are descriptions Image Resolution Three picture quality options are available Best Standard and Basic The difference is the video compression ratio For example has the highest compression ratio It takes up the least memory but has the lowest pict...

Page 47: ...46 Menu Index Video Mode Continued ...

Page 48: ...ch to Review Mode View pictures and videos in the Review Mode Icons on the screen and functions vary depending on the file format Picture Icon Description Current picture information Information about the current mode Review Mode ...

Page 49: ...g this mode changes to Magnification Mode Recording Info Battery Info Image resolution for photos White Balance for photos The picture contains audio recording time Exposure compensation in photos Metering mode in picture taking ISO in photos Where there is no file stored in the memory a No File message will appear on the screen and you cannot access the selection menu Review Mode Continued ...

Page 50: ... button to display that picture video in full size Icon Description Review Mode Protect Mode Current file format Video Current file index Total file number Video Recording Time Date and Time 5seconds after entering this mode this changes to Video Review Volume Adjustment Info Battery Info Review Mode Continued ...

Page 51: ...nification Mode In the Magnification Mode press the buttons to zoom in out the picture The magnification value is displayed on the upper left You can also use the buttons to navigate and zoom into different parts of the picture The maximum magnification value depends on the image resolution of the picture Pictures with higher resolution can have a larger magnification value To exit the Magnificati...

Page 52: ...he button to record the audio record of the picture Press the button to stop recording The red framing mark becomes smaller when increasing the magnifaction value When the memory is full the text blinks and the camera stops recording Review Mode Continued ...

Page 53: ...ying the Audio Record Press the button to play the audio file in the Play Delete Mode the audio recording time is shown on the upper right of the screen To stop playing press button Deleting the Audio Record In the Play Delete Mode you can delete the audio records of pictures Press the button to delete the audio record and record another one with the picture NOTE the record can not be restored onc...

Page 54: ...udio record press the button to adjust the volume either before or during playback Press the or buttons to adjust the volume the lowest volume is mute Before playing audio record Playing audio record Before video is playing While video is playing Review Mode Continued ...

Page 55: ...de the icon on thescreen including two sub options this differs on whether the file has been selected for protection as shown below Single Protection when the selected file has not been set for protection Single Protection Remove when the selected file is set for protection To return to the menu select and press button All Protection Remove Protection All Protection All the pictures videos on the ...

Page 56: ...an equal printing number for all of the pictures and whether the date stamp is printed or not The operation is the same as that of setting a single picture Direct Printing This setting enables a direct print out of your pictures by connecting the camera with a printer through the USB cable The printer must support the Direct Printing function Printing a Single Picture For printing one selected pic...

Page 57: ... Menu Index Deletion If the selected file has been set for protection it shows Single Protection Single Protection Remove All Protection Remove Protection Slide Show Direct Printing Review Mode Continued ...

Page 58: ... and cannot be deleted The icon blinks Select Previous Next Come back after 0 5 seconds After the second picture is deleted the original third picture becomes the second and the total file number decreases by one Review Mode Continued ...

Page 59: ...58 Single Protection Single Protection Remove Displays this message if the protection of a single file is removed All Protection Remove Protection Review Mode Continued ...

Page 60: ...59 Slide Show This message appears when entering the Slide Show DPOF Direct Printing Mode with only videos but no pictures on the memory card Starting the Slide Show Review Mode Continued ...

Page 61: ...60 Skip over it if the second file is a video Direct Printing Before connection Connect the camera with a printer that supports Direct Printing Connection OK Review Mode Continued ...

Page 62: ...61 The following options show up only when the printer supports these functions Current Picture Total File Number Skip over a picture file Review Mode Continued ...

Page 63: ...tart the camera If the screen displays one of the following messages there might be a problem with the printer Examine the printer status Often the problems are the result of the printer being Out of Paper Out of Ink Using Mismatched Paper Size For other un correctable printer errors please contact the printer manufacturer Review Mode Continued ...

Page 64: ...y card to your PC or from the PC to the memory card When the camera screen goes dark you can operate directly from the PC Once the USB connection is removed restart the camera to resume operation Plug in the USB cable connecting the camera with your computer When memory card is inserted all of the operations will be based on the data on the memory card If you want to use the internal memory simply...

Page 65: ...der reach DATA9999 the camera will automatically make a new folder named 101DGCAM where new pictures videos and audio files will be saved When the file index reaches 9999 again it will repeat this process again Picture Video If the upload file cannot be opened the file format is probably not compatible with the camera PC Mode Continued ...

Page 66: ...o cable provided to connect the camera with the televsion Switch to the Setup Mode enter under Display and press the button When the camera LCD turns off the television will receive the data and display the images You can then use the camera as usual Remember to switch the display back to the camera screen before disconnecting the video cable or the camera screen will remain off Because of differe...

Page 67: ...m will be executed and the welcome screen will appear with the following message If your CD ROM drive doesn t support the auto run function please double click on the My Computer icon on the desktop Then double click the CD ROM drive icon and click the Driversetup Setup exe file in the root directory 3 Select the desired language of setup program you wish to install 4 Click on Driver Install and t...

Page 68: ...7 6 Click Next to continue the setup program 7 After the installation is completed the following screen will appear Click Finish to complete the application installation Installing the Software Continued ...

Page 69: ...ear the following message If your CD ROM drive doesn t support the auto run function please double click on the My Computer icon on the desktop Then double click the CD ROM drive icon and click the MP38 Setup exe file in the root directory 3 Select the desired language of setup program you want to install 4 Click on the NewSoft Video works Install the following screen will appear 5 Select the desi...

Page 70: ...al Disclaimer and continue the installation 7 After entering the application setup screen click Next to continue 8 Press Yes to accept the conditions of Software License Agreement and continue the installation Installing Application Programs Continued ...

Page 71: ...d to select the folder location 10 Select the program folder name and click Next to continue 11 Click Yes to accept the conditions of the Software License Agreement and continue the installation Installing Application Programs Continued ...

Page 72: ...ick Finish to complete the application installation 13 The Windows Media application has been installed successfully Click OK to continue 14 Go to DirectX9 for setting and click Set after confirmation Installing Application Programs Continued ...

Page 73: ...X Optical Zoom Digital Zoom 4X Digital Zoom Flash mode Off Forced Flash Auto Flash plus Red Eye Reduction Forced Flash plus Red Eye Reduction Slow Sync Flash Effective Range 2 6 feet Photo Mode Auto Manual Scene EV Compensation 2 0EV 2 0EV 20 options White Balance Picture Auto Daylight Tungsten Cloudy Fluorescent Movie Auto Indoor Outdoor Metering Mode Matrix Metering Center Weighted Metering Spot...

Page 74: ...imensions 3 5 x 2 48 x1 58 Weight 5 29 ounces without batteries System Requirements Please refer to the minimum system requirements when operating the digital camera Better computer equipment is strongly recommended for achieving better performance The minimum system requirements are as follows OS Windows 98SE Me 2000 XP CPU Pentium 166MHz or higher Memory 32 MB memory or more CD ROM 4X and above ...

Reviews: