background image

31 


White Balance


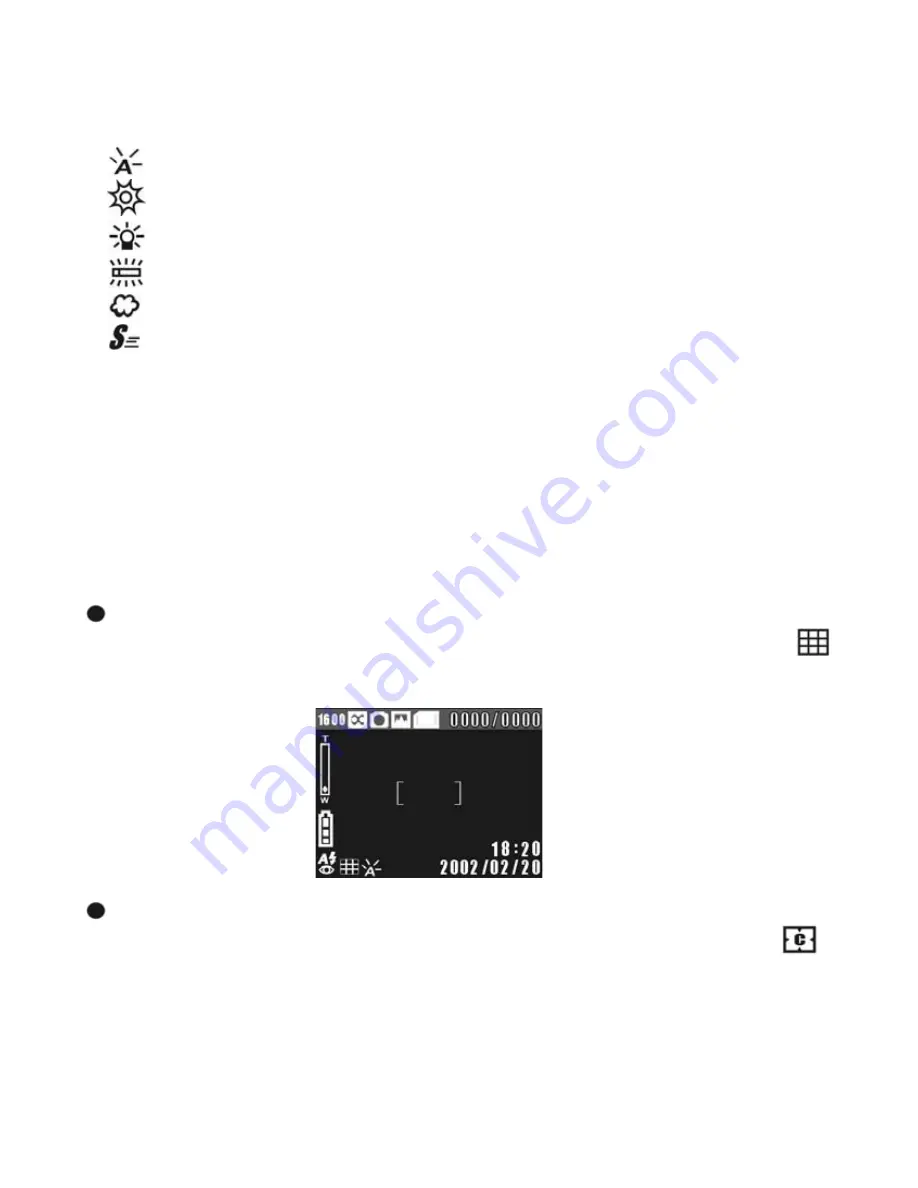
There are six white balance settings in the Still mode: 
 

Auto: Automatic. For general-purpose photography. 

Sunny: For shooting outdoors on sunny days. 

Bulb: For indoors with fluorescent lighting. 

Neon: For indoors with tungsten lighting. 

Cloudy: For outdoor scenes with cloudy or overcast skies. 

Speed: For shooting fast-moving objects. 

 
For more information on White Balance. 


EV Compensation


The EV compensation can be adjusted manually from -2.0EV to +2.0EV. It is 
divided into 9 steps. 


Metering Mode


The DV camera provides four metering modes: 


  Matrix metering: the picture area is divided into sections. The light 

metering system will evaluate the best-suggested exposure values. The 


indicator displays in the lower left corner of the LCD display.   


  Center-weighted metering: measures the entire image area but 

calculates the exposure by emphasizing the center of the image. The 


indicator is displayed in the lower left hand corner of the LCD display. This 
mode is well applicable to portrait photography. 


Summary of Contents for DXG-301V

Page 1: ...Ver 2 0 July 2004 DXG 301V Video Camera User s Manual ...

Page 2: ...r 8 LCD 9 Batteries 10 AC Adapter 11 Memory Internal vs External Memory 12 Memory Card Use 12 Memory Card Handling 13 Troubleshooting 14 Wrist Strap 15 Using Your Camera Power and LED Indicators 16 Practice 17 Setup Date and Time 20 Language 20 Setup Menu Navigation 21 Video Video Indicators 23 Recording Video 24 Display Toggle 25 Resolution 25 Quality 25 Contents ...

Page 3: ...1 Metering 31 ISO 33 Still Menu Navigation 33 Viewing Videos and Photos Camera Playback Playback Indicators 35 Display Toggle 36 Thumbnails 36 Volume 36 View Photos 37 View Videos 37 Delete 37 Protect Unprotect 37 Slideshow 38 DPOF 38 Removable Device 38 Playback Menu Navigation 39 TV Out 44 Camera Driver 46 Applications 47 File Transfers 49 Appendices A Specifications 50 B System Requirements 51 ...

Page 4: ... the manufacturer s responsibility and no compensation will be given for it Copyright information Unless agreed to by the owner all pictures taken with this camera should not be used in violation of copyright law Moreover when restrictions are in place you may not record any live performance improvisation or exhibits even for personal purpose Any transfer of pictures or use of memory card with dat...

Page 5: ...y environments Do not open the battery cover when the power is on Always turn the power off first to avoid damage to sensitive electronic circuits If water gets into the camera turn the power OFF and remove the batteries immediately Basic care 1 If the lens LCD display or viewfinder surfaces become dirty use lens brush or soft cloth to clean Do not touch the lens with fingers 2 Avoid scratching th...

Page 6: ...e the following items are inside If anything is missing or damaged please contact your vendor immediately 1 DXG 301V Camera 4 AA Alkaline Batteries x 4 7 AC Adapter Optional 2 USB Cable 5 Software CD incl Camera Driver 3 TV OUT Cable 6 User s Manual Contents ...

Page 7: ...to take a picture or to start recording a video First you must press the Power button Menu button Top Press the MENU button in the Still Video and Playback modes and the operation menus for each of these modes appears on the LCD display Flash button Top Press the button to toggle between flash modes Getting to Know Your Camera ...

Page 8: ...utton 11 Flash Button 5 Fast Rewind 12 MENU Button 6 LCD Display 13 Shutter Button 7 SD Memory Card Slot DISPLAY button Press this button to toggle between display modes RWD PLAY STOP and FWD buttons In the Playback mode press these buttons to reverse play stop forward In the Still mode the PLAY STOP button acts as the Self timer button ...

Page 9: ...C in Jack 3 Connector Cover 7 Mode Buttons 4 TV OUT Port 8 Power Button Multi Select Button Use this button to access the menus and perform digital zoom and volume adjustment Mode Buttons Press these buttons to switch to Video Still Setup and Playback modes ...

Page 10: ... The rotation directions and stop positions of the LCD display are as follows Open Clockwise 90 degrees clockwise Counterclockwise Counterclockwise 90 degrees counterclockwise 180 degrees counterclockwise Do not rotate the LCD display past its stop positions ...

Page 11: ...f fresh batteries on hand See AC Adapter section for using an AC adapter as an alternative power source Loading Batteries Press the battery cover latch Slide the battery cover open as indicated by the arrow Insert the batteries as indicated on the inside cover Close and lock the battery cover Batteries Opening and closing the cover roughly may damage battery cover ...

Page 12: ... in jack on the camera Connect the other end to an electrical outlet The following product has been tested and approved for use at the 5V setting Brand RadioShack Product Digital Camera Power Adapter Catalog 273 1696 Model 273 1696 AC Adapter Make sure the AC adapter is accordance with the above specifications to avoid causing damage to the camera This camera cannot be used as a battery charger Do...

Page 13: ...ted actions you perform will use the 16MB internal memory Be careful cards are very small and easily lost Memory Card Use Please format memory cards in the camera prior to first use Doing so will ensure the memory is formatted for this particular camera model If you want to use a memory card from a different camera offload the files to a secure location such as to your computer s hard drive or ont...

Page 14: ...attery cover open as indicated by the arrow Insert the memory card as indicated by the arrow Removing Turn the camera off Slide the battery cover open as indicated by the arrow Push the memory card down gently and the memory card will pop up Withdraw the memory card ...

Page 15: ...r for assistance If the card does not work use a different card you have formatted in the camera Please do not simply assume the camera is not working properly Check the memory card by testing it in other devices before calling for support Most often it is the card or card use at fault and not the camera Use only SD or MMC 4MB 512MB memory cards Never force a card Re orient the card and try insert...

Page 16: ...15 To adjust the wrist strap Open the wrist strap pouch Adjust the wrist strap to fit your wrist Close the wrist strap pouch Wrist Strap ...

Page 17: ...he front of camera and the Status LED located in the rear of camera Status Meaning Red Blinking Busy Status LED Green On Camera on and in standby Self timer LED Red Blinking Self timer activated Blinks rapidly for 3 seconds prior to flash Power On and LED Indicators Without user input the camera will turn OFF automatically default 3 minutes You can select idle off times See Setup ...

Page 18: ... batteries will last around 1 5 hours of typical continuous use Keep spare batteries handy at all times Format New Memory If you have a new memory card or a card that has been used in a different camera skip ahead to Step 4 and return to Step 1 below and start practicing Turn the Power on Start Practicing Record a Video 1 Turn on the camera by pressing the round button as illustrated You are now i...

Page 19: ... 3 Press Shutter Button halfway down wait a few seconds for the camera to stop whirring as it adjusts focus and then fully depress the Shutter Button You have just taken a photo 4 Optional Step Change Photo Settings When in Still Mode change picture taking settings by pressing the Menu Button Note that the camera only starts up in Video Mode You can switch back to it at any time by pressing the mo...

Page 20: ... using the Multi Select button s arrows Warning SELECTING THIS FUNCTION WILL ERASE IMAGES on the card If you have recorded anything worth saving transfer files first Refer to FILE TRANSFER SECTION 2 Select Format using the square Enter button to format 3 Use arrow buttons and enter button to answer yes to the series of questions to affirm the fact you want to format Why Reformatting the memory hel...

Page 21: ... and time for your location before using the camera Refer to the Setup Mode section for more information Setting the Language Select the preferred language for displaying information on the LCD display There are 7 language options English Chinese Traditional Japanese German French Italian and Spanish Press the SET button to enter Setup mode Setup ...

Page 22: ...21 Setup Menu Navigation ...

Page 23: ...you back up important data from the memory card before formatting Formatting the memory card internal memory will permanently erase all stored data The Frequency option helps to prevent image quality loss caused by 50Hz or 60Hz AC power interference USA 60Hz Selecting the Reset option restores the factory default values The default display language is English ...

Page 24: ...ecording Image resolution White balance Image quality Video files count Video mode Date Time Audio Enable audio recording Disable audio recording Digital zoom Memory status Card full Card half full Card empty Card protected Internal memory full Internal memory empty Remaining battery power Full Medium Low Very low Video length Recording status animation Video ...

Page 25: ...mode which offers a faster frame rate than VGA Turn on the camera The camera starts up in video mode Press and release the shutter button on the top of the camera to begin taking a video The movie camera indicator will show on the LCD display Frame the scene using the LCD display then press the Shutter Button to start recording The counter starts in the upper right of the LCD display Press the Shu...

Page 26: ...dio Voice Use this option to enable or disable audio recording Select ON to enable the audio recording and select OFF to disable White Balance WB White object looks white to human eyes no matter under what lighting conditions sunny cloudy and bulb lighting However for digital video cameras there are different white colors under different lighting conditions because RGB value varies for each kind o...

Page 27: ...26 Outdoor For outdoor sunny day photography See White Balance section Video Menu Navigation Press the MENU button camera top to show hide the menus ...

Page 28: ...alance Image Quality Metering Mode Record Mode Flash Status Scene Mode Digital Zoom Memory status Card full Card half full Card empty Card protected Internal memory full Internal memory empty Battery Power Levels Full Medium Low Very Low Recorded images Total Images Self Timer Mode Date Time Self Timer Countdown Still Photos Focus Area ...

Page 29: ...each image resolution varies from shot to shot To take a picture Turn on the camera Press the button nearest the still camera icon to switch to Still mode The Still mode indicator shows on the LCD display Select the preferred image setting and quality level Compose the picture on the LCD display and press the Shutter Button Press the Shutter button halfway down and the camera adjusts its focus Whe...

Page 30: ...l in of people in bright light Slow Synchronize For taking pictures of night scenes or in dark lighting Tripod use recommended Self Timer Mode See page 7 Playback Stop Self timer Button When the self timer is enabled the preset time 10 seconds and self timer mode indicator is displayed on the LCD display The self timer LED blinks Image Resolution There are three resolution settings for taking stil...

Page 31: ...scenes such as beaches snowfields or lakes Sunset For sunrise and sunset scenes Night P For night photographs of people Night L For night landscapes scenes Fireworks For firework displays faster shutter speeds Close up Close up macro photography Copy Photographs of text or printed matter Backlight Photographs where light sources are behind the subject Manual Mode White balance EV compensation mete...

Page 32: ... EV compensation can be adjusted manually from 2 0EV to 2 0EV It is divided into 9 steps Metering Mode The DV camera provides four metering modes Matrix metering the picture area is divided into sections The light metering system will evaluate the best suggested exposure values The indicator displays in the lower left corner of the LCD display Center weighted metering measures the entire image are...

Page 33: ...are frame is displayed in the center and indicator appears at the lower left side of the LCD display This mode is best applicable to objects with very bright or dark backgrounds Auto focus area the metering system only focuses on the current focus area and the indicator is displayed on the lower left of the LCD display Metering area Focus area ...

Page 34: ...d When you increase the sensitivity the shutter speed is faster and the exposure value is reduced The DXG 301V camera provides four ISO settings Auto 100 200 and 400 100 is equivalent to the ISO 100 film 200 is equivalent to ISO 200 film and so on Still Mode Setup Navigation In Still mode press the MENU button to show hide the Still setup menus ...

Page 35: ...34 ...

Page 36: ...ed files count Battery power Full Medium Low Very Low Image video recorded date and time Audio enabled disabled status Previous next image video Length of recorded video Image video indicator Video play stop indicator Playback If there is no image videos stored in the internal memory or memory card a blinking NO File message will appear on the LCD display ...

Page 37: ...nail images After entering the thumbnail display mode press the left arrow right arrow to select the previous next image video press the up arrow down arrow to select the previous next page After selecting the image video press the center to view the result Adjusting Volume Press the up arrow down arrow to increase or decrease the volume If no operation is carried out for three seconds the operati...

Page 38: ...tton to fast rewind the video Delete Use the Menu button on the camera s top to access the menu to delete unwanted images videos Use the Multi Select button to navigate the display see page 41 for guidance NOTE The deleted images videos cannot be retrieved You must first remove protection before deleting images videos Protect Unprotec Set protection to avoid accidentally deleting important images ...

Page 39: ...nting information on stored images With DPOF you can insert the memory card into a DPOF compatible printer and print your stored images to print in varying quantities and with or without dates Set Each to set the printing quantity for each image one by one press the up arrow down arrow to increase or decrease the desired print quantity press the left arrow right arrow to select the previous or nex...

Page 40: ...39 Playback Menu Navigation In Playback Press the MENU button to show hide the menus NEXT FILE ...

Page 41: ...40 If the selected image video is protected If the selected image video is protected the Remove sub menu appears automatically ...

Page 42: ...41 ...

Page 43: ...42 Slideshow plays only still images not videos ...

Page 44: ...43 If no image stored in the memory ...

Page 45: ...e TV OUT function The only significant difference is that the display of images videos and their related information are displayed on the video output device instead of on the camera s LCD display If you want to restore the display to the LCD display simply disconnect the video cable from the camera Troubleshooting the TV Out feature Any TV with RCA jacks should be able to display the signal from ...

Page 46: ...the CD ROM drive 2 The Auto run program will execute and the main screen appears Note If your CD ROM drive doesn t support the auto run function double click on the My Computer icon on the desktop Then double click the CD ROM drive icon and click the Setup exe file in the root directory 3 Click Install Driver the following screen shows as follows 4 Click Next to continue The screen will show the f...

Page 47: ...46 5 Click Finish to restart the computer and installation completes ...

Page 48: ...ftware CD included the package into the CD ROM drive 2 The Auto run program execute and the main screen shows as follows Note If your CD ROM drive doesn t automatically run double click on the My Computer icon on the desktop Then double click the CD ROM drive icon and click the Setup exe file in the root directory 3 Click Install ArcSoft PhotoImpression and the following screen shows 4 Select the ...

Page 49: ...are License Agreement and continue 7 Follow the installation wizard to select the folder location and application components 8 Select the program folder 9 After the installation is completed the following screen shows Press Finish to complete the installation ...

Page 50: ... from the camera using an alternative method from the one described above With the camera connected and with USB MSDC icon on the LCD display 1 Double click on the My Computer icon 2 Eject any CDs in the CD ROM drive 3 Find a new icon which looks like a flat gray box representing the digital camera XP lists it as a removable device Windows 98 as a removable disk 4 Double click on the icon 5 Double...

Page 51: ...ge JPEG Exif2 2 DCF standard Video MPEG4 standard Image resolution Image 2048x1536 1600x1200 and 640x480 Video VGA 640 x 480 15 25 fps QVGA 320 x 240 30fps Self timer 10 sec delay Flash mode Auto Flash Auto Flash Red eye Reduction Forced Flash Red eye Reduction Slow Synchronize Flash Off TV Out NTSC PAL system selectable Audio recording Enable Disable Auto power off 3 minutes 5 minutes 15 minutes ...

Page 52: ...better computer system for optimal performance as these are bare minimums OS Microsoft Windows 98SE Me 2000 XP CPU Intel Pentium 166MHz or higher Memory 32 MB memory or above CD ROM 4X or above HDD 20 MB free space or above the longer the video the more HDD space will be needed Others One standard USB 1 1 port or higher Appendix B ...

Page 53: ...aster Island Eritrea Ethiopia Equatorial Guinea Falkland Islands Faeroe Islands Fiji Finland Gambia Gaza West Bank Germany Ghana Gibraltar Great Britain Greenland Guinea Guinea Bissau Holland Hong Kong Iceland India Indonesia Ireland Israel Italy Jordan Kenya Korea N Kuwait Lebanon Lesotho Liberia Liechtenstein Luxembourg Macao Macedonia Madeira Malawi Malaysia Maldives Malta Namibia Nepal Netherl...

Page 54: ...described herein to improve reliability function or design Neither DXG nor any of its employees assume any liability for damages or losses either direct or incidental that may arise out of the application or use of any of its products or circuits particularly with regard to damage that may occur in the operation of its products Manual version 2 0 July 2004 DXG USA City of Industry CA 2004 ...

Reviews: