background image

23

SET-UP (SET)

- CAMERA ID (1~255)

  You can assign ID number for the camera (1 by Default). 

- PROTOCOL (PELCO-D by Default)

- BAUD RATE (2400 / 4800 / 9600 / 19200)

  Adjust data communication speed. Default is 9600.

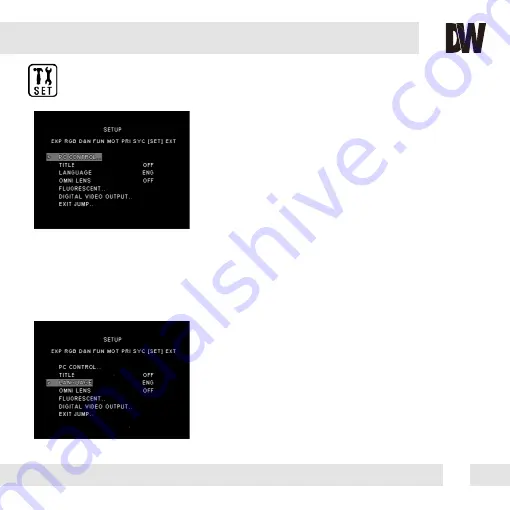
PC CONTROL

Select if you want to display the camera’s title on screen. You can setup 

a title up to 8 characters long. To edit the camera’s title, move the 

joystick to the right. The 1st letter will be highlighted. Move the joystick 

left and right to select the desired character. Press the joystick to move 

to the next space and repeat as necessary. 

ID POSITION- Select the position for the camera’s Title:


-Up-Left


-Up-Center


-Up-Right


-Down-Left


-Down-Center


-Down-Right

TITLE

You can select langaue you want to dispay on the monitor.

ENGLISH / DEUTSCH / FRANCAIS / ITALIAN / ESPANOL / 

DUTCH

LANGUAGE

Summary of Contents for PIXIM DWC-C235T

Page 1: ...ABOUT MANUAL Before installing and using the camera please read this manual carefully Be sure to keep it handy for future reference PIXIM Box Camera DWC C235T 07062012...

Page 2: ...ature may rise to high levels Cleaning To remove dirt from the case moisten a soft cloth with a soft detergent solution and wipe Mounting Surface The material of the mounting surface must be strong en...

Page 3: ...on Installation Module OSD Menu Troubleshooting Warranty Information Specifications Features Parts and Descriptions Dimensions Inside the Box Mount Installation Instructions Adjustment of Focus 4 5 6...

Page 4: ...Digital Noise Reduction Powerful Wide Dynamic Range Ultra Low Light Sensitivity Smear Canceling Circuit AGC BLC AWB Programmable Privacy Zones 6 Motion Detection Easy Icon Driven OSD Menu with Built i...

Page 5: ...r Box Camera Mounting Bracket Connectors A Iris Socket Back Focus Alarm RS485 Connector OSD Control Arrows and Enter Buttons Power LED BNC Video Output AC DC Power Input Terminal Block 1 2 3 8 9 10 11...

Page 6: ...119 7 4 71 14 5 0 57 47 6 1 87 62 0 2 44 119 7 4 71 131 8 5 19 58 8 2 31 55 0 2 17 62 0 2 44 58 8 2 31 55 0 2 17 6 DIMENSIONS IN MILLIMETERS IN...

Page 7: ...C2 Box Camera 1 2 5 6 3 4 Color Box User Manual Mini DIN Connector For Video or DC Auto Iris Lens Adapter Ring for C Type Lenses Two Port Terminal Block for AC or DC Power Connection Cable Extension f...

Page 8: ...essary holes to mount the bracket to a wall or ceiling Attach the mounting bracket to the surface using machine screws Attach the box camera to the mounting bracket Adjust the camera s position Consul...

Page 9: ...camera is compatible with any C or CS mount lens For C lenses please use the provided Adapter Ring See page 10 for details Lens is not included Connect the lens cable to the box s A Iris Socket Adjus...

Page 10: ...nsert the lens To use CS Mount lens fix the lens directly into the front camera without the C ring To adjust the focus slide the focus lever on the side of the front camera Please tighten the focus le...

Page 11: ...ION ZONES 1 1 2 1 3 1 4 ADJUST ZONE 1 ADJUST ZONE 2 ADJUST ZONE 3 ADJUST ZONE 4 RETURN EXIT JUMP SAVE EXIT EXIT PRIVICY MASK OFF ON AREA 1 6 RETURN MASK COLOR WHITE BLACK RED EXIT JUMP SAVE EXIT EXIT...

Page 12: ...e maximum you get the clear image Set the lens Focus Meter to maximum See above for more information DC GAIN is to adjust Iris speed 0 255 It is recommended to set the AUTO Gain to 120 AI THOLD is to...

Page 13: ...uto Exposure Set AE PREFERENCE depending on the environment in which the camera is installed Select from the following options INDOOR OUTDOOR Backlight compensation prevents subjects in defined areas...

Page 14: ...options LOW NORMAL MEDIUM Factory Default HIGH CUSTOM If CUSTOM is selected adjust the Bias Limit as you wish BIAS 30 30 Decide the WDR level in the range of LIMIT The higher the number the stronger t...

Page 15: ...rom X2 30FPS X64 x2 30FPS is the default EXPOSURE EXP Auto Gain Control automatically adjusts the video gain to enhance picture brightness in low light conditions The higher number the better sensitiv...

Page 16: ...s top border further up e Moving the joystivk down will move the zone s bottom border further down 4 Press the joystick again The zone s borders will appear red Use this option to reduce the size of...

Page 17: ...r R GAIN 20 20 Adjusts the amount of red in the image The higher the number the image will appear red The lower the number the image will appear green B GAIN 20 20 Adjusts the amount of blue in the im...

Page 18: ...W 0 60 Adjusts the light level at which the camera switches from day color to night B W mode The higher the number the lower the light level E LEVEL B W Color 0 60 Adjusts the light level at which the...

Page 19: ...ion D ZOOM Select the desired gamma level 25 100 45 is default 3D DNR reduces the noise on the screen in low light conditions and allows for clearer images even at night Select from the following opti...

Page 20: ...border further up e Moving the joystivk down will move the zone s bottom border further down 4 Press the joystick again to reduce the zone s size The zone s borders will appear red a Moving the joysti...

Page 21: ...joystick Left and Right to adjust the width of the mask 6 Move the joystick Up and Down to adjust the height of the mask NOTE when adjusting the size of the mask the top and left borders of the mask w...

Page 22: ...INT1 INT2 SYNC to 50 00Hz Select INTERNAL if camera uses DC power or if L L is not required Please note this setup option is only for NTSC version Consult your installer for additional information an...

Page 23: ...p to 8 characters long To edit the camera s title move the joystick to the right The 1st letter will be highlighted Move the joystick left and right to select the desired character Press the joystick...

Page 24: ...how many seconds to stay in zoom in Select from 5 to 15 seconds ALARM ZOOM is to set zoom rate when alarm occurs Select from 4 to 214 STAND BY is the zoom rate when it s normal scene Therefore when a...

Page 25: ...25 EXIT EXT EXIT Exit the OSD without saving SAVE EXIT Exit the OSD after saving the current settings FACTORY SET Go back to factory default...

Page 26: ...s connected securely Check the lens iris adjustment at the camera s OSD menu Check the power supply and make sure the camera has the proper voltage and current Check the clear dome cover and the lens...

Page 27: ...Friday from 8 30AM to 8 00PM Eastern Standard Time A purchase receipt or other proof of the original purchase date is required before warranty service is rendered This warranty only covers failures d...

Page 28: ...low the exclusion or limitation of incidental or consequential damages or limitatons on how long an implied warranty lasts so the exclusions or limitations listed above may not apply to you This warra...

Page 29: ...OPERATIONAL Image Sensor 1 3 PIXIM Nightwolf CMOS Sensor Total Pixels 768 H x 548 V Minimum Illumination F1 2 30IRE 0 22Lux Color F1 2 30IRE 0 01 Lux B W Horizontal Resolution 690 Effective Horizonta...

Page 30: ...Zones Baudrate 2400 38500 Protocol PELCO D Language ENGLISH DEUTSCH FRANCIAS ITALIAN ESPA OL DUTCH ENVIRONMENTAL OPERATIONAL ELECTRICAL MECHANICAL Storage Temperature 20 o C 70 o C 4 o F 158 o F Oper...

Page 31: ...31...

Page 32: ...5436 W Crenshaw St Tampa FL 33634 Tel 866 446 3595 813 888 9555 Fax 813 888 9262 www Digital Watchdog com technicalsupport dwcc tv Technical Support Hours Monday Friday 8 30am to 8 00pm EST...

Reviews: