background image

SETTING UP THE SERVER

STEP 1:


Connect external devices, power and network.   


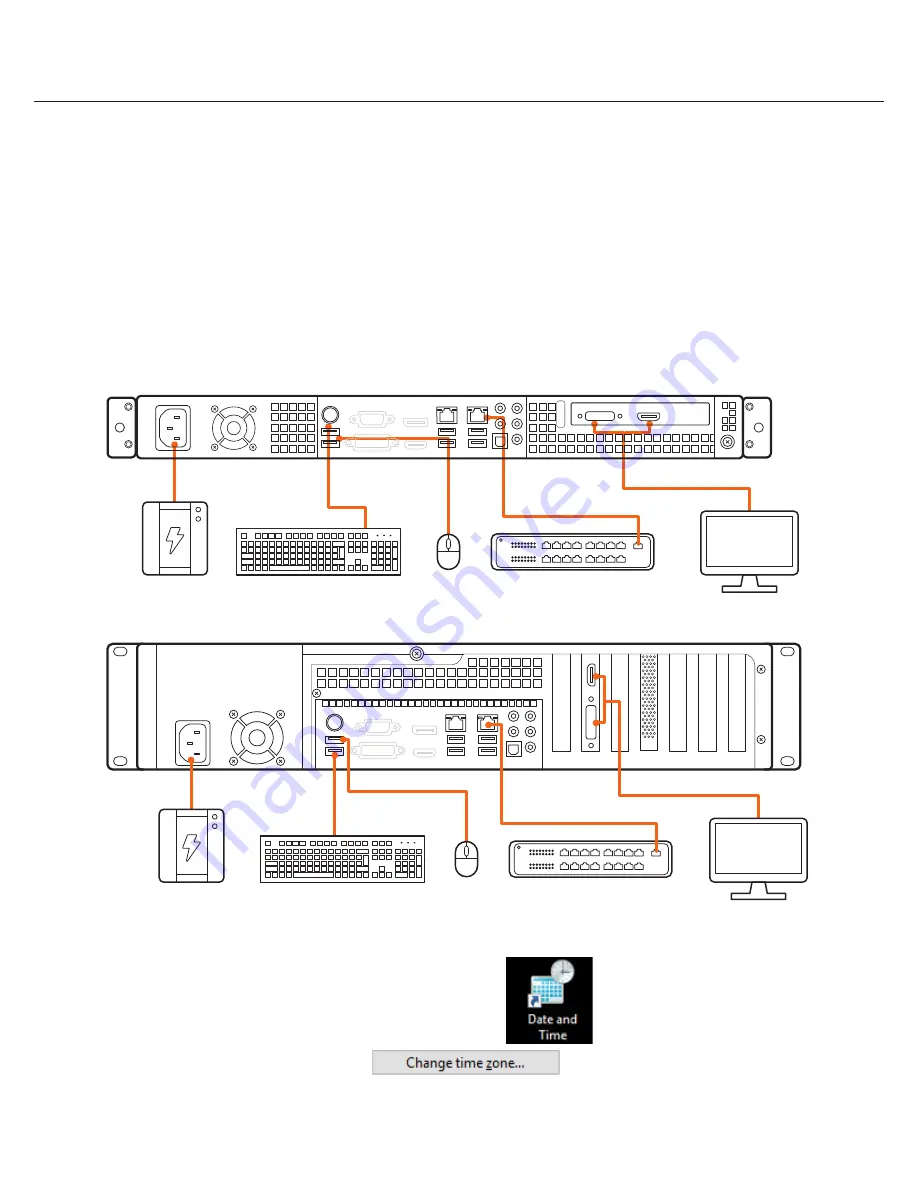
1.  Connect a monitor, USB keyboard, USB mouse and network cable to one of the Ethernet ports (B7 on the diagram). 


Configure the camera’s network first, then configure the server’s local network.


2.  Connect the server to an appropriate power source. It is recommended to use a UPS system.


  * Recommended to use 750VA or higher for the 1U P-RACK and 1000VA or higher for the 2U P-RACK


3.  Power up the server if the server does not turn on automatically by pressing the power button on the front of the  

  server. (F2 on the diagram). 


  * Connecting the power cable to the live power source may turn on the server automatically.

STEP 2:


Configure date and time 

 Windows®


1.  Double-click on the date and time icon on the desktop.


2.  Change time zone if it is not correct                                                  (default is UTC-08:00 Pacific Time).


SETTING UP THE E-RACK


STEP 1: 

Connect Peripherals, power and network 


1. Connect a monitor, USB keyboard, USB mouse and network cable to one of the ethernet ports (B8 on the diagram) Configure the camera network first 

then will configure local network later. 

2. Connect the server to an appropriate power source. Recommend to use UPS system 

*recommend to use 3000VA or higher. 
3. Turn on the server if the server does not turn on automatically.


(Press the Power Button on the front of the P-RACK. F2 on the diagram).


* Connecting the power cable to the live power source may turn on the server automatically


STEP 2: 

Configure Date and Time 

Windows 

1. Double click Date and Time icon on the Desktop. 


2. Change Time zone if not correct 

 (default is UTC-08:00 Pacific Time) 


Press OK after selecting the correct Time zone. 

Click Change date and time… to update the date and time if they are not correct. 


* Verify the Time zone before updating the date and time. Time may show 2 or 3 hours off due to incorrect Time zone. 

Quick Start Guide

3

POE Switch for cameras

POE Switch for cameras

Summary of Contents for Blackjack P-Rack DW-BJP1U

Page 1: ...Tel 1 866 446 3595 813 888 9555 Technical Support Hours 9 00AM 8 00PM EST Monday through Friday digital watchdog com Attention This document is intended to serve as a quick reference for initial setu...

Page 2: ...memory to 16GB NIC 2x gigabit Ethernet RJ45 2x gigabit Ethernet RJ45 Option DW R2NIC upgrade dual 1GB NIC card OR DW R4NIC upgrade quad 1GB NIC card System Max video storage rate Mbps 360 Mbps 600 Mb...

Page 3: ...ct the server to an appropriate power source Recommend to use UPS system recommend to use 3000VA or higher 3 Turn on the server if the server does not turn on automatically Press the Power Button on t...

Page 4: ...ct default is UTC 08 00 Pacific Time Press OK after selecting the correct Time zone Click Change date and time to update the date and time if they are not correct Verify the Time zone before updating...

Page 5: ...window when done Closing the window will automatically save the changes made 5 Linux 1 Update the date and time by clicking on the time on the upper right hand corner then click Time Date settings 2 I...

Page 6: ...d and click Properties Windows Camera network and local network cannot be on the same network Camera network Local network LAN IP address Subnet mask Netmask Default gateway Gateway Not applicable DNS...

Page 7: ...lick on the other Ethernet the one with network cable unplugged and click Properties 8 Click Internet Protocol Version 4 TCP IPv4 and click Properties 9 Select Use the following IP address Use the fol...

Page 8: ...rk settings are set to DHCP as default 11 Click OK to close then click close to go back to network connections 12 Connect a network cable to the Ethernet port B7 on the diagram page 2 to the switch on...

Page 9: ...red to perform port forwarding on your router to access the server Contact your Network Administrator or Installer for additional information 7 Enter IP Address then press Tab on the keyboard to move...

Page 10: ...art on the bottom left and select DW Spectrum in the Digital Watchdog folder OR WINDOWS BASED SOFTWARE MANUAL LAUNCH To launch the DW Spectrum Software on the Windows Based Cube Windows OPTION 1 Doubl...

Page 11: ...ick connect Default password admin12345 case sensitive STEP 2 To rename the server 1 Right click on the server name listed on the resources then click server settings 2 Go to the general tab and enter...

Page 12: ...ministration 2 Go to the updates tab If the system requires updating click on the update system button If you are on the latest version it will say You have the latest version installed and the Update...

Page 13: ...icense key and click Activate License An Internet connection is required Click on Activate Trial License if you have not purchased a valid license key 3 Click OK to when the license key is activated S...

Page 14: ...rding 4 Configure the camera s schedule settings for quality FPS and recording type 5 Click and drag the mouse over the recording schedule to apply the settings to multiple days and times Click All to...

Page 15: ...m administration window and click on the general tab 2 Click Create Backup 3 Navigate to the folder you want to save the database and enter a name for the backup file Click save It is strongly recomme...

Page 16: ...t of supported cameras 3 Is the camera updated to its latest firmware 4 If your camera is integrated with DW Spectrum via ONVIF make sure ONVIF is enabled on your camera 5 Try adding the camera manual...

Reviews: