background image

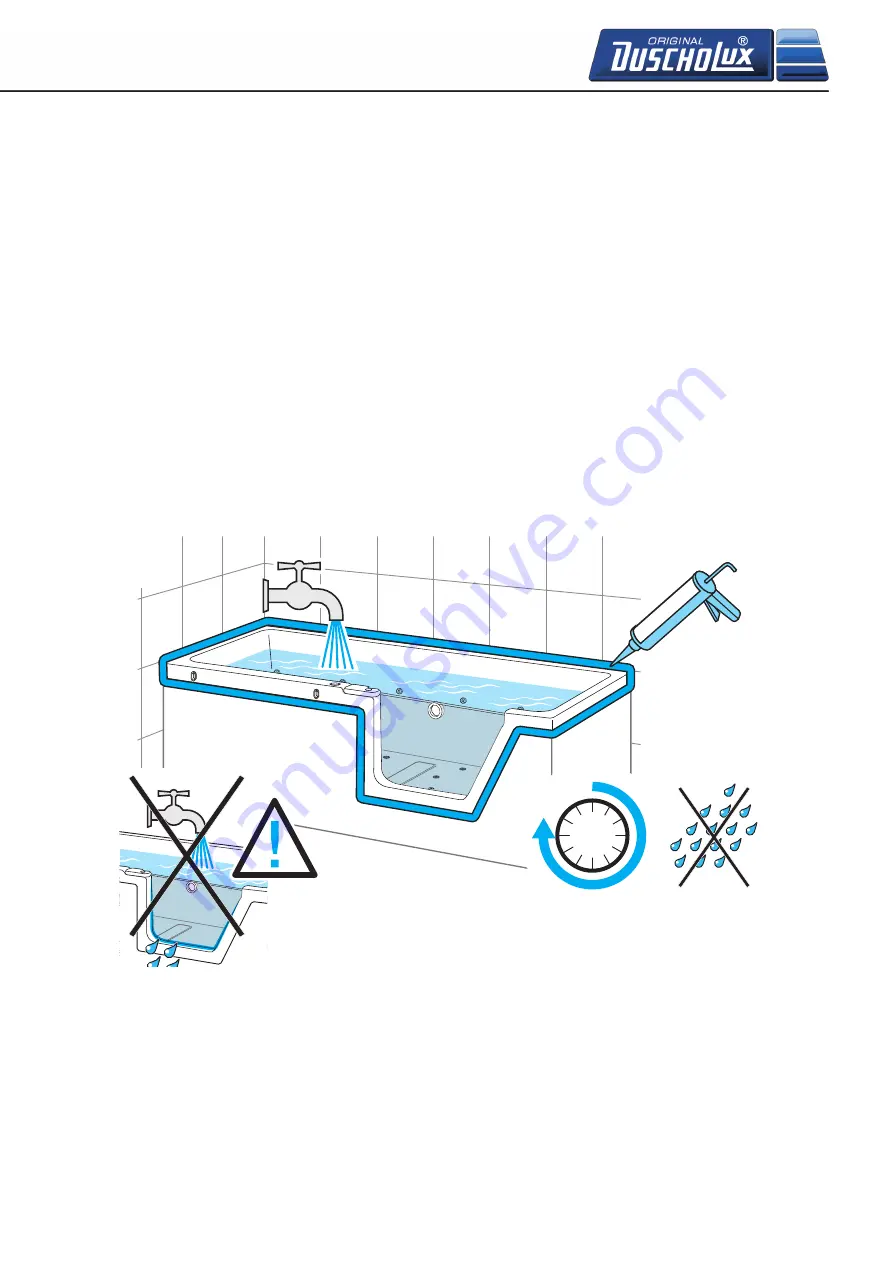
24h

21

Caution! Use only sanitary silicon for acrylic showers and bathtubs.With natural stone (e.g.marble) use 

only special silikon. Degrease the rim of the bath!

SIlIconE GroutInG

CARE INSTRUCTIONS FOR DUSCHOLUX SANITARY ACRYLIC BATHTUBS

The DUSCHOLUX acrylic bathtubs can be rinsed gently with water and wiped with a damp cloth

thanks to the non-porous surface. The liquid DUSCHOLUX bathtub cleaning agent (order 

no. 699.903200) is an ideal aid if there is excess dirt or limescale. A small squirt of the cleaning agent a 

just a little cold water are enough to make your bathtub fresh and shining again (follow the instructions). 

Never use scouring agents containing sand or grains. Scuff marks or even small scratches can be 

removed from shiny surfaces using a special polishing cream (DUSCHOLUX care and polishing set, 

order no. 699.903000).

Deeper scratches or burn marks can be removed carefully using fine sand paper

(please follow the instructions in the care and polishing set). Then treat with the polishing cream. Matte 

surfaces are best treated with fine wire wool (fineness no. 00). It is important that you always sand 

down in one direction (no circular movements). Blocked drains can be unblocked using

pipe and drain cleaner. You must adhere to the usage instructions provided by the relevant 

manufacturer. Then rinse thoroughly with water.

Summary of Contents for ShowerLux Step-in Sparkling + Music

Page 1: ...IN Sparkling Music Instruction de montage Page 22 31 Istruzione di montaggio Pagina 32 41 Installation instructions Page 12 21 Montageanleitung Seite 2 11 EDV Nr 452118 V101 Ausgabe 02 2016 Version 1...

Page 2: ...Sanit rinstallation Wasseranschluss Seite 4 Elektroinstallation Elektroanschl sse Seite 5 Probelauf Seite 6 Wannenmontage Seite 7 Silikonfugen Seite 11 Montageanleitung f r den Fachhandwerker Montagea...

Page 3: ...Davon ausgenommen sind Transportsch den Bestellfehler Sch den durch Montage Bedienungs und Pflegefehler Sch den durch die Verwendung von Kosmetika f rbenden Fl ssigkeiten und Lebensmitteln Farbabweic...

Page 4: ...neten Untergr nden Boden verfliest bzw versiegelt montieren Schallschutz Achten Sie beim Einbau auf die DIN 4109 bzw die SIA 181 Schallschutz im Hochbau Montage Zur Einnivellierung l sst sich die Step...

Page 5: ...eiche 0 2 im Bereich 3 zul ssig Elektroanschl sse Achtung S mtliche Montage und Demontagearbeiten an der Step in Sparkling Music nur im spannungslosen und staubfreien Zustand vornehmen Das komplette S...

Page 6: ...t berpr fen Achtung Wanne nicht entleeren Pr fen ob beim anschlie enden Entleeren das gesamte Wasser abl uft Sollten Nacharbeiten Anpassung der Komponenten Austausch von Bauteilen erforderlich sein is...

Page 7: ...1 5 9 0 m m 2 Entfetten degrease d graisser sgrassare desengrasar desengordurar ontvetten odt u ci avfette 7 Wannenmontage...

Page 8: ...che Zwischenlage z B Elastic intermediate layer Couche interm diaire Posizione intermedia elastica Capa intermedia el stica Capa intermedia elastica Elastische tussenlaag Fa HAFNER Fa MEPA Fa GABAG ED...

Page 9: ...5 DN 50 G G AG DIN ISO 228 DN 50 B B 6 220V A B A B 9 Wannenmontage...

Page 10: ...mm Einbau auf Rohbeton Schalungsma e Die Wanne kann bis max 165 mm tiefer gesetzt werden Spritzwasserbereich und gesamte Bodenfl che mit fl ssiger Dichtfolie abdichten Landes bliche Normen zur normge...

Page 11: ...eder frischen Glanz zu geben bitte Anweisung beachten Bitte verwenden Sie niemals sandhaltige oder k rnige Scheuermittel Scheuerstellen oder aber auch leichte Kratzer k nnen bei gl nzender Oberfl che...

Page 12: ...ons Page 14 Electrical installation electrical connections Page 15 Test run Page 16 Installation instructions Page 17 Silicon joints Page 21 Installation instructions for the installer Hand over these...

Page 13: ...The guarantee covers manufacturing and material defects Excluded from this are Transport damage order errors damage during installation operating and care errors damage caused by the use of cosmetics...

Page 14: ...surface which is suitable for use in a wet room tiled or sealed floor Soundproofing When installing pay attention to DIN 4109 or SIA 181 soundproofing in building construction Installation The height...

Page 15: ...utside protected areas 0 to 2 Electrical connections Caution All assembly and disassembly work on the Step in Sparkling Music may only be carried out when de energised and in a dust free condition The...

Page 16: ...overflow fittings for any leaks Caution Do not drain the bathtub Check that all of the water runs out when emptying the bathtub If any rework component adjustment component replacement be required thi...

Page 17: ...1 5 9 0 m m 2 Entfetten degrease d graisser sgrassare desengrasar desengordurar ontvetten odt u ci avfette 17 Installation Instructions...

Page 18: ...schenlage z B Elastic intermediate layer Couche interm diaire Posizione intermedia elastica Capa intermedia el stica Capa intermedia elastica Elastische tussenlaag Fa HAFNER Fa MEPA Fa GABAG EDV 45118...

Page 19: ...5 DN 50 G G AG DIN ISO 228 DN 50 B B 6 220V A B A B 19 Installation Instructions...

Page 20: ...llation on unfinished concrete using formwork The tub can be set up to max 165 mm deeper Before installation seal the water splash area and the complete floor surface with liquid sealing membrane Comp...

Page 21: ...bathtub fresh and shining again follow the instructions Never use scouring agents containing sand or grains Scuff marks or even small scratches can be removed from shiny surfaces using a special poli...

Page 22: ...tre les instructions de montage au client Sommaire Remarques importantes garantie responsabilit Page 23 Installation sanitaire Prise d eau Page 24 Installation lectrique branchements lectriques Page 2...

Page 23: ...aillances mat rielles Les points suivants en sont exclus Dommages li s au transport erreurs de commande dommages li s au montage utilisation et entretien inadapt s dommages li s l utilisation de produ...

Page 24: ...r la baignoire que sur un sol convenant une pi ce humide sol carrel ou scell Insonorisation Lors du montage respecter la norme DIN 4109 ou SIA 181 Insonorisation dans le b timent Montage Il est possib...

Page 25: ...on 0 2 savoir dans la zone 3 Branchements lectriques Attention Ne r aliser des travaux de montage et de d montage sur le Step in Sparkling Music que lorsque celui ci est hors tension et exempt de pous...

Page 26: ...est tanche Attention ne pas vider la baignoire V rifier que toute l eau s vacue lors de la vidange Si des ajustements adaptation de composants remplacement de pi ces sont n cessaires r p ter la proc...

Page 27: ...1 5 9 0 m m 2 Entfetten degrease d graisser sgrassare desengrasar desengordurar ontvetten odt u ci avfette 27 Instruction de montage...

Page 28: ...wischenlage z B Elastic intermediate layer Couche interm diaire Posizione intermedia elastica Capa intermedia el stica Capa intermedia elastica Elastische tussenlaag Fa HAFNER Fa MEPA Fa GABAG EDV 451...

Page 29: ...5 DN 50 G G AG DIN ISO 228 DN 50 B B 6 220V A B A B 29 Instruction de montage...

Page 30: ...coffrage Le receveur peut tre install une profondeur inf rieure de max 165 mm Avant le montage imperm abiliser la zone expos e aux claboussures ainsi que toute la surface du sol au moyen d une feuill...

Page 31: ...re la baignoire sa brillance initiale respecter les instructions Ne jamais utiliser de produits abrasifs base de sable ou granuleux Dans le cas de surfaces brillantes les traces de frottement et rayur...

Page 32: ...i Allacciamento dell acqua Pagina 34 Installazione elettrica Allacciamenti elettrici Pagina 35 Prova di funzionamento Pagina 36 Istruzione di montaggio Pagina 37 Silicone Pagina 41 Istruzioni di monta...

Page 33: ...ale Sono esclusi dalla garanzia Danni dovuti al trasporto errori nell ordine effettuato danni causati dal montaggio errori nell utilizzo e nella manutenzione ordinaria danni derivanti dall uso di cosm...

Page 34: ...imenti piastrellati o laccati Isolamento acustico All atto del montaggio attenersi alla DIN 4109 e o alla SIA 181 isolamento acustico all interno degli edifici Montaggio Per la messa a livello della S...

Page 35: ...ella zona 3 Allacciamenti elettrici Attenzione Tutte le operazioni di montaggio e smontaggio effettuati sulla Step in Sparkling Music devono essere eseguite in assenza di tensione e di polvere Il sist...

Page 36: ...ico e troppopieno Attenzione Non svuotare la vasca Verificare che tutta l acqua defluisca all atto dello scarico successivo Qualora siano necessarie operazioni di rifinitura adattamento dei componenti...

Page 37: ...1 5 9 0 m m 2 Entfetten degrease d graisser sgrassare desengrasar desengordurar ontvetten odt u ci avfette 37 IstruzionE di montaggio...

Page 38: ...ischenlage z B Elastic intermediate layer Couche interm diaire Posizione intermedia elastica Capa intermedia el stica Capa intermedia elastica Elastische tussenlaag Fa HAFNER Fa MEPA Fa GABAG EDV 4511...

Page 39: ...5 DN 50 G G AG DIN ISO 228 DN 50 B B 6 220V A B A B 39 IstruzionE di montaggio...

Page 40: ...o misura cassaforma La vasca pu essere interrata fino a max 165 mm di profondit Prima del montaggio impermeabilizzare l area soggetta a spruzzi e l intera superficie di fondo con pellicola isolante fl...

Page 41: ...a pulita e lucida come nuova seguire le istruzioni per l uso Si prega di non utilizzare mai prodotti in polvere o abrasivi Punti di abrasione o piccoli graffi della superficie possono essere eliminati...

Page 42: ...www duscholux com...

Reviews: