DuraVision FDS1702N Setup Manual Download Page 33

3

Fran

ça

is

AVERTISSEMENT

Gardez les sacs plastique d’emballage hors de portée des enfants pour éviter tout risque 

d’étouffement.
Veuillez vous assurer que le cordon d’alimentation réponde aux exigences suivantes.

Ce produit n’inclut pas le cordon d’alimentation. Veuillez fournir séparément un cordon d’alimentation 

répondant aux exigences. (Pour en savoir plus, veuillez contacter votre représentant local EIZO.)

•  Le cordon d’alimentation se conforme aux normes du pays et de la région dans lesquels ce produit doit 

être utilisé.

Par exemple

En Europe : Le cordon d’alimentation réglé a une valeur nominale d’au moins 250VAC/6A et un 

type de H05W-F, GTCE-3, 0,75 mm

2

.

Aux E.U. : Le cordon d’alimentation réglé a une valeur nominale d’au moins 125V/ 10A et un 

type SVT, 3/18AWG (0,75mm

2

).

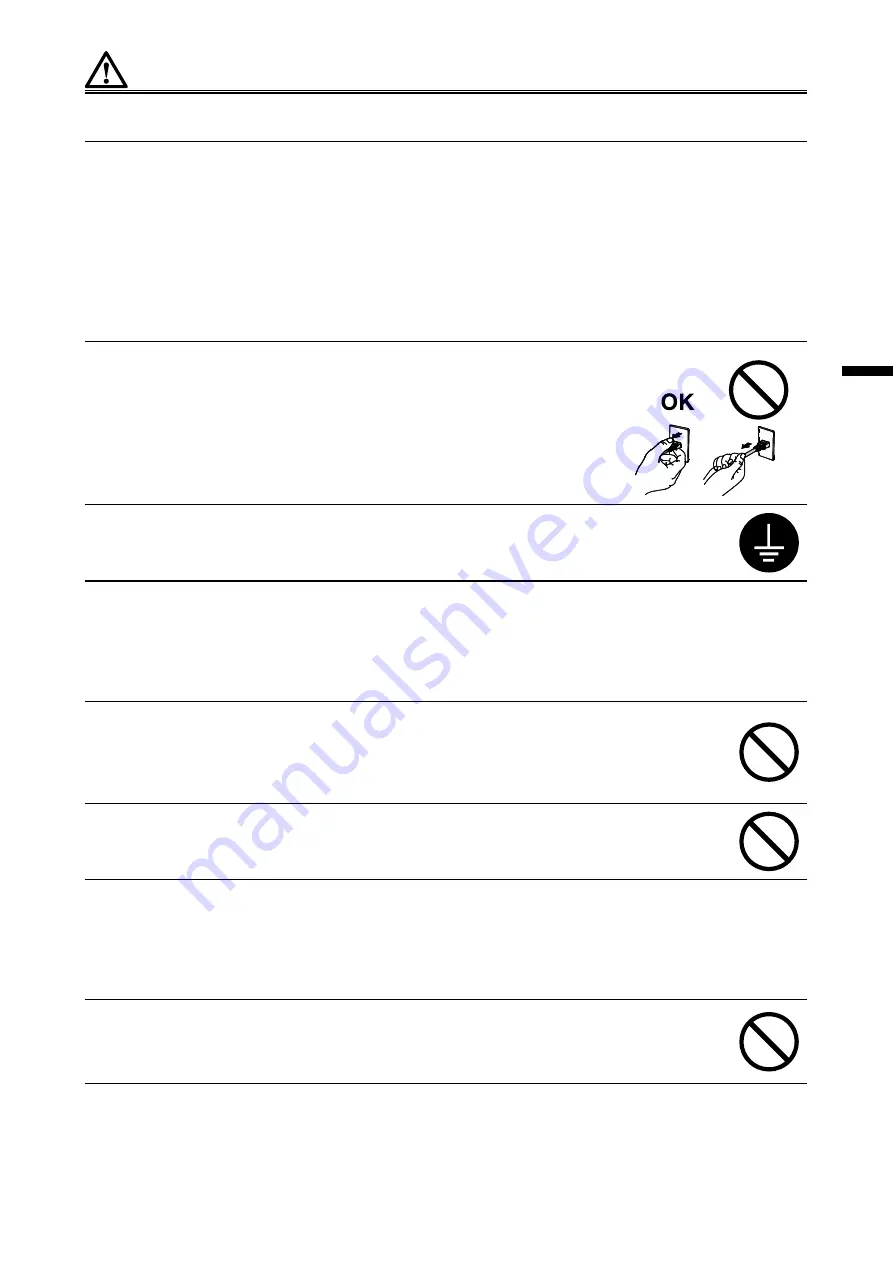
Pour débrancher le cordon secteur, tirez fermement sur la fiche exclusivement.

Ne tirez jamais sur le câble, cela pourrait endommager le cordon et entraîner  

un incendie ou un choc électrique.

L’appareil doit être relié à une prise avec terre.

Le non-respect de ces consignes peut présenter des risques d’incendie ou 

de choc électrique.

Utilisez la tension correcte.

•  L’appareil a été conçu pour une utilisation avec une tension de secteur particulière. L’utilisation sur une 

tension différente de celle spécifiée dans ce manuel pourrait causer un choc électrique, un incendie ou 

d’autres dégâts.

•  Ne surchargez pas les circuits d’alimentation électrique, cela pourrait entraîner un incendie ou un choc 

électrique. 

Manipulez correctement le cordon secteur. 

•  Ne faites pas passer le cordon sous le moniteur ou un autre objet lourd. 

•  Ne tirez pas sur le cordon et ne le fixez pas.

Cessez d’utiliser tout cordon secteur endommagé. L’utilisation d’un cordon défectueux peut entraîner un 

incendie ou un choc électrique.

Ne touchez pas au cordon secteur ni à la fiche si des étincelles apparaissent. 

Vous risqueriez un choc électrique. 

Pour fixer un bras de support, consultez le manuel d’utilisation du bras pour installer 

correctement le moniteur.

Un mauvais montage pourrait se traduire par une séparation de l’appareil qui pourrait l’endommager ou 

causer une blessure. En cas de chute de l’appareil, demandez conseil à votre représentant local EIZO 

avant de l’utiliser à nouveau. Toute utilisation de l’appareil après une chute peut entraîner un incendie ou 

un choc électrique. Pour refixer le socle inclinable, utilisez les mêmes vis et serrez-les correctement.

Ne touchez pas un panneau LCD endommagé à mains nues. 

Les cristaux liquides qui peuvent s’écouler du panneau sont toxiques par contact avec les yeux ou la 

bouche. En cas de contact de la peau ou du corps avec le panneau, lavez immédiatement à grande eau. 

En cas de symptôme anormal ou de malaise, veuillez consulter votre médecin.

Summary of Contents for FDS1702N

Page 1: ...utzerhandbuch auf der CD ROM aufmerksam durch um sich mit der sicheren und effizienten Bedienung vertraut zu machen Bewahren Sie dieses Handbuch zum späteren Nachschlagen auf Manuel d installation Important Veuillez lire attentivement ce Manuel d installation et le Manuel d utilisation inclus sur le CD ROM afin de vous familiariser avec ce produit et de l utiliser efficacement et en toute sécurité...

Page 2: ......

Page 3: ...to a PC to using the monitor User s Manual of this monitor 1 Describes the application information of the monitor such as screen adjustments settings and specifications NetDA Manager User s Manual 1 Describes the installation and use of the NetDA Manager special software for network connection and the network configuration of the monitor Touch Panel Driver User s Manual 1 2 Describes the installat...

Page 4: ...iquid falls spills into the cabinet unplug the unit immediately Have the unit checked by a qualified service engineer before using it again Place the unit at the strong and stable place A unit placed on an inadequate surface may fall and result in injury or equipment damage If the unit falls disconnect the power immediately and ask your local EIZO representative for advice Do not continue using a ...

Page 5: ... User s Manual may cause fire electric shock or equipment damage Do not overload your power circuit as this may result in fire or electric shock Handle the power cord with care Do not place the cord underneath the unit or other heavy objects Do not pull on or tie the cord If the power cord becomes damaged stop using it Use of a damaged cord may result in fire or electric shock Never touch the plug...

Page 6: ...may result in fire electric shock or damage Do not touch the plug with wet hands Doing so may result in electrical shock Use an easily accessible power outlet This will ensure that you can disconnect the power quickly in case of a problem Periodically clean the area around the plug Dust water or oil on the plug may result in fire Unplug the unit before cleaning it Cleaning the unit while it is plu...

Page 7: ...n information of the network 3 button Displays the volume adjustment menu Press or to adjust volume 4 button Switches input signals for display 5 button Displays the Adjustment menu determines an item on the menu screen and saves values adjusted 6 button Provides the menu selection as well as the adjustment and setting of a function Displays the brightness adjustment menu Press or to adjust bright...

Page 8: ...sfer is in progress c ALERT LED 3 Green Red Flashes in red 0 25 sec interval Wireless device error Flashes in red 1 sec interval Failed to auto connect when the monitor was turned on Failed to make a link via keyboard operation Flashes in green Searching for radio waves at the DFS startup is in progress Lights up green Switching channels by DFS function is in progress OFF Operating correctly d CON...

Page 9: ... 9 Linking via a wired LAN Network cable Network Connection Video Audio USB communication Linking via a wireless LAN Video Audio USB communication Network Connection Note When multiple PCs are connected to the monitor press on the front of the monitor to switch the input signal A speaker with built in amplifier can be connected to the line output connector of the monitor to output audio External s...

Page 10: ... connect the cables After connecting the signal cable tighten the screws of the connectors to secure the coupling DVI D SUB D SUB 2 Plug the power cord into a power outlet and the power connector on the monitor 3 Press to turn on the monitor The monitor s power indicator lights up blue 4 Turn on the PC The screen image appears If an image does not appear refer to No picture page 14 for additional ...

Page 11: ...via a wired LAN page 9 Settings via a wireless LAN page 10 Settings via a wired LAN 1 Connect the network cable straight or cross cable to the LAN ports of the monitor and PC LAN LAN Attention Directly connect the monitor and PC using the network cable 2 Plug the power cord into a power outlet and the power connector on the monitor 3 Press to turn on the monitor The monitor s power indicator light...

Page 12: ...c IP address take note of the current address and change the PC settings to obtain the IP address automatically 6 Search for the monitor on the PC and then connect it The default wireless LAN settings for the monitor are as follows SSID EZxxxxxx xxxxxx is the last 6 digits of the MAC Address Network Authentication Open 7 Install the NetDA Manager on the PC 8 Perform the network configuration for t...

Page 13: ...RT LED is off and that Link LED at the bottom lights up Note When the wired LAN connection is established at the 1000BASE Link LED lights up dark orange When the connection is established at the 10BASE 100BASE it lights up green 4 Connect another network cable to the LAN port of the PC and to the Ethernet hub To make a link to the wireless LAN using the Access Point mode 1 Connect the network cabl...

Page 14: ...d in the target PC If not install the software referring to the NetDA Manager User s Manual on the CD ROM If the target PC runs with Windows 8 1 Windows 8 Windows 7 it may take a while to link to this monitor for the first time The screen image may flicker when linked for the first time 1 Turn on the PC 2 Click Start All Programs NetDA Manager NetDA Manager The main window of the NetDA Manager app...

Page 15: ...ed via a network unlink the connection see page 12 2 Uninstall the other touch panel driver if it is installed 3 Install the touch panel driver according to the instructions included in the CD ROM For how to install the touch panel driver see the Touch Panel Driver User s Manual on the CD ROM 4 Link the monitor and PC via a network see page 12 2 Calibrate the monitor Calibrate the monitor accordin...

Page 16: ...ut the signal soon after power on Check whether the PC is turned on Check whether the signal cable is connected properly Switch the input signal with Check whether the network cable is connected properly Check the network configuration Check the network environment Switch the input signal with Check the network status The message shows that the input signal is out of the specified frequency range ...

Page 17: ...e Benutzerhandbuch zu diesem Monitor 1 Beschreibt die Anwendungsinformationen für den Monitor wie zum Beispiel Bildschirmjustierungen Einstellungen und technischen Daten Benutzerhandbuch von NetDA Manager 1 Beschreibt die Installation und Verwendung von NetDA Manager spezielle Software für Netzwerkverbindung und die Netzwerkkonfiguration des Monitors Benutzerhandbuch des Touch Panel Treibers 1 2 B...

Page 18: ...abel des Geräts abzuziehen Lassen Sie das Gerät in diesem Fall von einem qualifizierten Servicetechniker überprüfen bevor Sie wieder damit arbeiten Stellen Sie das Gerät auf eine feste stabile Fläche Ein an einer ungeeigneten Stelle aufgestelltes Gerät kann herunterfallen und dabei Verletzungen oder Geräteschäden verursachen Fällt das Gerät herunter ziehen Sie sofort das Netzkabel ab und wenden Si...

Page 19: ...pannung besteht die Gefahr von Bränden Stromschlag oder Geräteschäden Überlasten Sie den Stromkreis nicht da dies Feuer oder einen Stromschlag verursachen kann Gehen Sie mit dem Netzkabel sorgfältig um Stellen Sie das Gerät oder andere schwere Gegenstände nicht auf das Kabel Ziehen Sie nicht am Kabel und knicken Sie es nicht Verwenden Sie kein beschädigtes Netzkabel Die Verwendung eines beschädigt...

Page 20: ...scher Schlag oder Beschädigung führen Berühren Sie den Stecker nicht mit nassen Händen Dies führt zu einem Stromschlag Schließen Sie das Netzkabel an eine leicht zugängliche Steckdose an Damit stellen Sie sicher dass Sie das Netzkabel im Notfall schnell abziehen können Reinigen Sie den Bereich um den Stecker in regelmäßigen Abständen Staub Wasser oder Öl auf dem Stecker erhöht die Brandgefahr Zieh...

Page 21: ...n des Netzwerks an 3 Taste Zeigt das Lautstärkejustierungsmenü an Drücken Sie zum Einstellen der Lautstärke oder 4 Taste Schaltet zwischen den Eingangssignalen für die Anzeige um 5 Taste Zeigt das Justierungsmenü an legt ein Element im Menübildschirm fest und speichert geänderte Werte 6 Taste Dienen der Menüsteuerung sowie der Justage oder Auswahl von Funktionen Zeigt den Bildschirm für die Hellig...

Page 22: ...Drahtlose Datenübertragung läuft c ALERT LED 3 Grün Rot Blinkt rot 0 25 s Intervall Drahtlosgerät Fehler Blinkt rot 1 s Intervall Automatische Verbindung bei eingeschaltetem Monitor schlug fehl Herstellen einer Verknüpfung über Tastaturbedienung schlug fehl Blinkt grün Suche nach Funkwellen bei DFS Start läuft Leuchtet grün auf Umschalten von Kanälen mit DFS Funktion läuft AUS Arbeitet richtig d C...

Page 23: ...Verknüpfung über ein Kabel LAN Netzwerkkabel Netzwerkverbindung Video Audio USB Kommunikation Verknüpfung über ein Drahtlos LAN Video Audio USB Kommunikation Netzwerkverbindung Hinweis Wenn mehrere PCs am Monitor angeschlossen sind drücken Sie an der Vorderseite des Monitors um das Eingangssignal umzuschalten Ein Lautsprecher mit eingebautem Verstärker kann am Line Ausgang des Monitors zur Ausgabe...

Page 24: ...el verbinden Ziehen Sie nach dem Anschließen der Kabel die Schrauben der Anschlüsse an um die Verbindung zu sichern DVI D SUB D SUB 2 Verbinden sie mithilfe des Netzkabels den Netzanschluss des Monitors mit einer Steckdose 3 Drücken Sie um den Monitor einzuschalten Die Netzkontroll LED des Monitors leuchtet auf blau 4 Schalten Sie den Computer ein Das Bildschirmbild erscheint Falls kein Bild ersch...

Page 25: ... ein Kabel LAN Seite 9 Einstellungen über ein Drahtlos LAN Seite 10 Einstellungen über ein Kabel LAN 1 Schließen Sie das Netzwerkkabel Direkt oder Kreuzkabel an die LAN Anschlüsse von Monitor und PC an LAN LAN Beachte Verbinden Sie direkt den Monitor und den PC mit dem Netzwerkkabel 2 Verbinden sie mithilfe des Netzkabels den Netzanschluss des Monitors mit einer Steckdose 3 Drücken Sie um den Moni...

Page 26: ... PC eine statische IP Adresse hat notieren Sie die aktuelle Adresse und ändern Sie die PC Einstellungen um die IP Adresse automatisch zu erhalten 6 Suchen Sie den Monitor auf dem PC und schließen ihn dann an Die standardmäßigen Drahtlos LAN Einstellungen für den Monitor sind wie folgt SSID EZxxxxxx xxxxxx sind die letzten 6 Stellen der MAC Adresse Network Authentication Open 7 Installieren Sie Net...

Page 27: ...ss des Monitors mit einer Steckdose 3 Prüfen Sie ob die CONNECT LED an der Seite des Monitors grün blinkt ob die ALERT LED erloschen ist und ob die Link LED unten leuchtet Hinweis Wenn die Kabel LAN Verbindung mit 1000BASE hergestellt wird leuchtet die Link LED dunkelorange auf Wenn die Verbindung mit 10BASE 100BASE hergestellt wird leuchtet sie grün auf 4 Schließen Sie ein anderes Netzwerkkabel a...

Page 28: ... Software unter Bezug auf das Benutzerhandbuch von NetDA Manager auf der CD ROM Wenn der Ziel PC mit Windows 8 1 Windows 8 Windows 7 läuft kann es eine gewisse Zeit dauern bis dieser Monitor zum ersten Mal verknüpft ist Das Bildschirmbild kann bei der ersten Verknüpfung flackern 1 Schalten Sie den Computer ein 2 Klicken Sie auf Start All Programs NetDA Manager NetDA Manager Das Hauptfenster des Ne...

Page 29: ...verknüpft sind heben Sie die Verknüpfung auf siehe Seite 12 2 Deinstallieren Sie ggf den anderen Touch Panel Treiber 3 Installieren Sie den Touch Panel Treiber gemäß der Anleitung auf der CD ROM Zur Installation des Touch Panel Treibers siehe die Benutzerhandbuch des Touch Panel Treibers auf der CD ROM 4 Verknüpfen Sie den Monitor und den PC über ein Netzwerk siehe Seite 12 2 Kalibrieren Sie den M...

Page 30: ... Signal nicht gleich nach dem Einschalten ausgeben Prüfen Sie ob der Computer eingeschaltet ist Prüfen Sie ob das Signalkabel ordnungsgemäß angeschlossen ist Wechseln Sie das Eingangssignal mit Prüfen Sie ob das Netzwerkkabel ordnungsgemäß angeschlossen ist Prüfen Sie die Netzwerkkonfiguration Prüfen Sie die Netzwerkumgebung Wechseln Sie das Eingangssignal mit Prüfen Sie den Netzwerkstatus Diese M...

Page 31: ...à l utilisation du moniteur Manuel d utilisation de ce moniteur 1 Décrit les informations d application pour le moniteur telles que les ajustages d écran les réglages et les spécifications Manuel d utilisation NetDA Manager 1 Décrit l installation et l utilisation du NetDA Manager logiciel spécial pour la connexion réseau et la configuration réseau du moniteur Manuel d utilisation du pilote d écra...

Page 32: ...ement le cordon secteur Faites contrôler l appareil par un technicien qualifié avant de l utiliser à nouveau Placez le moniteur sur une surface stable et robuste Il y a risque de chute de l appareil sur une surface inappropriée qui pourrait entraîner des blessures ou endommager l appareil En cas de chute débranchez immédiatement le cordon secteur et faites contrôler l appareil par un technicien qu...

Page 33: ... spécifiée dans ce manuel pourrait causer un choc électrique un incendie ou d autres dégâts Ne surchargez pas les circuits d alimentation électrique cela pourrait entraîner un incendie ou un choc électrique Manipulez correctement le cordon secteur Ne faites pas passer le cordon sous le moniteur ou un autre objet lourd Ne tirez pas sur le cordon et ne le fixez pas Cessez d utiliser tout cordon sect...

Page 34: ...amais aux fiches électriques avec les mains humides Tout contact avec la fiche électrique les mains humides peut être dangereux et peut causer un choc électrique Utilisez une prise électrique facilement accessible Ceci vous permettra de débrancher rapidement l appareil en cas de problème Nettoyez régulièrement les alentours de la prise L accumulation de poussière d eau ou d huile sur la fiche peut...

Page 35: ...afficher le menu de réglage du volume Appuyez sur ou pour régler le volume 4 Touche Commute les signaux d entrée de l affichage 5 Touche Permet d afficher le menu Ajustage de sélectionner un élément de l écran de menu et de sauvegarder les valeurs ajustées 6 Touche Permet la sélection du menu ainsi que l ajustement et le réglage d une fonction Permet d afficher l écran de menu du luminosité Appuye...

Page 36: ...l est en cours c ALERT LED 3 Vert Rouge Clignote en rouge intervalle 0 25 sec Erreur du dispositif sans fil Clignote en rouge intervalle 1sec Echec de la connexion automatique à la mise en marche du moniteur Echec de la création d une liaison via le clavier Clignote en vert Recherche d ondes radio au démarrage du DFS en cours S allume en vert Permutation de canaux par la fonction DFS en cours ARRÊ...

Page 37: ...Liaison via un LAN câblé Câble réseau Connexion au réseau Vidéo Audio Communication USB Liaison via un LAN sans fil Vidéo Audio Communication USB Connexion au réseau Remarque Lorsque plusieurs PC sont connectés au moniteur appuyez sur à l avant du moniteur pour permuter le signal d entrée Un haut parleur avec amplificateur intégré peut être connecté au connecteur de sortie de la ligne du moniteur ...

Page 38: ...errez les vis des connecteurs pour assurer le couplage DVI D SUB D SUB 2 Branchez le cordon d alimentation dans une prise secteur et dans le connecteur d alimentation du moniteur 3 Appuyez sur pour mettre le moniteur sous tension Le témoin de fonctionnement du moniteur s éclaire en bleu 4 Mettez le PC sous tension L image affichée à l écran apparaît Si une image n apparaît pas reportez vous à la s...

Page 39: ...AN câblé page 9 Réglages via un LAN sans fil page 10 Réglages via un LAN câblé 1 Connectez le câble réseau câble direct ou croisé aux ports LAN du moniteur et du PC LAN LAN Attention Connectez directement le moniteur et le PC à l aide d un câble réseau 2 Branchez le cordon d alimentation dans une prise secteur et dans le connecteur d alimentation du moniteur 3 Appuyez sur pour mettre le moniteur s...

Page 40: ... tension Si le PC possède une adresse IP statique notez l adresse actuelle et modifiez les réglages du PC pour obtenir l adresse IP automatiquement 6 Recherchez le moniteur sur le PC et connectez le Les valeurs LAN sans fil par défaut du moniteur sont les suivantes SSID EZxxxxxx xxxxxx sont les 6 derniers chiffres de l adresse MAC Network Authentication Open 7 Installez le NetDA Manager sur le PC ...

Page 41: ...vert que la ALERT LED soit éteinte et que la Link LED en bas s allume Remarque Lorsque la connexion LAN câblée est établie au 1000BASE la Link LED s éclaire en orange foncé Lorsque la connexion est établie au 10BASE 100BASE elle clignote en vert 4 Connectez un autre câble réseau au port LAN du PC et au hub Ethernet Pour établir une liaison avec le LAN sans fil à l aide du mode Point d accès 1 Conn...

Page 42: ...Manuel d utilisation NetDA Manager sur le CD ROM pour obtenir plus de détails sur l installation du logiciel Si le PC cible exécute Windows 8 1 Windows 8 Windows 7 la première liaison à ce moniteur pourrait prendre du temps L image de l écran pourrait papilloter lors de la première liaison 1 Mettez le PC sous tension 2 Cliquez sur Start All Programs NetDA Manager NetDA Manager La fenêtre principal...

Page 43: ...un réseau supprimez la connexion voir page 12 2 Désinstallez l autre pilote d écran tactile si celui ci est installé 3 Installez le pilote de l éran tactile conforméent aux instructions fournies dans le disque d utilitaires LCD CD ROM Pour la méthode d installation du pilote d écran tactile voir le Manuel d utilisation du pilote d écran tactile sur le CD ROM 4 Reliez le moniteur et le PC via un ré...

Page 44: ...nateurs n émettent pas de signal dès leur mise sous tension Vérifiez si l ordinateur est sous tension Vérifiez que le câble de signal est correctement branché Changez le signal d entrée en appuyant sur Vérifiez que le câble du réseau est correctement branché Vérifiez la configuration du réseau Vérifiez l environnement du réseau Changez le signal d entrée en appuyant sur Vérifiez l état du réseau L...

Page 45: ...手册与用户手册 设定手册 本手册 说明显示器连接到个人计算机以及使用显示器的 基本信息 本显示器的用户手册 1 说明屏幕调整 设定和规格等应用信息 NetDA Manager 用户手册 1 说明了NetDA Manager 网络连接专用软件 的 安装与使用以及显示器的网络配置 触摸屏驱动程序用户手册 1 2 触摸屏驱动程序的安装和使用说明 1 光盘上的 PDF 文件 需要安装 Adobe Reader 2 仅适用于 FDS1702NT 未经EIZO Corporation事先书面许可 不得以任何形式或以任何方式 电子 机械或其它方式 复制本手册的任何 部分 或者将其存放到检索系统中或进行发送 EIZO Corporation没有义务为任何已提交的材料或信息保密 除非 已经依照EIZO Corporation书面接收的或口头告知的信息进行了事先商议 尽管本公司已经尽最大努力使本手册提 供最新...

Page 46: ...液体放置在远离设备的地方 如果小东西通过通风孔意外掉入设备或液体意外流入设备 则可能导致火灾 触电或设备损坏 如果物体或液体掉入 流入设备 请立即拔出设备插头 重新使用设备以前 请委托合格的维修 工程师对其进行检查 将设备安置在坚固稳定的地方 如果设备放在不恰当的平面上 则设备可能会跌落并导致人身伤害或设备损坏 如果设备跌落 请立即切断电源并咨询您的当地 EIZO 代表 切勿继续使用已损坏的设备 使用 已损坏的设备可能会导致火灾或触电 请在适宜的场所使用本设备 否则可能会导致火灾 触电或设备损坏 切勿放在室外 不要放置于可能受强烈振动或冲击影响的运输系统中 船舶 航空 火车 汽车等 切勿放置在多尘或潮湿的场所 禁止将设备放置在水滴可溅到屏幕的位置 浴室 厨房等 切勿放置在蒸汽会直接接触屏幕的场所 切勿放置在供暖设备或增湿器附近 禁止将设备放置在阳光可直射本产品的位置上 请勿放于有易燃气体的...

Page 47: ...而导致火灾或触电 设备必须连接到接地的电源插座 否则可能引起火灾或触电 请使用正确的电压 本设备只能在特定电压下使用 若将设备连接到本用户手册中指定的电压以外的电压时 可能 会导致火灾 触电或设备损坏 切勿使电路超载 否则可能会导致火灾或触电 请小心使用电源线 切勿将电源线压在本设备或其他重物下面 切勿拉扯或缠绕电源线 如果电源线已破损 请停止使用 使用已破损的电源线可能会导致火灾或触电 打雷时 绝对不要触摸插头和电源线 否则可能会导致触电 安装悬挂臂时 请参阅悬挂臂的用户手册 并牢固安装设备 否则可能会导致设备与悬挂臂脱离 从而可能造成人身伤害或设备损坏 如果设备跌落 请咨询 您的当地 EIZO 代表 切勿继续使用已损坏的设备 使用已损坏的设备可能会导致火灾或触电 重新安装倾斜底座时 请使用相同的螺丝并进行紧固 切勿直接光着手触摸已损坏的液晶显示屏 显示屏可能会有液晶流出 如果进入眼睛或...

Page 48: ...非常危险的 因为这样可 能会导致人身伤害 搬运本装置时 请如右图所示由底部抓紧装置 设备跌落可能会造成人身伤害或设备损坏 切勿在封闭场所安装该单元 如果内部发热 可能会导致火灾 触电或设备损坏 切切勿用湿手触摸插头 否则可能会导致触电 请使用易于接近的电源插座 这样可确保在出现问题时快速切断电源 定期清洁插头附近的区域 插头上的灰尘 水或油可能会导致火灾 设备清洁以前 请先将插头拔出 与电源插座相连时清洁设备可能会导致触电 如果计划长期不使用本装置 为了安全和节电 请在关闭电源后拔掉电源插头 ...

Page 49: ...息 3 按钮 显示音量调节菜单 按 或 调节音量 4 按钮 切换显示输入信号 5 按钮 显示调节菜单 确定菜单屏幕上的某个项目 并保存已调节的值 6 按钮 提供菜单选择以及某个功能的调节和设定 显示亮度调整菜单 按 或 调整亮度 7 按钮 开关电源 8 电源指示器 说明显示器工作状态 蓝色 工作 橙色 省电模式 关闭 主电源 电源关闭 9 扬声器 2 输出音频源 10 主电源开关 打开或关闭主电源 11 电源连接器 连接电源线 12 局域网端口 连接网线 a Link LED 绿色 深橙色 深橙灯亮 通过有线局域网 1000BASE 建立了网络连接 绿灯亮 通过有线局域网 10BASE 100BASE 建立了网络连接 关闭 通过有线局域网禁用了网络连接 b Status LED 橙色 闪烁 正在进行数据传输 13 USB端口 下 连接外部USB设备 注意 连接的设备只能通过使用网络链接的P...

Page 50: ... 1秒的时间间隔 显示器开启时 无法自动连接 无法通过键盘操作进行链接 闪烁绿灯 在DFS启动进程中搜寻无线电波 绿灯亮 DFS功能下的频道切换正在进行中 关闭 正常运行 d CONNECT LED 绿色 灯亮 连接到 PC 闪烁 未连接到 PC 19 接线板 固定电缆 20 底座 用于调节显示器屏幕角度 1 ScreenManager是EIZO的调节菜单的别名 关于如何使用ScreenManager 请参照显示器用户手册 在CD ROM上 2 只有当显示器是通过网络链接到PC上时 显示器的音频方可进行输入和输出 当显示器是使用模拟信号电缆连接到PC上 时 不支持音频输入 输出 输入 输出音频时 需设置一个 Audio Device Connection 请参阅 在CD ROM上 NetDA Manager用户手册 3 本产品支持DFS Dynamic Frequency Selectio...

Page 51: ... 根据所需的显示器使用途径设置显示器 模拟连接 参阅 模拟连接 第8页 使用信号线的连接 信号线 模拟连接 网络连接 参阅 网络连接 第9页 通过有线局域网链接 网线 网络连接 视频 音频 USB 通信 通过无线局域网链接 视频 音频 USB 通信 网络连接 注 当多台PC连接到显示器上时 按显示器前端的 来切换输入信号 带内置功放的扬声器可以连接到显示器线路输出连接器以输出音频 外置扬声器 只有当显示器是通过网络链接到PC上时 显示器的音频方可进行输入和输出 例如 ...

Page 52: ...手册 在CD ROM上 模拟连接不支持音频输入 输出 1 将信号线连接至输入信号连接器和PC 检查连接器的形状 然后连接电缆 连接到信号线后 请拧紧连接器的螺钉 固定连接 DVI D SUB D SUB 2 将电源线插头插入电源插座和显示器上的电源连接器 3 按 打开显示器电源 显示器电源指示灯以蓝色亮起 4 打开个人计算机电源 出现画面图像 如果未出现图像 请参照 无图片 第14页 获得帮助 注意 使用后关闭显示器和个人计算机 为了最大限度地省电 建议您关闭电源按钮 断开主电源开关 或者拔掉电源插头 彻底断开显示器电源供应 信号线 FD C16 选购件 信号线 MD C87 选购件 或 ...

Page 53: ... 执行显示器的网络配置 注 可以通过有线或无线局域网进行网络配置 我们建议使用有线局域网 通过有线局域网进行设置 第9页 通过无线局域网进行设置 第10页 通过有线局域网进行设置 1 将网线 直连或交连电缆 连接到显示器和PC的局域网端口 LAN LAN 注意 使用网线直接连接显示器和PC 2 将电源线插头插入电源插座和显示器上的电源连接器 3 按 打开显示器电源 显示器电源指示灯以蓝色亮起 4 检查显示器旁的CONNECT LED灯是否为绿色闪烁状态 LINK LED灯是否也亮起绿色 5 打开个人计算机电源 若PC有一个静态的IP地址 记下当前地址并改变PC设置自动获取IP地址 6 在PC上安装NetDA Manager 7 执行显示器的网络配置 注 有关如何安装NetDA Manager或如何执行显示器网络配置的信息 请参阅NetDA Manager用户手册 在CD ROM上 8 从显...

Page 54: ...旁的CONNECT LED灯是否为绿色闪烁状态 LINK LED灯是否也亮起绿色 5 打开个人计算机电源 若PC有一个静态的IP地址 记下当前地址并改变PC设置自动获取IP地址 6 在PC上搜索显示器 然后将其连接 默认的显示器无线局域网设置如下 SSID EZxxxxxx xxxxxx 是MAC地址的最后6位数字 Network Authentication Open 7 在PC上安装NetDA Manager 8 执行显示器的网络配置 注 有关如何安装NetDA Manager或如何执行显示器网络配置的信息 请参阅NetDA Manager用户手册 在CD ROM上 MAC地址 显示在显示器背面 MAC地址与以太网地址是相同的 ...

Page 55: ...的以太网集线器 2 将电源线插头插入电源插座和显示器上的电源连接器 3 检查显示器旁的CONNECT LED灯是否为绿色闪烁状态 ALERT LED灯是否熄灭 以及底部Link LED灯是否亮起 注 当有限局域网建立在1000BASE时 深橙色Link LED灯亮起 当连接建立在10BASE 100BASE时 绿灯亮起 4 将另一根网线连接到PC的局域网端口和以太网集线器上 使用访问点模式创建无线局域网链接 1 将网线连接至显示器局域网端口和以太网集线器 注 以太网集线器用于通过有线局域网链接显示器和其他网络设备 在要安装显示器的网络环境中 若存在带有免费局域网端口的以太网集线器或宽带路由器 显示器可以连接到 免费的局域网端口之一 无需安装一个新的以太网集线器 2 将电源线插头插入电源插座和显示器上的电源连接器 安装示例 以太网集线器 电源线 至电源插座 网线 安装示例 以太网集线器 电源...

Page 56: ...链接显示器和PC 注意 NetDA Manager和Display Driver必须安装在目标PC上 若没有安装 请安装上述软件 具体可参阅NetDA Manager用 户手册 在CD ROM上 如果目标PC运行的是Windows 8 1 Windows 8 Windows 7系统 首次与该显示器链接可能会需要一段时间 首次链接时 屏幕图像可能会发生闪烁 1 打开个人计算机电源 2 单击 Start All Programs NetDA Manager NetDA Manager 出现NetDA Manager主窗口 3 选择要链接到PC上的显示器 4 单击 Connect PC屏幕上的图像出现在显示器上 如果未出现图像 请参阅 无图片 第14页 或NetDA Manager用户手册之 故障排除 在CD ROM上 注 解除显示器和PC的链接时 在NetDA Manager的主窗口选择将要解...

Page 57: ...动程序更新驱动程序等时 请在卸载驱动程序后重新启动个人计算机 然后安装触摸屏驱动程 序 1 将触摸屏驱动程序安装到PC上 1 当显示器和PC通过网络相互链接时 解除链接 参阅第12页 2 如果安装了其它触摸屏驱动程序 请将其卸载 3 根据CD ROM中的说明安装触摸屏驱动程序 如要了解触摸屏驱动程序的安装说明 请参照触摸屏驱动程序用户手册 在CD ROM上 4 通过网络链接显示器和PC 参阅第12页 2 校准显示器 校准显示器 校准方法根据触摸屏驱动程序用户手册 在CD ROM上 调整屏幕角度 用双手抓住显示器的左右两边 将屏幕倾斜并转到最适合工作的状态 注意 请确认各接线是否正确 ...

Page 58: ... 显示下列信息 即使显示器正常工作 如果不正确输入信号 也显示此信息 当没有信号输入时 出现该信息 可能会出现左边所示的信息 因为某些个人计算机不会 在刚开启电源时即输出信号 检查个人计算机的电源是否已打开 检查信号线连接是否正确 用 切换输入信号 检查网线连接是否正确 检查网络配置 检查网络环境 用 切换输入信号 检查网络状态 该信息表示输入信号不在指定频率范围之内 该信号频率将以洋红色显示 例如 fH 水平扫描频率 fV 垂直扫描频率 检查PC配置是否符合显示器的分辨率和垂直扫描频率 要求 参阅用户手册中的 兼容的分辨率 重新启动PC 用显卡工具选择合适的设定 详细说明 请参照显卡使 用手册 注 如果显示的图像或者触摸屏有问题 请参照显示器用户手册 在CD ROM上 如果出现网络连接问题 请参阅NetDA Manager用户手册 在CD ROM上 ...

Page 59: ......

Page 60: ... 2013 2015 EIZO Corporation All rights reserved 中国苏州市苏州工业园区展业路8号中新科技工业坊5B Phone 86 512 6252 0100 Fax 86 512 6252 1508 Helmut Grashoff Strasse 18 41179 Mönchengladbach Germany Phone 49 2161 8210210 Fax 49 2161 8210150 153 Shimokashiwano Hakusan Ishikawa 924 8566 Japan Phone 81 76 277 6792 Fax 81 76 277 6793 ...

Reviews: