background image

13

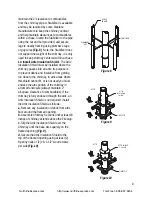
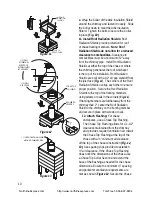
Figure 17

clearance between the chimney and any 

combustible materials.  Interior enclosures 

may be constructed with standard framing and 

sheathed with sheetrock or plywood.  Use a Wall 

Strap or Stabilizer at least every 8 feet to maintain 

a minimum of 2 inches of air space between the 

chimney and combustible materials. 

OFFSET  ELBOW  INSTALLATION 

A 30° elbow (measured from the vertical) is 

the largest that can be used in an offset.  A 

30° elbow may not be combined with another 

elbow to make a steeper offset (e.g. two 30° 

elbows are not allowed to be put together to 

form a 60° elbow).  Avoid elbows if possible.  A 

totally vertical chimney is more efficient.  When 

elbows are necessary to avoid obstructions 

such as rafters, ridgepoles, or joists, you 

are only allowed to use 1 pair of elbows in 

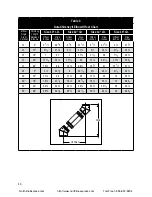
any one chimney system.  refer to Offset 

Chart in Table 3 (page 14)  to determine the 

pipe sections needed for the offset desired. 

horizontal runs of chimney violate building 

code and are not allowed.

1. Attach Elbows:  Attach elbow to Chimney 

Section or other elbow by mating the male 

and female ends with each other and 

using the (4) sheet metal screws provided.  

Attach one elbow to the Chimney Section 

below, and align it for the offset.  Determine 

the required offset length and attach an 

appropriate length (or lengths) of Chimney 

Section(s) above the elbow.  Attach the 

second elbow above the Chimney Section to 

complete the offset (Fig. 17)

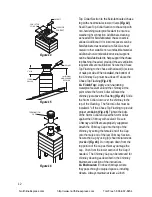
2. Secure Offset: Use an elbow Strap to 

secure the offset. Secure the elbow Strap’s 

band to chimney around the upper portion of 

the top elbow, then tighten the nut and bolt 

until the clamp is firm.  Wrap the Elbow Strap 

end over an adjacent joist or rafter and secure 

it with at least two 8-penny nails or #8, 1-1/2” 

Figure 18

screws.  Add additional elbow Straps for each 

section of chimney in the offset (Fig. 18)

every chimney section in the offset must be 

supported. Do not add more Chimney Sections 

until the elbows and the offset are supported.  

Be sure that the chimney above the second 

elbow remains vertical.

30° OR 15°

ELBOW STRAP

ELBOW

ELBOW STRAP

1 PER

SECTION

ELBOW STRAP

NorthlineExpress.com

http://www.northlineexpress.com

Toll-Free 1-866-667-8454

Summary of Contents for DuraChimney II

Page 1: ...himney ii Complete Venting Solutions for the Hearth Industry Installation Instructions Air Cooled All Fuel Chimney for Fireplaces NorthlineExpress com http www northlineexpress com Toll Free 1 866 667...

Page 2: ...Chimney II is listed to UL 103 and ULC S604 standards for use on masonry fireplaces which burn wood oil coal or gas Some factory built fireplaces may be listed with DuraChimney II Check to the firepla...

Page 3: ...ce Installation Frame Opening Chart 6 Chimney Sizing Chart 11 Elbow Offset Installation 13 Elbow Offset Chart 14 Chimney Maintenance 15 Warranty 16 Air cooled all fuel chimney for fireplaces DuraChimn...

Page 4: ...or positive pressure appliances The DuraChimney II system is designed to extend vertically with a maximum of one 1 offset two elbows total of up to 30 from vertical DuraChimney II is listed under UL R...

Page 5: ...rough floors of buildings requiring the protection of vertical openings shall be enclosed with approved walls having a fire resistance rating of not less than one hour when such chimneys are located i...

Page 6: ...on which to attach the Anchor Plate or Anchor Plate If the top of the masonry does not have a level surface then you will need to modify the masonry accordingly Center the Anchor Plate over the mason...

Page 7: ...ve cut Frame openings at each floor level above the Fireplace Fig 4 These openings are to hold the Firestop and Attic Insulation Shield Locate each opening by dropping a plumb bob to the four corners...

Page 8: ...ections Fig 6 Do not penetrate the inner liner of the chimney Use a Wall Strap every eight 8 feet of chimney height 9 Supplementary Support and Stabilizer Install a Supplementary Support if total chim...

Page 9: ...cannot fit or is not used you must enclose the attic portion of the chimney in a framed enclosure always maintain 2 air space clearance to combustibles If the chimney is fully enclosed through the at...

Page 10: ...g members are further away from the chimney than 2 center the Roof Radiation Shield to the chimney on the framing member and secure in place with screws or nails 12 Attach Flashing For chase enclosure...

Page 11: ...le is 12 diameter pipe T W H T W H 8 7 6 30 16 14 20 8 10 15 12 10 50 40 30 24 48 60 36 42 72 HEIGHT 36 30 42 24 48 18 W IDTH 18 20 22 24 20 18 60 72 84 84 HEIGHT FEET CHIMNEY FIREPLACE OPENING INCHES...

Page 12: ...he Flashing Fig 15 Slide the Storm Collar down over the chimney to the top of the Flashing The Storm Collar must be installed 1 off the Chase Top Flashing to provide proper ventilation Fig 15 Tighten...

Page 13: ...1 Attach Elbows Attach Elbow to Chimney Section or other Elbow by mating the male and female ends with each other and using the 4 sheet metal screws provided Attach one Elbow to the Chimney Section b...

Page 14: ...hes Rise Inches Offset Inches Rise Inches 15 0 2 20 2 21 2 21 2 21 15 12 5 31 5 31 5 32 5 32 15 18 7 37 7 37 7 38 7 36 15 36 11 54 11 55 11 55 11 55 15 48 14 66 14 66 14 67 14 67 30 0 5 22 6 22 6 24 6...

Page 15: ...attach the top lid of the Cap to the cap s legs 5 Coal To reduce corrosion in chimneys where coal is burned clean the chimney thoroughly within 48 hours of shutting down the appliance for the season 6...

Page 16: ...ro PelletVent CornVent DuraLiner DuraFlex DirectVent Pro Type B Gas Vent DuraConnect or DVL with dated proof of purchase Purchaser s sole remedy is replacement of component fittings and chimney pipe l...

Reviews: