background image

10

VIDEO

DOC.CAMERA

KEYSTONE

ASPECT

SEARCH BLANK

MUTE

MY BUTTON

POSITION

1

2

ESC

ENTER

MENU

RESET

COMPUTER

MY SOURCE/

AUTO

MAGNIFY

VOLUME

ON

OFF

FREEZE

      FOCUS                             D-ZOOM

-           +           -            +

10. Operation (continued)

Selecting an aspect ratio

Each time you press the 

ASPECT

 button 

on the remote control, it switches the 

aspect ratio of the image, in turn.

Muting the sound

Press the 

MUTE

 button on the remote control. To restore the sound, press the 

MUTE

 or 

/

-

 button.

NOTE

• For details, see the 

Operating Guide

 in the CD.

Adjusting the picture position

After pressing the 

POSITION

 button on 

the remote control, use the ▲, ▼, ◄ and 

► buttons. Press the 

POSITION

 button 

again to finish this operation.

Zooming

Use the

 D-ZOOM +

 and 

D-ZOOM – 

buttons on the remote control to adjust the 

screen size.

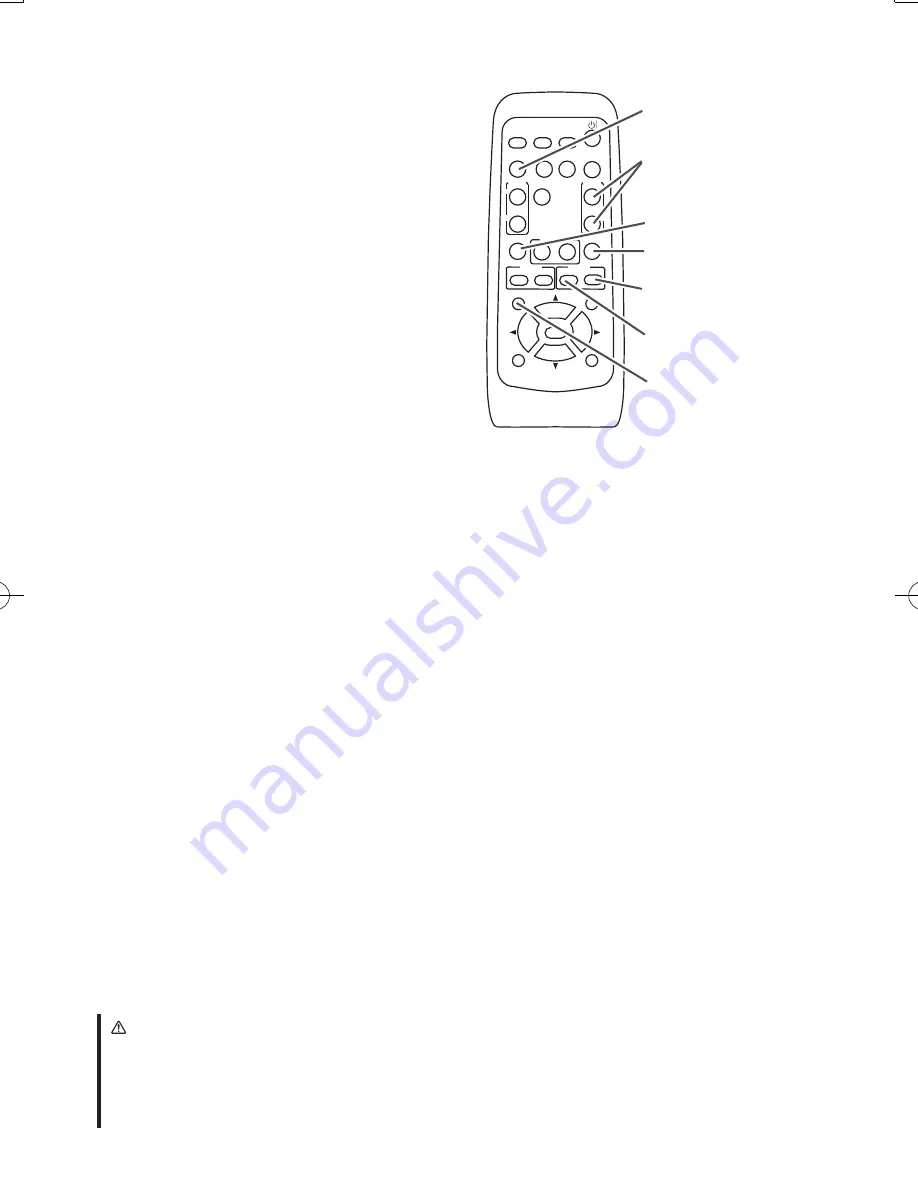
D-ZOOM +

 button

D-ZOOM –

 button

POSITION 

button

KEYSTONE

 button

/-

 button

ASPECT

 button

MUTE

 button

Correcting distortion

Press the 

KEYSTONE

 button on the remote control. A dialog will appear on the screen to 

aid you in correcting the distortion. 

Use the ▲/▼ cursor buttons to select, 

MANUAL

 or 

PERFECT FIT

 operation, and press 

the ► button to perform the following.

MANUAL

 displays a dialog for keystone correction. 

PERFECT FIT

 displays a dialog for adjusting the shape of the projected image in each 

of the corners and sides.

Use the cursor buttons according to the dialog, checking the image.  

Press the 

KEYSTONE

 button again to finish this operation.

Adjusting the volume

Use the 

/

-

 buttons to adjust the volume.

CATION

■ If you wish to have a blank screen while the projector's lamp is on, use the 

BLANK


function. (See the “

Operating Guide

” in the CD.)  Any other method of blocking the 

projection light, such as attaching something to the lens or placing something in front of 

the lens, may cause the damage to the projector.

d11_01CP-A200_CO_ENG.indd   10

2009/12/22   9:37:56

Summary of Contents for 8103H

Page 1: ...m www dukane com av Information in this Guide may change due to product improvements To obtain the latest manuals literature and software please visit the Dukane web site at www dukane com av and look at the specific model SUPPORT or DOWNLOADS section Data Video Projector User s Manual Concise Model 8103H 403 8103H C 00 Concise ...

Page 2: ... 9 Adjusting the projection position 9 10 Operation 9 11 Turning the projector off 11 12 Replacing the lamp 12 13 Maintaining the air filter 14 14 Caring for the mirror and lens 15 15 Using the CD manual 16 16 Regulatory notices 17 17 Warranty and after service 18 18 Specifications 19 WARNING Before using this product be sure to read all the manuals for the product Heed all the warnings and cautio...

Page 3: ...g to decide the projection style For the case of installation in a special state such as ceiling mount the specified mounting accessories and service may be required Before installing the projector consult your dealer about your installation 2 Ceiling mount 1 Usual use NOTE When installing the projector confirm that there is nothing that blocks the projection light between the projector and the sc...

Page 4: ...nch to 100 inch diagonal The screen image adjusted out of this range either smaller or larger may be deteriorated 1 2 2 Arrangement continued Refer to the following for the projection distance The values shown in the table are calculated for a full size screen 1024 x 768 A Screen size diagonal B1 B2 Projection distance 8 C1 C2 Screen height 8 inch cm inch cm inch cm inch cm inch 60 9 6 4 47 4 19 2...

Page 5: ...ver see the paragraph 6 Using the cable cover 6 beforehand WARNING Use only the accessories contained in this product or recommended by your dealer Do not modify the projector or accessories For the cable with a ferrite core only at one end connect the end with the core to the projector The cables may be required a specific length or a ferrite core by the regulations Be careful not to damage the c...

Page 6: ...wer supply indicated on the projector Use a power outlet that is close to the projector and easily accessible Connect firmly the power cord not to result in loose connection Do not use a loose or unsound power outlet Do not overload the outlet since overloading can result in a risk of fire or electric shock Use only the power cord contained in this product unless it is damaged If it is damaged con...

Page 7: ...by the hot exhaust gas may cause a burn Do not use the security bar or slot for the purpose of fall prevention since these are not designed for it 6 Using the cable cover Utilize the cable cover as the guard and blind for the connecting parts 1 Connect the signal cables and the power cord to the projector first 2 Attach the cable cover to the projector uniting the interlocking parts 3 Tighten the ...

Page 8: ...sensors from being hit by a strong ray It may cause malfunction of the projector and remote control WARNING Be careful of handling a battery as a battery can cause explosion cracking or leakage which could result in a fire an injury and environment pollution Use only the specified and new battery Do not use a battery with damage such as a scratch a dent rust or leakage Do not mix a new battery wit...

Page 9: ...rol The buttons may not work soon 2 Confirm that there is nothing that the lens door hits while opening Then press the STANDBY ON button on the projector or remote control The lens door opens the projection lamp lights up and the POWER indicator begins to blink green NOTE This projector has the DIRECT POWER ON function For details see the Operating Guide in the CD Install the projector in the way ...

Page 10: ... feet to 43 mm or more The foot lengthened exceeding the limit may come off from the projector and result in an injury 10 Operation Displaying and switching the image Press the INPUT button on the projector to display the image from one of active input ports Each time you press the button the port is switched in turn when two or more signals are inputted Focusing Use the FOCUS and FOCUS buttons on...

Page 11: ...OSITION button KEYSTONE button VOLUME button ASPECT button MUTE button Correcting distortion Press the KEYSTONE button on the remote control A dialog will appear on the screen to aid you in correcting the distortion Use the cursor buttons to select MANUAL or PERFECT FIT operation and press the button to perform the following MANUAL displays a dialog for keystone correction PERFECT FIT displays a d...

Page 12: ...nds cooling the projector down enough Do not turn the projector on for about 10 minutes or more after turning it off to prevent shortening its life 3 Press the side marked O of the power switch as the power off position The POWER indicator goes off NOTE This projector has the AUTO POWER OFF function For details see the Operating Guide in the CD CAUTION Be careful not to pinch your finger with the ...

Page 13: ... 2 screws of the lamp that are loosened in the previous process to lock it in place 6 Slide the lamp cover into place and firmly tighten the screw of the lamp cover 7 Plug in and restart the projector 5 8 Then reset the lamp time which is the time counter for the lamp use 1 Press the or button on the projector or the MENU button on the remote control The EASY MENU appears 2 Point at the Go to Adva...

Page 14: ...om well and make sure not to inhale the gas or fine particles that come out from the projector s vent holes and not to get them into your eyes or mouth Before replacing the lamp turn the projector off and unplug the power cord then wait for at least 45 minutes for the lamp to cool sufficiently Handling the lamp while hot can cause burns as well as damaging the lamp Never unscrew except the appoint...

Page 15: ...removed Filter unit Intake vents 1 Turn the projector off and unplug the power cord from the power outlet And cool the projector down by leaving it for a while as it is 2 Use the vacuum cleaner on and around the filter unit 3 Slide the filter unit upward to take it off from the projector 4 Use the vacuum cleaner on the intake vents of the projector 5 Use the vacuum cleaner on the cover side of the...

Page 16: ...t to clean up 4 To close the lens door properly please take the following procedure 1 Plug in the projector 2 Turn on the power switch Even though the lens door starts to close it might not be closed properly 3 Press the STANDBY ON button so that the lamp starts to light up 4 After the POWER indicator turns to steady green press the STANDBY ON button twice to turn off the projector The lens door w...

Page 17: ...n the Projectors icon appeared on the desktop screen 2 When main html file is clicked Web browser will start and Initial window will appear 2 Click the model name of your projector first and then click language you want from the displayed list The user s manual will open CAUTION Only use the CD in a computer s CD drive The CD is designed for PC use only Never insert the CD into a non computer CD p...

Page 18: ...rference in a residential installation This equipment generates uses and can radiate radio frequency energy and if not installed and used in accordance with the instructions may cause harmful interference to radio communications However there is no guarantee that interference will not occur in a particular installation If this equipment does cause harmful interference to radio or television recept...

Page 19: ...curs with the projector first refer to the Troubleshooting of the Operating Guide in the CD and run through the suggested checks If this does not resolve the problem please contact your dealer or service company They will tell you what warranty condition is applied Please check the following web address where you may find the latest information for this projector http www hitachi us digitalmedia o...

Page 20: ...IN1 D sub 15 pin mini x 1 COMPUTER IN2 D sub 15 pin mini x 1 Y CB PB CR PR Component video RCA x 3 S VIDEO mini DIN 4 pin x 1 VIDEO RCA x 1 MONITOR OUT D sub 15 pin mini x 1 AUDIO IN1 Stereo mini x 1 AUDIO IN2 Stereo mini x 1 AUDIO IN3 L R RCA x 2 AUDIO OUT Stereo mini x 1 CONTROL D sub 9 pin x 1 Optional parts Lamp 456 8101H Filter unit UX35381 Soft case CA100 For more information contact to your...

Page 21: ......

Reviews: