INSTALLATION MANUAL
DS-N4 - HD-SDI Video
Page:
6
Page:
6
DSE SRL - ITALY - WWW.DSE.EU
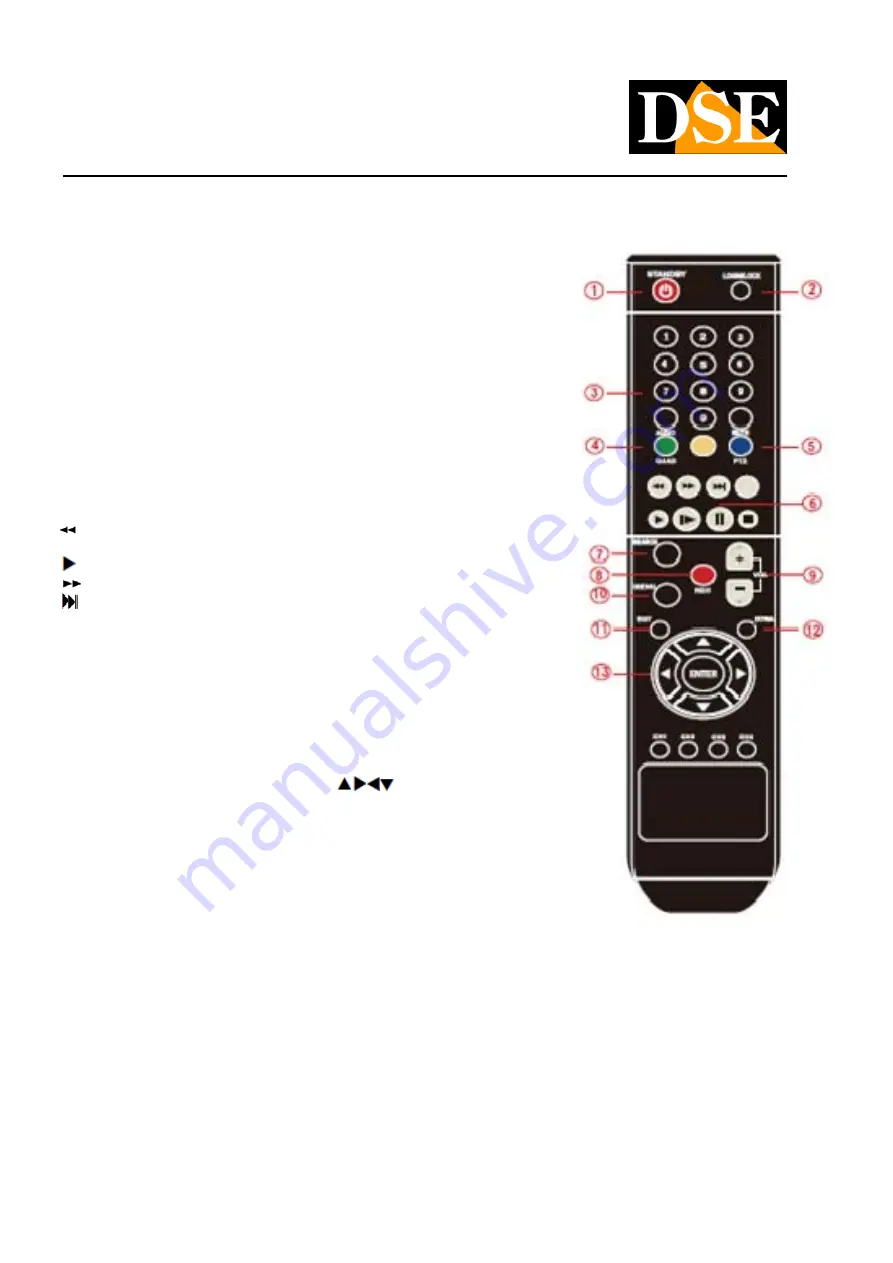
TV remote
Most of the buttons on the remote replication the keys on the DVR keyboard.
Description remote control buttons:
1.
STANDBY:
Enable or disable the STANDBY mode (ON / OFF). If you want to turn off the DVR
1.
STANDBY:
Enable or disable the STANDBY mode (ON / OFF). If you want to turn off the DVR
1.
STANDBY:
Enable or disable the STANDBY mode (ON / OFF). If you want to turn off the DVR
2.
LOGIN / LOCK:
No use at the time
2.
LOGIN / LOCK:
No use at the time
2.
LOGIN / LOCK:
No use at the time
3.
Numbers / Channel buttons:
In the menu, press these buttons to enter numeric values; while
3.
Numbers / Channel buttons:
In the menu, press these buttons to enter numeric values; while
3.
Numbers / Channel buttons:
In the menu, press these buttons to enter numeric values; while
viewing live press them to open the desired channel to full screen.
4.
QUAD:
Swing into the contemporary live viewing of 4 channels to live viewing a full-screen
4.
QUAD:
Swing into the contemporary live viewing of 4 channels to live viewing a full-screen
4.
QUAD:
Swing into the contemporary live viewing of 4 channels to live viewing a full-screen
channel.
5.
PTZ:
Opens the PTZ controller for moving the dome camera ..
5.
PTZ:
Opens the PTZ controller for moving the dome camera ..
5.
PTZ:
Opens the PTZ controller for moving the dome camera ..
6.
Playback controls:
These commands can be used during movie playback
6.
Playback controls:
These commands can be used during movie playback
6.
Playback controls:
These commands can be used during movie playback
: Back to normal 1x playback, fast 2X, 4X, 8X or slow 1 / 2x 1 / 4x, 1 / 8x.
: Starts playback.
: Increases the playback speed 2X, 4X, 8X. : Plays back frame by frame.
║: Pause. Stop playing on a frame.
║: Pause. Stop playing on a frame.
■ : Exits the playback.
7.
SEARCH:
Opens the search window.
7.
SEARCH:
Opens the search window.
7.
SEARCH:
Opens the search window.
8.
RECORD:
Start manual recording, press it again to stop recording.
8.
RECORD:
Start manual recording, press it again to stop recording.
8.
RECORD:
Start manual recording, press it again to stop recording.
9. + / - : In the menu press the buttons to change the setting values.
9. + / - : In the menu press the buttons to change the setting values.
9. + / - : In the menu press the buttons to change the setting values.
10.
MENU:
Opens the main menu window.
10.
MENU:
Opens the main menu window.
10.
MENU:
Opens the main menu window.
11.
EXIT:
Close the main menu window.
11.
EXIT:
Close the main menu window.
11.
EXIT:
Close the main menu window.
12.
EXTRA:
For future use.
12.
EXTRA:
For future use.
12.
EXTRA:
For future use.
13.
Navigation (arrows) / Enter:
13.
Navigation (arrows) / Enter:
When pressing the menu
arrows to select the desired item and press Enter to confirm the selection; live display, press
Enter to open the menu bar.
Making connections
Before turning on the VCR is necessary to arrange the connections with the peripheral units which we explain below.
•
Connect HD-SDI cameras
The cameras are connected to the BNC Video IN. DS-N4 is not suitable for connecting analog or web cameras on the contrary, it is
absolutely not able to play, but is designed to handle HD-SDI cameras in Full HD 1080p resolution. These cameras can be connected
with the same RG59 coaxial cable and BNC connectors that are used for analog cameras. But we must pay attention to the fact that the
HD-SDI signal is much more delicate analog video and requires high-quality coaxial cables


