background image

DRUCK

TEMPERATUR

&

Leitenberger GmbH •

Bahnhofstr. 33 • D-72138 Kirchentellinsfurt •

Tel. +49 (0) 7121-90920-0 • Fax +49 (0) 7121-90920-99 •

[email protected] •

• www.druck-temperatur.de

GERMANY

DT

www.

-Cal.net

LR

MANUAL

LTC 100

35

1.0 Introduction

2.0 Thermocouple Theory

The

is a high precision, multi-functional, hand-held calibrator suitable for

the process control industry. Its speciality is Thermocouple and Resistance Temperature
Detector(

) based instruments which it can measure and source. Ohms, millivolts,

milliamps and circuit continuity can also be measured. The trend feature is ideal for
graphing temperature profiles and

controller optimization. Its small size, long battery

life and high precision make the

ideal for industrial field calibration.

LTC 100

RTD

PID

LTC 100

LR-

Cal

LR-

Cal

A thermocouple is made of two dissimilar metals or alloys joined at the measuring end,
(Hot Junction) and connected to a meter at the other end (Cold Junction).A potential
difference is created between the hot and cold junctions when there is a temperature
difference between them. The temperature at the cold junction is then measured and
added to the difference to give the correct reading.

(

LR-

Cal

LTC 100

: Set

Temp to ‘internal’).

CJ

For bare wire connection (measure or source) an extender terminal housing is used. This
has a Pt100 element mounted in the terminals and the cold junction temperature is
sampled at five second intervals.

(

LR-

Cal

LTC 100

: Set

Temp to ‘external’)

CJ

In some cases the cold junction is put into an icebox or maintained at a constant
temperature, typically 50 °C, in which case the cold junction is set manually to 0 °C or 50 °C.
For laboratory accuracy, the cold junction can be in an insulated box with an accurate
thermometer to measure the temperature.

(

LR-

Cal

LTC 100

: Set

Temp to ‘manual’ and key in temperature)

Thermocouple extension wires are copper alloys that give the same mV/°C as the
thermocouple type. These are used to extend the thermocouple to the cold junction. This is
primarily as a result of cost as some thermocouple metals are very expensive, for instance
Platinum-Rhodium.

CJ

Summary of Contents for LR-Cal LTC 100

Page 1: ...alibrator Mul func on Temperature Calibrator DEUTSCH ab Seite 2 Page 30 ff ENGLISH DRUCK TEMPERATUR Leitenberger GmbH Bahnhofstr 33 D 72138 Kirchentellinsfurt Tel 49 0 7121 90920 0 Fax 49 0 7121 90920 99 Info Leitenberger de www druck temperatur de GERMANY DT www Cal net LR MANUAL LTC 100 1 ...

Page 2: ...CK TEMPERATUR Leitenberger GmbH Bahnhofstr 33 D 72138 Kirchentellinsfurt Tel 49 0 7121 90920 0 Fax 49 0 7121 90920 99 Info Leitenberger de www druck temperatur de GERMANY DT www Cal net LR MANUAL LTC 100 2 ...

Page 3: ...mperatur am Cold Junction Punkt gemessen und zu dieser Differenz addiert um eine korrekten Temperaturmesswert zu erhalten Verlängerungsleitungen für Thermoelemente können aus einer Kupferlegierung sein die das gleiche Verhältnis mV C verfügen wie das verwendete Thermoelement Solche Verlängerungsleitungen werden verwendet um die Zuleitung des Thermoelements zur Kaltstelle Cold Junction zu verlänger...

Page 4: ... n sind am stabilsten und genauesten Am meisten verbreitet ist Pt 100 100 Ohm Widerstand bei 0 C aber auch andere Widerstandswerte können verwendet werden Für besonders hohe Anforderungen an die Genauigkeit wird Pt 1000 1000 Ohm Widerstand bei 0 C verwendet Solche Elemente sind normalerweise in Hochtemperaturglas oder Keramik eingekapselt Die Messspannung sollte auf ca 1 mA limi ert sein um eine S...

Page 5: ...en der Umgebungstemperatur Bei höheren Anforderungen an die Genauigkeit werden 3 Leiter Schaltungen verwendet bei denen zwei der Leitungen kombiniert am Sensor angeschlossen sind Für höchste Ansprüche an die Genauigkeit werden 4 Leiter Schaltungen verwendet bei denen jeweils zwei der Leitungen kombiniert am Sensor angeschlossen werden 200 100 0 200 100 400 300 500 600 700 800 900 0 100 200 300 400...

Page 6: ...ur Veränderung der Stromspeisung Änderung an Menü Einstellungen Werteeinstellungstasten Veränderung von Untermenü Optionen Zurück in Untermenü zurück in Hauptmenü ENTER Taste Bestätigung von ausgewählten Menü Optionen und schalten des Gerätes EIN AUS HOCH RUNTER und scrollen in Menüs ein Untermenü Text basierend Untermenü Hauptmenü ein Hauptmenü Icon basierend Datum und Zeit 4 2 Anzeige Messung ei...

Page 7: ...ät sein mit kleiner Gleichspannungswelle beginnt zu scrollen sobald der Kalibrator geladen wird 3 Wenn die Ladeanzeige nicht mehr scrollt entfernen Sie das Ladegerät vom Kalibrator und von der Steckdose Ein kompletter Ladevorgang dauert etwa 5 Stunden 4 Die Ladespannung muss zwischen 8 und 15 liegen inner Pin an VDC Der Kalibrator kann also auch mit anderen Gleichspannungsquellen geladen werden z ...

Page 8: ...oop Funktion Trendgrafik Spannung mV Widerstand Ohm Thermo elemente Widerstands thermometer Trendgrafik Bereich 2 3 4 Leiter Trendgrafik Typ Temp Einheit Trendgrafik KV Trendgrafik Einheit Typ 2 3 4 Leiter Strom mA Spannung mV Widerstand Ohm Thermo elemente Widerstands Thermometer Fun tion k Modus Einheit Loop Versorgung Bereich Modus Bereich Modus Modus Einheit Typ KV Temp Typ Einheit Modus Geben...

Page 9: ...gsten vorkommenden elektrischen Anschlusssituationen 6 1 Messen von Strom mA 3 4 Leiter Messumformer Controller usw Versorgung Von mA ausgebendem Gerät Externe Versorgung 0 24 000 mA Schleifen Versorgung 24V schalten AUS O R DE Im Schaltkreis Externe Versorgung 0 24 000 mA Schleifen Versorgung 24V schalten AUS O R DE 2 Leiter Messumformer 2 Leiter Messumformer Interne Versorgung 0 24 000 mA Schlei...

Page 10: ...0 mV Thermoelement Messzellenspeisung usw mV Thermoelemente Typ J K T B R S E N U oder L Widerstände 1 bis 400 00 1 bis 2 200 0 Ω Ω Widerstandsthermometer Pt50 Pt 100 Pt200 Pt500 Pt1000 Ni100 Ni120 Widerstände 1 bis 400 00 1 bis 2 200 0 Ω Ω Widerstandsthermometer Pt50 Pt 100 Pt200 Pt500 Pt1000 Ni100 Ni120 Für bessere Ergebnisse und einfachere Handhabung verwenden Sie die mitgelieferte Terminal Ext...

Page 11: ...1 bis 400 00 1 bis 2 200 0 Ω Ω Widerstandsthermometer Pt50 Pt 100 Pt200 Pt500 Pt1000 Ni100 Ni120 Widerstand 3 Leiter Widerstandsthermometer zweimal 2 Leitungen am Widerstand miteinander verbunden RTD Link on RTD 6 8 Geben von Strom mA Schleifen Versorgung 24V schalten EIN An mA messendes Gerät Intern versorgt 0 24 000 mA an passiven Eingang 3 4 Leiter Anschluss Anzeigegerät Transmitter Rekorder PL...

Page 12: ...H 10 bis 100 000 mV Thermoelement Anzeige usw mV Thermoelemente Typ J K T B R S E N U oder L Für bessere Ergebnisse und einfachere Handhabung verwenden Sie die mitgelieferte Terminal Extension Einheit und stellen die Temp Kaltstellenkompensa on auf Extern KV Anzeige für Thermoelemente Rekorder Messumformer usw TC Input C Widerstände 1 bis 400 00 1 bis 2 200 0 Ω Ω Widerstandsthermometer Pt50 Pt 100...

Page 13: ...lten AUS Schleifen Versorgung 24V schalten EIN 3 oder 4 Leiter Messumformer Anzeige mit Signalweiterleitung Versorgung mA 0 24 000 mA bis 0 24 000 mA bis 10 100 mV bis 10 100 mV bis ODER 2 Leiter Messumformer Thermo element Eingang Thermo element Eingang Hinweis Der Thermoelement mV Ausgang ist vom mA Eingang des Kalibrators isoliert max 100 Dies ist für die Kalibrierung von nich solierten Messumf...

Page 14: ...eigt die Messwerte an LINKS RECHTS AUS oder AN der Kalibrator stellt eine grafische Trendkurve dar Intervall Werteeinstelltasten zum Ändern Wählen Sie das Zeitintervall zwischen den Messpunkten in Stunde Minuten Sekunden Nur wenn Trendgrafik auf gestellt ist EIN Wenn Sie die gewünschten Einstellungen vorgenommen haben drücken Sie die Taste um die Strommessung zu starten ENTER Zwei Beispiele Messun...

Page 15: ...chnik oder für Anschluss in 3 Leiter Technik oder für Anschluss in 4 Leiter Technik Taste zum Ändern LINKS RECHTS AUS der Kalibrator zeigt die Messwerte an o r de AN der Kalibrator stellt eine grafische Trendkurve dar siehe Kap 7 1 Messen von Strom mA Messung von 10 000 mV Trendgrafik geschaltet EIN oder Intervall siehe Kap 7 1 Messen von Strom mA Für eine fortlaufende Datenaufzeichnung während de...

Page 16: ...fling Intervall 7 4 Messen von Thermoelementen TE Typ Temp KV CJ Temp Einheit Taste zum Ändern Auswahl des Thermoelement Typs LINKS RECHTS K J T B R S E N U L oder Taste zum Ändern LINKS RECHTS Intern die Kaltstellenvergleichstemperatur wird intern im Kalibrator gemessen Manuell oder Sie können die Kaltstellenvergleichstemperatur manuell selber einstellen Extern oder wählen Sie diese Einstellung a...

Page 17: ... Typ K mit einer Kaltstellenvergleichstemperatur 20 1 C entspricht 41 276 mV und Trendgrafik TE AUS Messung von 1020 1 C von einem Thermoelement Typ K mit Trendgrafik EIN Für eine fortlaufende Datenaufzeichnung während des Messens von Thermoelementen stecken Sie eine Speicherkarte ein und drücken Sie die Taste zum Starten und SD ENTER ENTER zum Stoppen Die Werte und entsprechen den im Menü Datenlo...

Page 18: ...rte ein und drücken Sie die SD ENTER ENTER Taste zum Starten und zum Stoppen Die Werte u Von Prüfling Tag Interva l nd l entsprechen den im Menü Datenlogging eingestellten Werten Einheit Taste zum Ändern LINKS RECHTS Celsius C Fahrenheit Kelvin K Rankine R oder Zwei Beispiele Messung von 128 4 C von einem Pt100 mit 2 Leiter Anschluss und Trendgrafik AUS Messung von 128 4 C von einem Pt100 mit Tren...

Page 19: ...n um das Zeitintervall und die Schritte einzustellen danach Taste drücken ENTER HOCH RUNTER HOCH RUNTER ENTER oder AUTOSCHRITT Es wird nach Drücken der Taste ein Bildschirm wie rechts dargestellt gezeigt Sie können zwischen festen Schritten wählen Schritte betragen 25 des Bereiches gesteuert durch und Tasten und Ben Def benutzerdefinierten Schritten wählen Schritte können individuell festgelegt we...

Page 20: ...m Ihre Auswahl zu bestätigen ENTER Loop Error zeigt an dass die Verdrahtung fehlerhaft angeschlossen ist Loop Error Ω zeigt an dass der Widerstand in der Stromschleife zu hoch ist oder Beispiele Beispiele Geben von 20 000 mV 8 2 Geben von Spannung mV 8 3 Geben von Widerstand Ohm Ω Modus Taste zum Ändern Ausgabe jedes Wertes im Bereich siehe Kapitel 8 1 Geben von Strom mA Drücken Sie abschließend d...

Page 21: ...messen Manuell oder Sie können die Kaltstellenvergleichstemperatur manuell selber einstellen Extern oder wählen Sie diese Einstellung aus wenn Sie die mitgelieferte Terminal Extension Einheit an den Kalibrator angesteckt haben Werteeinstelltasten zum Ändern Wenn die Kalstellenvergleichstemperatur Temp auf Intern gestellt wurde können Sie hier die Temperatur in C einstellen im Bereich 99 9 bis 99 9...

Page 22: ...tätigen Geben eines Widerstandsthermometers Typ Pt100 mit 650 C LINKS RECHTS LINKS RECHTS ENTER Beispiel 9 0 Messen und Geben Wählen Sie mit der Taste Messen und Geben im Hauptmenü aus Diese Funk on ermöglicht es Ihnen gleichzei g Strom mA zu messen und Spannung mV Widerstand ENTER Ω Ohm Thermoelemente oder Widerstandsthermometer zu geben Siehe Kapitel 6 1 für die Einstellungen zum Messen von Stro...

Page 23: ...den um einen Block von 5 Zeichen auszuwählen Werteeinstellungstasten verwenden zum durchscrollen Hiermit können Sie die Nummer des Prüflings eingeben oder z B die Messstellennummer TAG PRFL Prüfling Tasten verwenden um einen Block von 5 Zeichen auszuwählen Werteeinstellungstasten verwenden zum durchscrollen Hier können Sie den Prüflingstyp definieren z B Temperaturmessumformer o Ä LINKS RECHTS STA...

Page 24: ...ce 11 0 Datenlogging Schnittstelle Nach Beendigung der Datenaufzeichnung kann die Speicherkarte aus dem Kalibrator entfernt und in einen Kartenleser eingesteckt werden um die Daten z B auf einen herunterzuladen SD PC Alternativ können die gespeicherten Dateien direkt über ein Kabel angeschlossen am Interface des Kalibrators an einen angeschlossenen übertragen werden In diesem Fall die Speicherkart...

Page 25: ...annungsfrequenz in Ihrem Land beträgt 50 Hz oder 60Hz die Netzspannungsfrequenz in Ihrem Land beträgt 60 Hz 8 0 Datalogging Interface 8 0 Datalogging Interface 8 0 Datalogging Interface 12 0 Setup Einstellungen In diesem Bereich können Sie Grundeinstellungen des Kalibrators Ihren Erfordernissen anpassen Auto Power Save Tasten zum Ändern der Kalibrator schaltet sich nach 15 min Inaktivität ab LINKS...

Page 26: ... zum Ändern Gerät gibt hörbare Rückmeldungen und Warnungen aus LINKS RECHTS AN oder AUS Gerät arbeitet ohne Töne Klang Für Zugriff auf Kontrasteinstellungs Bildschirm drücken Sie die Taste ENTER Kontrast Mit Tasten gewünschten Kontrastwert einstellen dann mit Taste bestätigen LINKS RECHTS ENTER Akku Info drücken um Akkutyp Ladezustand und vorhandene Restspannung angezeigt zu bekommen ENTER Datum Z...

Page 27: ... Datum der letzten Kalibrierung SD Karte Speicherkarte eingesteckt oder nicht Zugangscode eingeben drücken um Zugriff auf Zugangscode Bildschirm zu erhalten ENTER Werteeinstellungstasten verwenden um den Zugangscode einzugeben dann drücken Dieser Code wird für die Gerätekalibrierung benötigt kontaktieren Sie ggf Ihren Lieferanten Es muss in jedem Fall sichergestellt sein dass die Referenzgerätegen...

Page 28: ...enthalten einen Temperatursensor Öffnen Sie den Kalibrator wie oben gezeigt stecken die Verbindungsleitungen zum alten Akku ab ersetzen den Akku und stecken die Leitungen an den neuen Akku an Verwenden Sie antistatisches Equipment um Beschädigungen an der Elektronik zu vermeiden Ohne große Kraft aufstecken 14 3 Gerät zurücksetzen RESET Ein Zurücksetzen Reset des Kalibrators kann erforderlich werde...

Page 29: ...mittel mit einem nur ganz leicht angefeuchteten fusselfreien Tuch z B Mikrofaser Versuchen Sie das Gerätinnere zu reinigen NIE 14 5 Akku Behandlung 8 0 Datalogging Interface 8 0 Datalogging Interface 15 0 Technische Spezifikation In diesem Abschnitt erhalten Sie technische Informationen zum Kalibrator 100 LTC LR Cal Maße und Gewicht Größe 149x34x77mm ohne Gummischutzkappe 155x43x86mm mit Gummischu...

Page 30: ...00 100 100 100 100 100 LRCAL SP KABEL LRCAL SP BATT LRCAL SP LADER LRCAL KFZ LADER LRCAL SP SCHUTZ LTC SP TASTATUR LRCAL SP KOFFER Beschreibung Sicherung 250 mA Testkabel Set Akku Pack Litium Ionen Ladegerät 100 240 Ladegerät 12 Anzünder Gummischutzkappe grün Tastatur Aufbewahrungskoffer SMD VAC KFZ VDC 8 0 Datalogging Interface 8 0 Datalogging Interface 16 0 Zubehör Die Spannungs Thermoelemente W...

Page 31: ...temperatur de GERMANY DT www Cal net LR MANUAL LTC 100 31 In gleicher Bauform gibt es die Kalibratoren LR Cal Stromschleifenkalibrator LLC 100 LR Cal Bi e kontak eren Sie hierzu Ihren Händler oder DRUCK TEMPERATUR Leitenberger GmbH Bahnhofstraße 33 D 72138 Kirchentellinsfurt Tel 49 0 7121 90920 0 Fax 49 0 7121 90920 99 Internet www druck temperatur de ...

Page 32: ...RATUR Leitenberger GmbH Bahnhofstr 33 D 72138 Kirchentellinsfurt Tel 49 0 7121 90920 0 Fax 49 0 7121 90920 99 Info Leitenberger de www druck temperatur de GERMANY DT www Cal net LR MANUAL LTC 100 32 NOTIZEN NOTES ...

Page 33: ...MPERATUR Leitenberger GmbH Bahnhofstr 33 D 72138 Kirchentellinsfurt Tel 49 0 7121 90920 0 Fax 49 0 7121 90920 99 Info Leitenberger de www druck temperatur de GERMANY DT www Cal net LR MANUAL LTC 100 33 English ...

Page 34: ...K TEMPERATUR Leitenberger GmbH Bahnhofstr 33 D 72138 Kirchentellinsfurt Tel 49 0 7121 90920 0 Fax 49 0 7121 90920 99 Info Leitenberger de www druck temperatur de GERMANY DT www Cal net LR MANUAL LTC 100 34 ...

Page 35: ...tial difference is created between the hot and cold junctions when there is a temperature difference between them The temperature at the cold junction is then measured and added to the difference to give the correct reading LR Cal LTC 100 Set Temp to internal CJ For bare wire connection measure or source an extender terminal housing is used This has a Pt100 element mounted in the terminals and the...

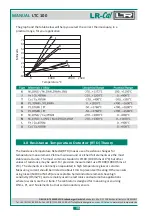
Page 36: ...e changes for temperature measurement Platinum wire wound or etched foil elements are the most stable and accurate The most common standard is Pt100 100 Ohms at 0 C but other values of resistance may be used For precision measurement use Pt1000 1000 Ohms at 0 RTD C The is designed for measuring or sourcing Ohms Pt and Ni elements but not semiconductor sensors calibrator C The elements are normally...

Page 37: ... to 850 C 200 C to 630 C 200 C to 320 C C to 2 0 C 60 5 200 C to 850 C 200 C to 630 C Ni120 75 C to 260 C Long extension lead wires between the sensor and the measuring instrument can cause inaccuracies with two wire connections copper resistance varies with ambient temperature changes For this reason three wire connection circuits with two of the extension wires joined at the sensor were introduc...

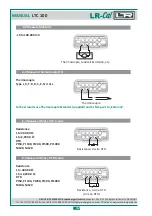
Page 38: ...ypad These keys change the desired output and are used to set values in the menu LEFT RIGHT and keys used to change sub menu options Go back from run to sub menu to main menu ENTER key enter menu selections or turn on off UP DOWN and keys used to step up or down in the main and sub menus A Submenu Text Based Sub menu Main menu The Main Menu Icon Based Date and Time 4 2 Display Measuring Pt100 Powe...

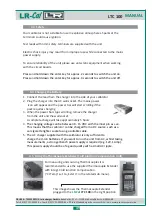
Page 39: ...ility of the unit please use anti static equipment when working with the circuit boards Press and hold down the enter key for approx 2 seconds to switch the unit on Press and hold down the enter key for approx 4 seconds to switch the unit off 1 Connect the lead from the charger into the side of your calibrator 2 Plug the charger into the wall socket The mains power AC icon will appear and the powe...

Page 40: ...rce Datalog Settings Help Main Menu Source Wiring Measure or Datalog mA Range Function Unit 24V Trend mV Ohms TC RTD Trend Range 2 3 4 Wire Trend Type CJC Temp Unit Trend Type 2 3 4 Wire Unit Trend mA mV Ohms TC RTD Range Function Mode Unit 24V Mode Range Mode Type CJC Unit Mode Type Unit Mode Source By Tag Item Start Stop Interval Datalog Power Language Mains Light Sound Contrast Date Time Batter...

Page 41: ... Schematics This section shows examples of wiring configurations These are also found in the Help Menu 6 1 Measure Milliamps 3 4 wire Transmitter Controller etc Supply Set 24 V OFF OR Set 24 V OFF OR 2 wire Transmitter Set 24 V ON mA Control Room 2 wire Transmitter mA From mA output device Externally powered 0 to 24 000 mA In circuit Externally powered 0 to 24 000 mA 2 wire transmitter Internally ...

Page 42: ...sure Ohms 2 wire RTD 6 5 Measure Ohms 3 wire RTD 10 to 100 000 mV Thermocouple Loadcell Excitation etc mV Thermocouple Type J K T B R S E N U or L Resistance 1 to 400 00 1 to 2 200 0 Ω Ω RTD Pt50 Pt 100 Pt200 Pt500 Pt1000 Ni100 Ni120 Resistance 1 to 400 00 1 bis 2 200 0 Ω Ω RTD Pt50 Pt 100 Pt200 Pt500 Pt1000 Ni100 Ni120 For best results use Thermocouple Extender supplied and Temp set to External C...

Page 43: ...Ohms 4 wire RTD Resistance 1 to 400 00 1 to 2 200 0 Ω Ω RTD Pt50 Pt 100 Pt200 Pt500 Pt1000 Ni100 Ni120 Resistance 4 wire Link on RTD RTD RTD Link on RTD 6 8 Source Milliamps Set 24V ON mA 6 9 Simulate Milliamps Set 24V OFF 2 wire Transmitter to active input Control room mA Cable run test potential free contact To mA input device 0 to 24 000 mA 3 4 wire device panel meter transmitter recorder PLC I...

Page 44: ...ouple TC 6 12 Source Ohms RTD 10 to 100 000 mV Thermocouple Loadcell Indicator etc mV Thermocouple Type J K T B R S E N U or L For best results use the Thermocouple Extender supplied and Temp set to External CJ Thermocouple temperature indicator Recorder Transmitter etc TC Input C Resistance 1 to 400 00 1 to 2 200 0 Ω Ω RTD Pt50 Pt 100 Pt200 Pt500 Pt1000 Ni100 Ni120 RTD temperature indicator Recor...

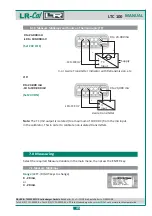
Page 45: ... to 100 000 mV Set 24V OFF Set 24V ON 3 or 4 wire Transmitter Indicator with Retransmission etc Supply mA 0 24 000 mA to 0 24 000 mA to 10 100 mV to 10 100 mV to OR 2 wire transmitter TC Input TC Input Note The mV output is isolated to a maximum of 100 from the mA input in the calibrator This in order to calibrate non isolated transmi ers TC VDC 7 0 Measuring Select the required Measure Variable i...

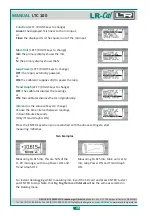
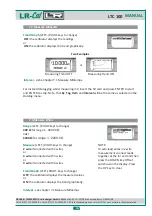
Page 46: ...ies 24V to power the loop Trend Graph keys to change the calibrator displays the readings LEFT RIGHT OFF or ON the calibrator displays the trend graphically Interval us the value set keys to change Choose the time interval between readings in Hour Minutes Seconds Only if Trend Graph is ON Press the key when you are satisfied with the above settings to start measuring milliamps ENTER Two Examples M...

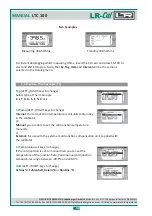
Page 47: ...ys to change LEFT RIGHT if connected with 2 wires or if connected with 3 wires or if connected with 4 wires keys to change LEFT RIGHT OFF the calibrator displays the measured values or ON the calibrator displays the trend graphically see chapter 7 1 Measure Milliamps Measuring Trend OFF Measuring Trend ON or Interval siehe Chapter 7 1 Measure Milliamps Two Examples NOTE To zero lead wires in 2 wir...

Page 48: ...is calculated internally in the calibrator Manual or you are able to set the cold junction temperature manually External or for use with the external Cold Junction compensation unit supplied with the calibrator value set keys to change If the cold junction is set to manual then you can set the temperature of the junction here Valid manual cold junction temperatures range between 99 9 C and 99 9 C ...

Page 49: ... Two Examples Measuring 1020 1 C from a type K thermocouple with a cold junction temperature of 20 1 C being 41 276 mV and Trend Graph OFF Measuring 1020 1 C from a type K thermocouple with Trend Graph ON There are two that might appear means that the reading is over ranged is displayed means that the reading is under ranged error messages ʌʌʌʌʌ CHECK TC vvvvv 7 5 Measure Resistance Temperature De...

Page 50: ...T RIGHT Celsius C Fahrenheit Kelvin K Rankine R or Two Examples Measuring 128 4 C from a type Pt100 and Trend Graph RTD OFF Measuring 128 4 C from a typ Pt100 and Trend Graph RTD ON For instant datalogging whilst measuring insert the card and press to start and to stop Note that and will be the same as selected in the Datalog menu RTD SD ENTER ENTER By Tag Item Interval For instant datalogging whi...

Page 51: ...hoose thesteps Use the row of keys to UP DOWN change the steps then press the key ENTER or AUTO STEP pressing the key with mode set to ENTER Auto Step will bring up the screen to the right You may either choose Fixed steps where the steps are 25 of the range directed by the and the keys or User Defined steps where you may choose the steps The time interval is the UP DOWN time between steps Use the...

Page 52: ...he key when you are satisfied with the above settings ENTER Loop Error indicates that the wiring is not connected correctly Loop Error Ω indicates the resistance in the loop is too high or Examples Examples Sourcing 20 000 mV 8 2 Source Millivolts 8 3 Source Ohms Mode keys to change output may value in range see chapter 8 1 Source Milliamps Press the key when you are satisfied with the above setti...

Page 53: ...ally in the calibrator Manual or you are able to set the cold junction temperature manually External or for use with the external cold junction compensation unit supplied with the calibrator value set keys to change If the cold junction is set to manual then you can set the temperature of the junction here Valid manual cold junction temperatures range between 99 9 C and 99 9 C keys to change LEFT ...

Page 54: ...ter 8 4 Source Thermocouples Press the key when you are satisfied with the above settings LEFT RIGHT LEFT RICHT ENTER Example Sourcing 650 C type Pt100 RTD 9 0 Measure Source Select Measure Source in the main menu then press the key This will allow you to simultaneously measure milliamps and source mV Ohms or Please refer to chapter 6 1 for measuring milliamps and chapter 8 0 for sourcing of the r...

Page 55: ...es who was responsible for the atalogging d Tag Use and keys to select block of five characters LEFT IGHT R and use the Set Value keys to scroll This identifies the tag number usually also the plant location Start time Press and use or and set value keys to change year month day hour minute and seconds Press to set and return to datalogging menu ENTER UP DOWN keys ENTER Interval Use set value keys...

Page 56: ...rt and to stop Note that SD ENTER ENTER By Tag Item Interval and will be the same as selected in the Datalog menu After Datalogging is complete the card can be removed from the calibrator and inserted into a card reader to download the logged data to a SD PC Alternatively the csv files can be downloaded directly from the Calibrator via a cable plugged into the port The card remain inserted in the ...

Page 57: ...quency is filtered out 50Hz the mains frequency in your country is 50 Hz or 60Hz the mains frequency in your country is 60 Hz 8 0 Datalogging Interface 8 0 Datalogging Interface 8 0 Datalogging Interface 12 0 Settings This section will let you customise the calibrator to your personal work style Auto Power Save keys to change the calibrator switches after 15 minutes of inactivity LEFT RIGHT ON OFF...

Page 58: ...audible warnings and confirmations LEFT RIGHT ON or OFF the calibrator is silent Sound Press the key to gain access to the contrast screen ENTER Contrast Use the and keys to change the display contrast When satisfied press LEFT RIGHT ENTER Battery Info Press the key to view the battery type status and remaining voltage level ENTER Set Date and Time Press then use the set value keys to change the y...

Page 59: ...ersion of the unit the software version of the unit Firmware Last Cal when the unit was last calibrated SD Card wether a card is inserted SD Enter Access Code Press the key to gain access to the access code screen ENTER Use the row of set value keys to change the access code then press This code is used for the units calibration Contact your supplier Ensure accuracy levels of the equipment before ...

Page 60: ...t to tear the keypad ribbon or damage the electronics If the battery pack fails you must order a new pack from your dealer Use only the factory supplied battery pack as it contains a temperature sensor Open the calibrator as shown above and then disconnect the old pack and replace it with the new one Be careful not to damage the electronics while the unit is open an anti static mat and wrist band ...

Page 61: ...UL ABS 54 dust and splash proof 94V 0 flame retardant plastic NOTE Some devices connected to the Calibrator may emit significant conductive and radiated noise from their terminals Excess noise injected into the Calibrator will degrade the accuracy To minimise the accuracy degradation the maximum conducted noise level must not exceet 1 Vpp when measured with an impedance of at least 1 MΩ 15 1 Gener...

Page 62: ...er Code LRCAL SP SICH 100 100 100 100 100 100 100 100 LRCAL SP KABEL LRCAL SP BATT LRCAL SP LADER LRCAL KFZ LADER LRCAL SP SCHUTZ LTC SP TASTATUR LRCAL SP KOFFER Description Fuses 250 mA Test Lead Set Battery Pack Lithium Ion Charger 100 240 Mains Charger 12 Car Lighter Rubber Boot green Keypad Plastic kit case with foams SMD VAC VDC 8 0 Datalogging Interface 8 0 Datalogging Interface 16 0 Accesso...

Page 63: ...temperatur de GERMANY DT www Cal net LR MANUAL LTC 100 63 In gleicher Bauform gibt es die Kalibratoren LR Cal Stromschleifenkalibrator LLC 100 LR Cal Bi e kontak eren Sie hierzu Ihren Händler oder DRUCK TEMPERATUR Leitenberger GmbH Bahnhofstraße 33 D 72138 Kirchentellinsfurt Tel 49 0 7121 90920 0 Fax 49 0 7121 90920 99 Internet www druck temperatur de ...

Page 64: ... 0 Fax 49 0 7121 90920 99 Info Leitenberger de www druck temperatur de GERMANY DT www Cal net LR MANUAL LTC 100 64 DRUCK TEMPERATUR Leitenberger GmbH Bahnhofstr 33 D 72138 Kirchentellinsfurt Tel 49 7121 90920 0 Fax 49 7121 90920 99 E Mail Export Leitenberger de GERMANY DT www druck temperatur de ...

Reviews: