background image

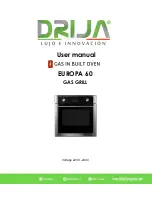
User manual 

GAS IN BUILT OVEN |EUROPA 60 GAS GRILL


  Air duct must be used in ventilation. 

  Cabinets  veneer  exterior  must  be  assembled  with  glues  withstand 

temperatures up to 100 

Installation of built-in ovens 

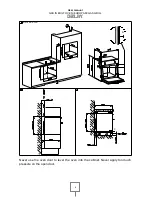
In  order  to  ensure  the  proper  functioning  of  the  device  properly,  the  cabinet 
containing  it  must  be  appropriate.  The  apparatus  is  designed  for  recessed 
installation  (class  3)  in  cabinets  of  any  heat  resistant  material.  Comply  with  the 
dimensions shown in Figures 1, 2 and 3. When installed undercounted, comply with 
the  dimensions  shown  in  Figure  1-3.  When  installed  undercounted  incorporating 
burners, a space of at least 110 mm should stop any side wall, as shown in Figure 1. 
When  installed  in  height  units,  comply  with  the  dimensions  shown  in  Figure  1.2, 
considering that the top / back of the unit must have an opening of 45 mm deep. A 
screw  4  screws  inside  the  frame  (fig.1).  For  installation  under  burners,  make  sure 
that the rear / bottom of the unit is similar to that shown in Figure 1 (B) opening, and 
the front / bottom of the unit has an opening with an opening of at least 45 × 560mm 
similar  to  that  shown  in  figure  1-3  (C),  or  the  like  curtain  window,  ensure  that  the 
aperture opening area of at least 45 × 560mm. See the instructions supplied with the 
hob for positioning and fixing procedures. Make sure the opening area of at least 45 
×  560mm.  See  the  instructions  supplied  with  the  hob  for  positioning  and  fixing 
procedures.  Make  sure  the  opening  area  of  at  least  45  ×  560mm.  See  the 
instructions supplied with the hob for positioning and fixing procedures. 

In  compliance  with  current  safety  standards,  contact  with  the  electrical  parts  of  the 
oven should not be possible once it has been installed. 

All parts which ensure the safe operation must be removable only with the aid of  a 
tool. 


Summary of Contents for EUROPA 60 GAS GRILL

Page 1: ...User manual EUROPA 60 GAS GRILL Voltage 220V 240V ...

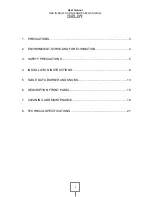
Page 2: ...AS GRILL 2 1 PRECAUTIONS 3 2 ENVIRONMENT SCHOOLING FOR ELIMINATION 4 3 SAFETY PRECAUTIONS 5 4 INSTALLATION INSTRUCTIONS 6 5 TABLE DATA BURNER AND KNOBS 13 6 DESCRIPTION FRONT PANEL 15 7 CLEANING AND MAINTENANCE 19 8 TECHNICAL SPECIFICATIONS 21 ...

Page 3: ...dissipation The data plate should not be removed Do not use scouring pads or rough metal spatulas they would damage the surface Use non abrasive products with wood or plastic utensils if necessary Rinse thoroughly and dry with a soft cloth Do not allow food spills containing sugar to dry inside the oven They could damage the enamel and cause internal damage to the oven The manufacturer is not liab...

Page 4: ...nd disposal Never leave all or part of the packaging lying around Packaging materials especially plastic bags pose a choking hazard to children Your old appliance must also be disposed of properly Important deliver the appliance to your local authorized to collect the discarded appliances organization Proper disposal allows the intelligent recovery of valuable materials Before disposing of your ap...

Page 5: ...ing on the cord The device must be grounded in compliance with safety regulations electrical system Immediately after installation you must perform a brief test run of the device by following the instructions later in this manual If the device does not work disconnect from the mains and contact your nearest service center Never attempt to repair the appliance Never place flammable objects in the o...

Page 6: ...ible position on the apparatus If a plug is used and takes power make sure the same type Do not use adapters or junctions since they may cause overheating or burns 220 240 V operation use H05VV F type three wire cable Cable of 3 x 1 0 mm 1 5mm 20mm The ground wire yellow green must be at least 20 longer than the other wires at the end for connection to the appliance mm The manufacturer is not liab...

Page 7: ...of the unit must have an opening of 45 mm deep A screw 4 screws inside the frame fig 1 For installation under burners make sure that the rear bottom of the unit is similar to that shown in Figure 1 B opening and the front bottom of the unit has an opening with an opening of at least 45 560mm similar to that shown in figure 1 3 C or the like curtain window ensure that the aperture opening area of a...

Page 8: ...User manual GAS IN BUILT OVEN EUROPA 60 GAS GRILL 8 Never use the oven door to lever the oven into the cabinet Never apply too much pressure on the open door A Misure fornite inmm C B C min min ...

Page 9: ...All parts which ensure the safe operation must be removable only with the aid of a tool To hold the oven cabinet open the oven door and attached by inserting screws 4 into the 4 holes on the frame perimeter Do not use the oven door to lever the oven into the cabinet Never use excessive pressure to the open door Ventilation The appliance can be installed in a ventilated room permanently as specifie...

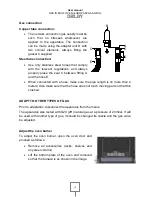
Page 10: ...E When connected with a hose make sure the pipe length is no more than 2 meters Also make sure that the hose does not touch moving parts or that this crushed ADAPT TO OTHER TYPES OF GAS Prior to adaptation disconnect the apparatus from the mains The apparatus was tested with G20 2H natural gas at a pressure of 20mbar If will be used with another type of gas it should be changed its nozzle and the ...

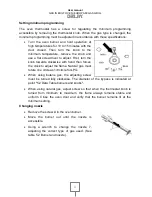
Page 11: ...b towards clockwise with hand then forces the clock to adjust the flame Natural gas must rotate one circle as 1 8 circle for LPG When using butane gas the adjusting screw must be turned fully clockwise The diameter of the bypass is indicated at point 5 2 Data Table burners and knobs When using natural gas adjust screw so that when the thermostat knob is turned from minimum to maximum the flame alw...

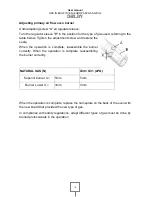
Page 12: ...store the seals When the operation is complete reassemble the burner correctly When the operation is complete reassembling the burner correctly NATURAL GAS N G30 G31 LPG Superior burner X 5mm 5mm Burner Lower X 3mm 3mm When the operation is complete replace the nameplate on the back of the oven with the new board that provided the new type of gas In compliance with safety regulations adapt differe...

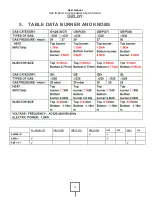
Page 13: ...User manual GAS IN BUILT OVEN EUROPA 60 GAS GRILL 13 5 TABLE DATA BURNER AND KNOBS ...

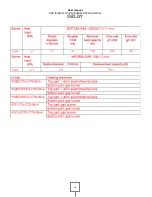
Page 14: ...User manual GAS IN BUILT OVEN EUROPA 60 GAS GRILL 14 ...

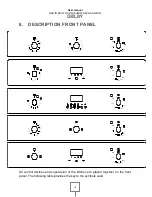
Page 15: ...vides the key to the symbols used MAX 205 230 180 165 MIN 10 20 30 40 50 60 70 8 0 9 0 1 0 0 12 0 11 0 8 0 6 0 10 0 12 0 1 4 0 16 0 2 0 0 18 0 22 0 M A X MAX 205 230 180 165 MIN 8 0 6 0 10 0 12 0 14 0 16 0 20 0 1 8 0 22 0 M A X MAX 205 230 180 165 MIN 8 0 6 0 10 0 12 0 14 0 16 0 20 0 18 0 22 0 M A X 11 0 1 2 0 1 0 0 9 0 8 0 70 60 50 40 30 20 10 MIN 165 180 230 205 MAX MIN 165 180 230 205 MAX ...

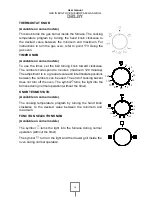
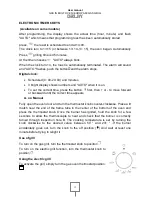
Page 16: ... adjustment is in a gradual scale and intermediate positions between the numbers can be used The end of cooking buzzer does not turn off the oven The symbol turns the light into the furnace during normal operation without the timer KNOB TESMOSTATO Available on some models The cooking temperature program by turning the hand knob clockwise to the desired value between the minimum and maximum FUNCTIO...

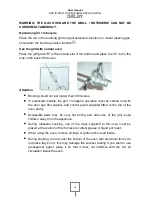
Page 17: ...ton first then or to move forward or backward until the correct time appears A on Manual Fully open the oven door and turn the thermostat knob counter clockwise Place a lit match near the end of the flame tube in the center of the bottom of the oven and press the thermostat knob Once the burner has ignited hold the knob for a few seconds to allow the thermocouple to heat and check that the burner ...

Page 18: ...rill rotisserie operation must be carried out with the door ajar first capture and control guard supplied fitted to the top of the oven cavity Accessible parts may be very hot during and after use of the grill keep children away from the appliance During rotisserie cooking one of the trays supplied to the oven must be placed at the bottom of the furnace to collect grease or liquid pot roast When u...

Page 19: ...ducts with wood or plastic utensils if necessary rinse thoroughly and dry with a soft cloth Do not allow food spills containing sugar dry in the oven they could damage the enamel and cause internal damage to the oven Cleaning the oven To keep the oven in good condition should be cleaned regularly after I cool Remove the removable parts Clean the oven racks with hot water and non abrasive detergent...

Page 20: ...istics Replace the glass cover and reconnect the oven to the power source Voltage 220 240V Power 25W Type E 14 Remove oven door Removing the inner glass pane Pull gently inner glass sheet fig 1 fig 4 Clean the glass with a suitable cleaner Dry completely Remove the board To permit adequate cleaning of the oven the door gasket can be removed Before removing the gasket remove the oven door as descri...

Page 21: ...VEN EUROPA 60 GAS GRILL 21 8 TECHNICAL SPECIFICATIONS Furnace internal dimension Width 42 3cm Depth 40 7cm Height 31 2cm Internal volume of the oven 54 liters Voltage and frequency of power supply 220 240V 50 60Hz or 50Hz 1800W ...

Reviews: