


07-01568B 05-29 Copyright 2007 Dri-Eaz Products, Inc.
2
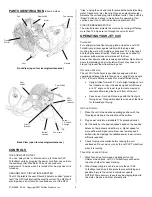
Power cord
GFCI
Outlet
(in back)
Rear Grill (#2)
Front Grill (#1)
Top Housing
Circuit
Breaker
PARTS IDENTIFICATION
(Shown, below)
Front View (open for cleaning/maintenance)
Back View (open for cleaning/maintenance)
CONTROLS
THE AUXILIARY OUTLET
You can “daisy chain” or interconnect up to three Jet CXV
TurboDryer units by plugging the power cord from one unit into
the auxiliary outlet of another. The unit can conduct a
maximum of 12 amps when it is turned off or 9 amps when it is
turned on.
GROUND FAULT CIRCUIT INTERRUPTER
The GFCI protects the user. Should it detect a sudden “ground
fault,” the GFCI will interrupt the electric current. The GFCI will
also trip when a short circuit or overload occurs. If the GFCI
“trips,” unplug the unit and look for potential hazards (standing
water, frayed cord, etc.) that might cause an electrical surge.
Relocate the unit and plug into a different outlet. Then push the
“Reset” button and check to make sure it is operating. If so,
continue use; if not, call Dri-Eaz Service at
888-867-3235
.
CIRCUIT BREAKER SWITCH
The circuit breaker protects the machine by turning it off when
more than 12 amps are run through the on-unit circuit.
OPERATING YOUR JET CXV
P
LACEMENT
For optimal wall and floor drying, place at least one Jet CXV
TurboDryer per room against walls (with the hinge side
touching the wall), with multiple units spaced 10-14 feet apart
and facing the same direction. Place as many as needed for
maximum airflow across all wet areas of the floor.
Ensure that all wet surfaces receive good airflow. Open interior
doors to maintain good air circulation. Doors may need to be
braced to prevent them from blowing shut.
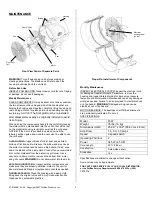
O
PERATING
P
OSITION
The Jet CXV TurboDryer is specifically designed with two
operating positions. Operate face-down or upright (at an angle
of 12°) to direct airflow as needed for most effective drying.
•
Upright (tilted forward 12°) - Set upright resting on two
feet (handle on top). Unit was designed to tilt forward
at a 12° angle on its lower legs to create maximum
laminar airflow along the floor in front of the unit.
•
Face down - Set on all three legs with the front grill
facing down. This position directs air down at the floor
for focused spot drying.
G
ETTING
S
TARTED
1. Place the unit in the desired operating position with the
three legs pointing in the direction of the airflow.
2. Plug power cord into a standard 115v grounded outlet.
3. Set the switch at the desired speed based on the needed
balance of amp draw and airflow (i.e., higher speed for
more airflow and higher amp draw; use lower speed if
limited circuit amperage is available and/or lower volume
airflow is required).
4. Check for proper operation before leaving the unit
unattended. Do not move or carry the Jet CXV TurboDryer
when it is running.
T
RANSPORTING AND
S
TORING
1. Stack face down for storage and transport on the
Unimover hand truck. Jet CXV TurboDryers will nest on
top of each other for easy stacking.
2. When transporting in a vehicle, secure the Jet CXV
TurboDryer and strap it into place to prevent sliding and
possible injury to the unit and vehicle occupants.
NOTICE!
Store securely to avoid any damaging impact to
the motor, blades, and other internal parts.
Bottom
Housing
Switch –
1.5, 2.0 and
3.0 amps
Front
Grill #1
Handle
Motor
Fan
Rear Grill #2
Foot
Rear Grill #2
Front
Grill #1


