background image

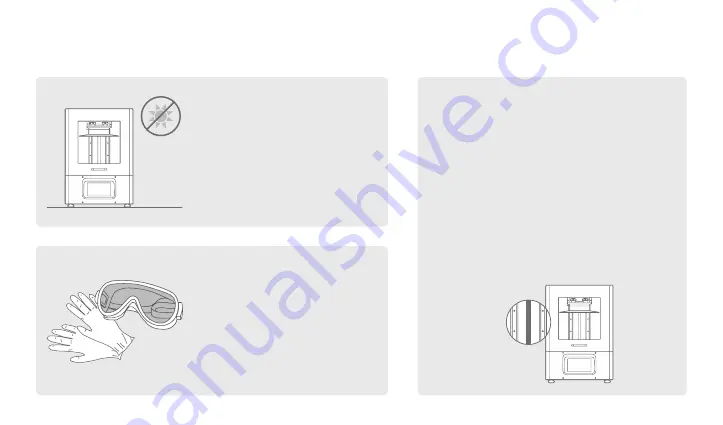
Stable Printing Environment

Store your 3D printer in a dry 

and ventilated environment.

Avoid exposure to direct sun-

light. Make sure to place it on 

a flat surface.

Protective Measures

While printing and using resin, 

please make sure to wear gloves,  

masks, UV-protective goggles, 

and long-sleeved clothing.

Maintenance

Clean the Z-axis

First, dry clean the Z-axis T-screw. Then apply 

a thin layer of general lubricant on it, so that 

it whirls smoothly.

Clean the 3D Printer

Use sanitizing alcohol and tissue paper to 

carefully clean the printer, the resin vat, and 

the building plate.

02  

Important key notes

Summary of Contents for phrozen Sonic XL 4K 2022

Page 1: ...Bedienungsanleitung User manual ...

Page 2: ...Dreve Design Rev 270422 DU270422 200 4616 ...

Page 3: ......

Page 4: ...Bauplattform Luftreinigungsfilter Harzwanne LCD Screen Touch Screen Netzschalter Netzanschluss Netzwerkbuchse USB Port Phrozen OS SD Karte Bauraum heizung Z Achse ...

Page 5: ...edienung 5 Touch Screen Slicing Software Phrozen 3D Verbindung USB Ethernet WiFi Technologie LCD 3D Drucker Lichtquelle 405 nm ParaLED 3 0 Module XY Auflösung 0 052 mm Lagenhöhe 0 01 0 30 mm Spannungsversorgung AC 100 240 V 50 60 Hz Gerätemaße L 29 x B 33 x H 47 cm Bauvolumen L 20 x B 12 5 x H 20 cm Gerätegewicht 17 2 kg ...

Page 6: ... Bei technischen Problemen wenden Sie sich bitte an phrozen dreve com PRINT Eine 3D Datei für den Druck auswählen RESIN PROFILE Um die Einstellungen anzupassen auf RESIN PROFILE klicken Z AXIS Bewegung und Kalibrierung der Z Achse LCD TEST Zum Durchführen eines LCD Tests Anwei sungen der Bedienungsanleitung befolgen WIFI Möglichkeit den Drucker mit einem WiFi Netzwerk zu verbinden SHUT DOWN Vor de...

Page 7: ...auf die jeweilige Schaltfläche klicken HEATER STATUS LIGHT STATUS SD Kapazität CPU Temperatur und die CPU Leistung werden angezeigt LIGHT LED Lichtleistung wird manuell ein gestellt Ein Standardwert wurde bereits von Dreve eingestellt und ist auf der Service Card vermerkt HEATER Die Heizung des Bauraums wird ein aus geschaltet und die Temperatur eingestellt ...

Page 8: ...und Arbeiten mit Harzen sind unbedingt Handschuhe UV Schutzbrille und langärmelige Kleidung zu tragen Instandhaltung Reinigung der Z Achse Zuerst die Z Achse mit einem trockenen Tuch reinigen Im Anschluss dünne Schicht Schmiermittel auftragen damit die Z Achse sauber gleitet Reinigung des 3D Druckers Zum Reinigen des Druckers der Harzwanne und der Bauplattform Desinfektionsalkohol verwenden 02 Wic...

Page 9: ...icken 2 Drei Modi stehen zur Auswahl Decken Sie das LCD Display mit einem Blatt Papier ab und prüfen Sie es in folgender Reihenfolge 3 Wurde bei allen drei Tests das Bild sauber abgebildet ist die Kalibrierung abgeschlossen LIGHT UP ENTIRE LCD SCREEN Stellen Sie sicher dass der LCD Bildschirm vollständig aufleuchtet und es keine schwarzen Flecken gibt BLACKENED LCD SCREEN Stellen Sie sicher dass d...

Page 10: ...elle 1 Dateien mittels Slicing Software slicen und als zip Datei abspeichern 2 Durch Eingabe der Drucker IP in die Browser Adress zeile mit dem Drucker verbinden PLATES auswäh len und auf den Drucker laden über USB 1 USB Laufwerk in den Drucker stecken 2 Über das Touchscreen folgende Schritte aus führen PRINT USB icon 3D file zip Wait for Upload 05 3D Dateien importieren ...

Page 11: ...an Print Resume Function Resume Yes Auf dieser Höhe könnte es eine sichtbare Naht im Bauteil geben Hinweis Häufige Stromausfälle können zu Systemausfällen führen Kundendienst und Garantie Dreve gewährt eine 12 monatige Garantie auf alle Teile ausgenommen Verbrauchsmaterialien wie das LCD Display und die FEP Folie Die Garantie für das Display des Sonic XL 4K 2022 beträgt 3 Monate Schäden durch Eige...

Page 12: ...Building plate Air filtration system Resin vat LCD screen Touch panel Power switch Power socket Network port USB port Phrozen OS SD card Heater Z axis ...

Page 13: ...ration 5 touch panel Slicing software Phrozen 3D Connectivity USB Ethernet WiFi Technology LCD 3D printer Light source 405 nm ParaLED 3 0 Module XY resolution 0 052 mm Layer thickness 0 01 0 30 mm Power requirement AC 100 240 V 50 60 Hz Printer size L 29 x W 33 x H 47 cm Printing volume L 20 x W 12 5 x H 20 cm Printer weight 17 2 kg ...

Page 14: ...nd our tutorials at dreve com phrozen If you encounter any technical problems please contact phrozen dreve com PRINT Choose your 3D file to begin printing RESIN PROFILE To adjust your settings click on RESIN PROFILE Z AXIS Movement and calibration of the z axis LCD TEST Please follow instructions in the user manual to conduct the LCD test WIFI Option to connect the printer to your WIFI POWER BUTTO...

Page 15: ... card adjust the light setting and view the status HEATER STATUS LIGHT STATUS Displays the SD capacity CPU tem perature and CPU Performance LIGHT Manually adjust the LED light settings from 50 to 100 The default value is set by Dreve and can be found on your Service Card HEATER Option to turn on off the chamber heater ...

Page 16: ... and using resin please make sure to wear gloves masks UV protective goggles and long sleeved clothing Maintenance Clean the Z axis First dry clean the Z axis T screw Then apply a thin layer of general lubricant on it so that it whirls smoothly Clean the 3D Printer Use sanitizing alcohol and tissue paper to carefully clean the printer the resin vat and the building plate 02 Important key notes ...

Page 17: ...d click Done to finish the calibration 1 Click on LCD TEST 2 Cover the display with a piece of paper and test your LCD screen in the following order 3 When all three modes are clearly displayed on the LCD LCD TEST is completed LIGHT UP ENTIRE LCD SCREEN Make sure that the LCD screen fully lights up and there are no black spots BLACKEND LCD SCREEN Make sure that the LCD screen covers all the light ...

Page 18: ...s calibrated correctly 06 Printing via Phrozen OS Interface 1 Make sure that the sliced file and save it as a zip file 2 Enter Phrozen OS Interface Select PLATES page choose the zip file from your device and upload it onto the 3D printer via USB 1 Plug in the USB drive into the 3D printer 2 Using the touchscreen follow these steps PRINT USB icon 3D file zip Wait for Upload 05 Import 3D Files ...

Page 19: ...ware that there may be a few layer seams on the printed 3D model as a result of pausing the print Notice Frequent abnormal power outages may result in system failure After sales service warranty Dreve offers a one year warranty for all parts excluding consumable components such as the LCD screen and FEP film The Sonic XL 4K 2022 screen is covered under a 3 month warranty Please note that this warr...

Page 20: ...dreve com phrozen phrozen dreve de Dreve Dentamid GmbH Max Planck Str 31 59423 Unna Germany ...

Reviews: