


10
EN
EN
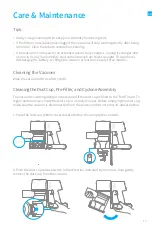
Charging Base Installation Diagram
3. Install the charging base onto the mount
as illustrated.
Note: You can simultaneously charge the replaceable battery when charging the vacuum on
the 2-in-1 charging & storage mount.
Installation
1. Remove the cover on the top of the 2-in-1
charging & storage mount.
2. Install the removed cover to the back of
charging base.
Summary of Contents for T20 Pro
Page 1: ...Dreame Cordless Vacuum Cleaner User Manual ...
Page 9: ...7 EN Installation Vacuum Installation Diagram Click Click ...
Page 10: ...8 EN Click Click Click Accessories Installation Diagram Installation ...
Page 194: ...192 SA التركيب طريقة الرئيسي الجهاز تركيب طرقعة طرقعة ...
Page 195: ...193 SA طرقعه طرقعه طرقعه الملحقات تركيب بيكرتلا ...
Page 225: ...223 HE התקנה האבק שואב להתקנת תרשים והאבזרים במקום להקלקה עד הכניסו במקום להקלקה עד הכניסו ...