background image

14

15

EN

EN

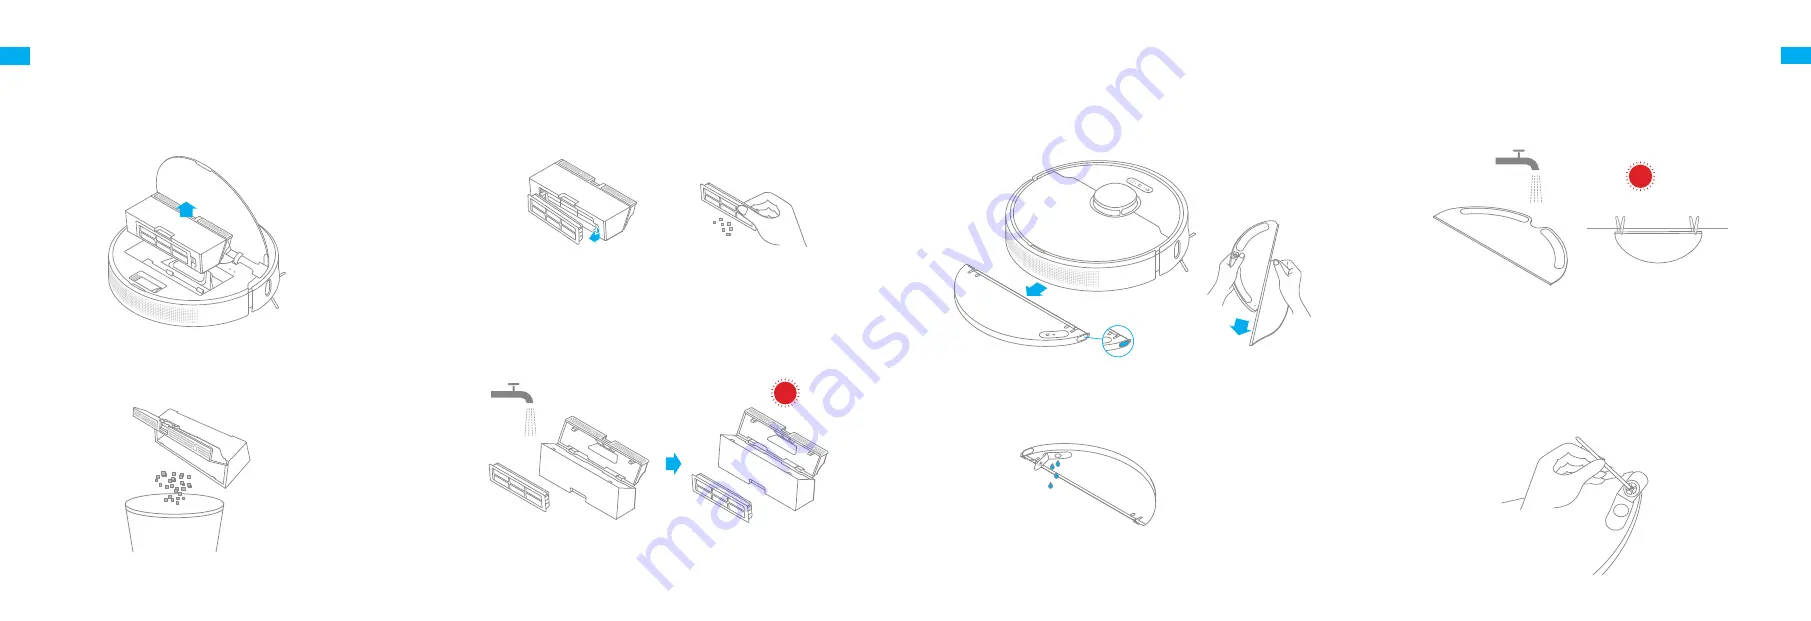
Clean the Dust Bin and Filter

Routine Maintenance

1. Open the robot cover, then press the dust bin clip to remove the 

dust bin.

2. Open the dust bin cover as indicated by the diagram.

3. Remove the filter and tap its basket gently.

4. Rinse the dust bin and filter with water until they are clean. 

Thoroughly dry the filter before re-installing.

Note: 

Do not attempt to clean the filter with a brush or finger.

•  Only clean water should be used to clean the filter. Do not use detergent.

•  Before using, keep it in a well-ventilated or cool place.

Note:

Clean the Mopping Module

Routine Maintenance

1. Press the two release clips on the side of water tank, remove the 

mopping module and pull the mop pad off the mopping module.

3. Clean the mop pad with water only and leave to air dry before re-

installing.

2. Pour out the water in the tank. Clean with water only and leave to 

air dry before re-installing.

4. If slow water flow occurs, or the volume is not well-distributed, 

please clean the air hole in the cover of the water tank.

Note: 

Do not expose the tank to the sun directly.

•  Remove the pad from the mopping module before cleaning it, and 

make sure dirty water does not flow back into the water outlet to avoid 

clogging.

•  For optimal performance, it is recommended to replace the mop pad 

every 3 to 6 months.

Note:

Summary of Contents for Bot L10 Pro

Page 1: ...myRobotcenter The expert for robots in your home With one click to the online shop myRobotcenter eu myRobotcenter co uk...

Page 2: ...P2029 V2 0 2020 11 20 210mm 140mm CMYK 157g 105g 05 2029 018 01 000...

Page 3: ...eht und die Vision des Unternehmens widerspiegelt n mlich im Bereich der Technologie unaufhaltsam weiterzustreben zu erforschen und entdecken Dreame est l abr viation de l entreprise chinoise Dreame T...

Page 4: ...for an extended period fully charge it then turn it off and store in a cool dry place Recharge the robot at least once every 3 months to avoid over discharging the battery This product contains batter...

Page 5: ...Brush Cleaning Tool Power Cord Mop Pad Robot Product Overview Spot Clean Button Press briefly to begin Spot Clean Mode Power Clean Button Press and hold for 3 seconds Press to begin cleaning after th...

Page 6: ...sor Main Wheels Main Brush Charging Contacts Brush Guard Clips Omnidirectional Wheel Side Brush Charging Contacts Press and hold for 3 seconds to restore the robot to factory settings Dust Bin Mopping...

Page 7: ...Click 4 Place the robot onto the charging dock to recharge The robot will turn on automatically and begin recharging Preparation Before Use Note Fully charge is recommended before first time use Do no...

Page 8: ...ning off the robot will end the current cleaning task Dreame Bot L10 Pro has four cleaning modes Quiet Standard Strong and Turbo The default mode is Standard You can specify the cleaning mode in the M...

Page 9: ...p might have been updated please follow the instructions based in the current app version Note 9 Use the Mopping Function How to Use It is recommended that all floors are vacuumed at least three times...

Page 10: ...ean the Mopping Module Routine Maintenance 1 Press the two release clips on the side of water tank remove the mopping module and pull the mop pad off the mopping module 3 Clean the mop pad with water...

Page 11: ...and the tire Clean the LDS Laser Sensor Edge Sensor Clean the Charging Contact Clean the High Precision 3D Clean the Cliff Sensor Routine Maintenance Note Wet cloths can damage sensitive elements with...

Page 12: ...Please ensure your robot connects to 2 4GHz Wi Fi The username or password of Wi Fi is incorrect Please enter the correct username and password The robot has low battery Scheduled cleaning will not st...

Page 13: ...tion All products bearing this symbol are waste electrical and electronic equipment WEEE as in directive 2012 19 EU which should not be mixed with unsorted household waste Instead you should protect h...

Reviews: