Draytek VigorSwitch V1281 User Manual Download Page 24


I-7 User Operation

I-7 User Operation

If the ports have been set up and all of your sources, output devices are connected, the 
VigorSwitch V1281 is ready to use. Remember to select the correct HDMI input on your 
screens/TVs/monitors.

You can now select any of your sources from any output device – your TVs or projectors 
around your home, office or other premises.

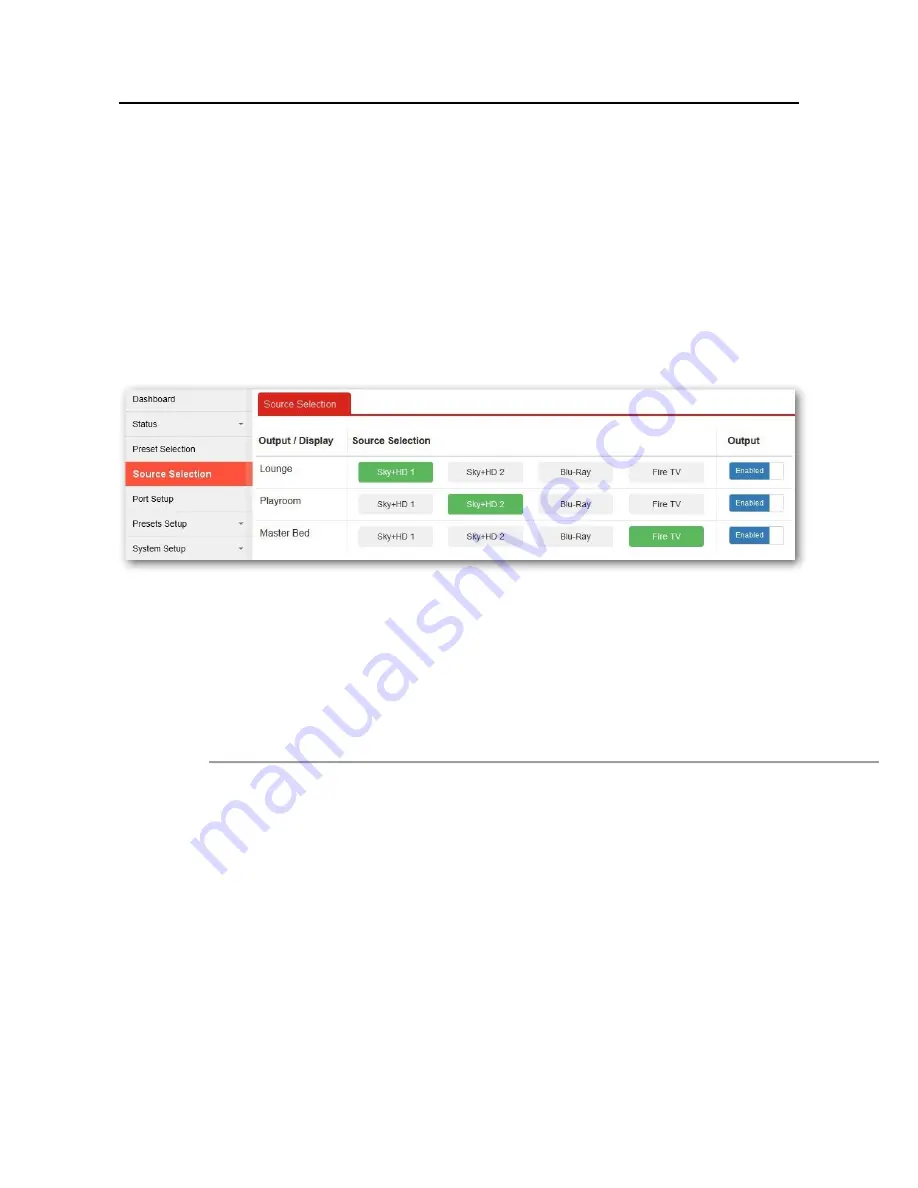
You can select sources either from the web interface (the same GUI which you used to 

configure the switch) or by using the DrayTek AVS app on a phone or other compatible 
mobile device.  

Within the VigorSwitch GUI, you can use the 

[Source Selection]

 menu:

If you are using the DrayTek AVS app on your mobile device, that has the same function, 

allowing you to select your source for each output (room/TV).

Regular (non-admin) users should be given a username and password which does not have 
administrator privileges, otherwise they can log in and change the switch configuration. 
Only admins can disable a port temporarily (e.g. if it’s bedtime!). Users can share the same 
non-admin login, or you can set different logins for each user. Users can be restricted to 
controlling only specific outputs or be able to select only certain sources.

User Accounts configured on the VigorSwitch V1281 have access to 

either

:

1.

[Preset Selection]

 – when this option is enabled for a User Account, the user can 

select any of the configured presets

or

2.

[Source Selection]

 – Available when Preset Selection is not enabled for the User 

Account. 
This can be limited to control only specified 

Sources 

Outputs

 for individual user 

accounts

Creation and management of user-level accounts is performed from 

[System Setup] > [User Management]

, which is detailed in Section III-5 of this manual.

VigorSwitch V1281 User Guide

18

Summary of Contents for VigorSwitch V1281

Page 1: ......

Page 2: ...orSwitch V1281 24 Ports 4 Combo UTP SFP Ports A V Video Switch User s Guide Version 1 0 Firmware Version V2 3 0 For future update please visit DrayTek web site Date Jun 2018 VigorSwitch V1281 User Guide ii ...

Page 3: ... packaging out of reach of children for safety When you dispose of the switch please follow local regulations Warranty DrayTek Corp warrants to the original end user purchaser that the router will be free from any defects in workmanship or materials for a period of two 2 years from the date of purchase from a DrayTek authorized dealer in the UK Ireland Keep your purchase receipt as it serves as pr...

Page 4: ...uipment into an outlet on a circuit different from that to which the receiver is connected Consult the dealer or an experienced radio TV technician for help This device complies with Part 15 of the FCC Rules Operation is subject to the following two conditions 1 This device may not cause harmful interference and 2 This device may accept any interference received including interference that may cau...

Page 5: ...ation 18 I 7 1 Preset Selection 19 I 7 2 Source Selection 20 I 8 Dashboard 21 I 8 1 Configure Switch Name Location 23 I 9 Status 24 I 9 1 Port Bandwidth Utilization 24 Part II A V Switch Configuration 25 II 1 Port Setup 26 II 2 Presets Setup 28 II 2 1 Preset Names Setup 28 II 2 2 Preset Setup 29 Part III System Setup 31 III 1 Multicast 32 III 1 1 Properties 32 III 1 2 IGMP Snooping 33 III 1 2 1 IG...

Page 6: ...II 6 Network 59 III 6 1 IP Address 59 III 6 2 IPv6 Address 61 III 7 Firmware Upgrade 62 III 8 Configuration Backup 63 III 9 Factory Default 64 III 10 Reboot 65 Part IV Troubleshooting 66 IV 1 Diagnostics 67 IV 1 1 Cable Diagnostics 67 IV 1 2 Ping Test 68 IV 1 3 SysLog 69 IV 1 3 1 SysLog Explorer 69 IV 1 3 2 SysLog Settings 70 IV 2 Contacting DrayTek 73 VigorSwitch V1281 User Guide vi ...

Page 7: ...Part I Introduction Part I Introduction VigorSwitch V1281 User Guide 1 ...

Page 8: ...cations Specifications Physical Interfaces Physical Interfaces 24 10 100 1000BaseT Ethernet Ports RJ 45 IEEE 802 3 3u ab Ports Can be set to video input source video stream output or data LAN Port No 1 is always set for data LAN only 4 Additional Selectable Ports Nos 25 28 use as either 10 100 1000BaseT Gigabit Ethernet or SFP 802 3z Video Feed Control Video Feed Control Configure ports as source ...

Page 9: ...e of IGMP may interfere with normal AV switching functions General IEEE Standards Compliance General IEEE Standards Compliance 802 3 10Base T 802 3u 100Base T 802 3ab 1000Base T 802 3x Flow Control Capability 802 3 Auto negotiation Physical Specifications Physical Specifications Power Requirements 220 240VAC 802 3az Energy Efficient Ethernet Environment Operation Temperature 0 C 40 C Storage Tempe...

Page 10: ...ount Kit brackets screws Also Rubber Feet not shown UK type Power Cord If any of these items is missing or damaged when you receive the product please immediately contact your supplier You will also need HDMI to IP extenders convertors one for each A V source or output These are not supplied with the VigorSwitch see Section I 3 for more information VigorSwitch V1281 User Guide 4 ...

Page 11: ...t 1000Mbps On Amber The device is connected at 10 100Mbps Blinking The port is sending or receiving data Off The port is not connected Interface Port Description RJ 45 LNK ACT Ports 1 24 Port 1 to Port 24 are standard RJ 45 Ethernet ports supporting Gigabit speed RJ 45 or SFP Ports 25 28 Port 25 to Port 28 are used either as Fibre ports or RJ 45 ports If you use for example Port 25 as RJ 45 you ca...

Page 12: ...on of this guide in Black White you may prefer to download the colour PDF version from our web site HDMI vs Ethernet Cabling Like any Ethernet switch the V1281 has RJ 45 sockets on the front not HDMI Although native HDMI switches do exist cable lengths are limited and the cables themselves are more costly and complex to wire up Using Ethernet means you use low cost CAT5e or higher cable which ofte...

Page 13: ...er of converters extenders so you re not paying for HDMI ports you don t need you just purchase the right number of HDMI to IP convertors As there are many similar looking products it is essential is that the HDMI to IP adaptor extender that you use supports IP Some devices can send an HDMI signal over CAT5 CAT6 cable but using a proprietary method and not IP or Ethernet That type of device will n...

Page 14: ...on your rack type Installing Network Cables Crossover or straight through cable All the ports on the switch support Auto MDI MDI X functionality Both straight through or crossover cables can be used as the media to connect the switch with PCs as well as other devices like switches hubs or router Category 3 4 5 or 5e 6 UTP STP cable To make a valid connection and obtain the optimal performance an a...

Page 15: ...he left and four output screens on the right For this example you would need three HDMI over IP senders and four receivers Any port on the V1281 can be defined as one of three modes source output or LAN so it doesn t matter which port you select for your sources or outputs Later when you configure the V1281 you will allocate each port s function Coloured cables are used only for illustration Red a...

Page 16: ...ce device Set top boxes DVD players etc The sender units will also need power not shown Connect the Ethernet end of the sender to your VigorSwitch V1281 In the example photo below we have used two satellite TV receivers as the sources VigorSwitch V1281 User Guide 10 ...

Page 17: ...to your source e g DVD player and receivers connect to your output e g television Connect your VigorSwitch V1281 to your computer network we suggest using port 1 You can connect a PC to the VigorSwitch if you want to use that for configuration or you can use a wireless laptop if you have WiFi on your LAN Note down what is connected to each port on the V1281 especially if you won t be able to see t...

Page 18: ...itch on the app stores Ensure that your phone is connected to the correct WiFi network Click the Discover button in the app and will locate the V1281 and tell you its IP address the app won t do anything else yet You can also use the Windows DrayTek Device Finder utility download from our web site which will locate the switch on the network Either way note down the V1281 s IP address If you can t ...

Page 19: ...tificate against your switch s dynamic LAN IP address which will fail If you ve entered the correct address for the switch you can proceed past this message which will vary depending on your browser You may need to press Advanced to get to the continue link and then permit access or add an exception If you can t use https use http in the address bar instead The Login screen should now appear for y...

Page 20: ... connected a PC or the uplink to your LAN must always be set as LAN ports Port 1 on the V1281 is always a data port For our example we are going to have 4 sources and 3 inputs set as follows Port No Function Device Purpose Port 1 GE1 LAN Network WiFi Router Port 9 GE9 Source Sky HD 1 Port 11 GE11 Source Sky HD 2 Port 13 GE12 Source Blu Ray Port 15 GE15 Source Fire TV Port 17 GE17 Output Lounge Por...

Page 21: ...function to them all at once so here we select ports 9 11 13 and 15 select the Source button and click apply Now you can do the same for the outputs 17 19 and 21 Select those select Output and click apply You may notice the Allow LAN Access checkbox for output ports Do not click this unless you need to share the output s Ethernet cable with a data device Remember that the port numbers used in thes...

Page 22: ...he video feed you then need a small Ethernet switch at the output end to provide Ethernet outputs for your HDMI to IP receiver and then to the LAN devices you wish to connect for example a hard wired IP TV Wireless WiFi access point PC etc In the photo above we re using a DrayTek Vigor access point which has a built in 5 port Ethernet switch so it can provide Ethernet connectivity to the TV direct...

Page 23: ...enu on the V1281 s web interface and click on the Modify icon for the Output port that the network switch or access point will be connected to Just click the Allow LAN Access option and click OK to apply the change VigorSwitch V1281 User Guide 17 ...

Page 24: ...on admin users should be given a username and password which does not have administrator privileges otherwise they can log in and change the switch configuration Only admins can disable a port temporarily e g if it s bedtime Users can share the same non admin login or you can set different logins for each user Users can be restricted to controlling only specific outputs or be able to select only c...

Page 25: ...ctive Preset which controls the selection of multiple Sources Outputs simply press the desired Preset option to activate it Presets 1 11 can be configured from the Presets Setup section see Section II 2 Presets Setup for more details Preset 12 turns off all Outputs VigorSwitch V1281 User Guide 19 ...

Page 26: ...tion and click on the desired Source Selection option for an Output On larger screens all available options are displayed in a table On smaller displays press the button for an Output to select the available Sources To turn an Output on or off press the Enabled Disabled button VigorSwitch V1281 User Guide 20 ...

Page 27: ... that are active the firmware version and the switch s IP address location details Item Description Ports Indicates a port operating at 1000mb s indicates a port operating at 100mb s Model The model name of the VigorSwitch Firmware The operating firmware version of the VigorSwitch System Up Time The time that the switch has been active for since power on boot VigorSwitch V1281 User Guide 21 ...

Page 28: ...he VigorSwitch Contact The manually specified contact details for the VigorSwitch MAC MAC address of the VigorSwitch Protocol Method used to determine IP address DHCP Static Auto Configuration IP The current IP address of the VigorSwitch Link Local IPv6 only The VigorSwitch s Link Local address Gateway Network Gateway used to access addresses outside of the VigorSwitch s LAN subnet DNS DNS servers...

Page 29: ...me and Location details go to the Dashboard and click the Modify button in the lower right This will bring up a window to edit the switch naming information Click the OK button to save and apply these details on the VigorSwitch which can be viewed from the Dashboard VigorSwitch V1281 User Guide 23 ...

Page 30: ... Bandwidth Utilization This page offers the traffic statistics inlcuding data information and data of interframe gap for each port GE1 to GE28 In which data of interframe gap can be displayed or hidden by choose Enable Disable for IFG VigorSwitch V1281 User Guide 24 ...

Page 31: ...Part II Part II A V A V Switch Switch Configuration Configuration VigorSwitch V1281 User Guide 25 ...

Page 32: ... the mode that the port will operate in Source Used for HDMI over IP Transmitters connected to HDMI video sources i e IPTV Output Used for HDMI over IP Receivers connected to screens projectors LAN Standard LAN port no A V switch functionality Disable The port is disabled and can not pass network traffic Allow LAN Access Only available for ports with Output function Enable this option to allow LAN...

Page 33: ... see Port Function definitions on previous page LAN Access Allow LAN Access Only available for ports with Output function Enable this option to allow LAN access on the selected port s in addition to A V Source Output functionality OK Save the setting for the Port Cancel Close the Edit Interface window without saving changes VigorSwitch V1281 User Guide 27 ...

Page 34: ...I 2 2 Preset Setup and specifying a display name for the preset configured in Section II 2 1 Preset Names Setup II II 2 2 1 1 Preset Names Setup Preset Names Setup Configure the displayed name of a Preset to be shown in Preset Selection Available settings are explained as follows Item Description Preset 1 to 11 Select the Preset to modify Name Enter the display name for the Preset Apply Save the s...

Page 35: ...as follows Item Description Preset Name 1 11 Select the preset to modify it Upon selection the preset configuration will be displayed in the table Ports labelled 1 28 Each column represents a port on the VigorSwitch that is either an Output port or is used for LAN access LAN Admin ports these can not be modified by presets Unconfigured ports these can not be modified by presets Output ports Source...

Page 36: ...P display will switch to this Source Allow HDMI Video Output Enable Disable this setting to allow or disallow HDMI Video Output on the switch port Changing this setting affects all Presets Colour Blind Mode When enabled this switches the Preset Setup table to an alternative colour palette Show Source Ports When enabled this displays the Source ports on the X axis Apply Save the selected Preset con...

Page 37: ...Part III Part III System Setup System Setup VigorSwitch V1281 User Guide 31 ...

Page 38: ...sent out to the LAN segment Changing the Multicast configuration of the VigorSwitch V1281 from its default settings may stop multicast based HDMI over IP devices from communicating through the VigorSwitch or cause unexpected behaviour II III I 1 1 1 1 Properties Properties This page allows the administrator to choose actions for processing the unknown muliticast packets and for handling known pack...

Page 39: ... which links need which IP multicast streams Multicasts may be filtered from the links which do not need them and thus controls which ports receive specific multicast traffic HDMI over IP devices that communicate through Multicast packets can be used with the VigorSwitch V1281 without enabling IGMP Snooping IGMP Snooping may be used in networks that have significant multicast traffic on the LAN po...

Page 40: ...y support process IGMP v2 packet v3 Support v3 basic and v2 IGMP Snooping Report Suppression Click Enable to allow the switch to handle IGMP reports between router and host suppressing bandwidth used by IGMP Apply Save the settings or changes to the switch Modify Click this to modify IGMP settings IGMP Snooping State Choose Enable to enable IGMP snooping function Router Ports Auto Learn Set the en...

Page 41: ...any response from the subscribed member VigorSwitch will stop transmitting data to the related GE port s Last Member Query Interval The maximum time interval between counting each member query message with no responses from any subscribed member Immediate Leave Leave the multicast group immediately on the port VLAN where leave message is sent from regardless there is still a subscribed member or n...

Page 42: ...the enabling status of IGMP Querier on the chosen VLAN profile Disable Click it to disable the function Querier Version Set the query version of IGMP Querier Election on the chosen VLANs v2 Querier version 2 v3 Querier version 3 Note For maximum compatibility it is suggested to use querier version lower than IGMP snooping version for there is possibile network mixed with IGMP v2 v3 client and v2 q...

Page 43: ...cified port VLAN member Available settings are explained as follows Item Description VLAN ID Use the drop down list to specify a VLAN profile as IGMP Static Group Group IP Address Specify the IPv4 multicast address you wish to assign for the static group defined in VLAN ID Member Ports Specify the port s that static group with given IPv4 multicast address shall include Apply Save the settings or c...

Page 44: ...ws Item Description VLAN ID Display the VLAN of this multicast group belongs to Group IP Address Display the multicast address of this multicast group Member Ports Display the port s where subscribing member of this multicast group belongs to Type Display if it is dynamically learned or statically assigned Life sec Display the life time of this multicast member left if no membership report sent ag...

Page 45: ...this switch Available settings are explained as follows Item Description VLAN ID Display the VLAN profile that the IGMP querier belongs to Port Display the uplink ports where querier router exists Expire Time sec Display the time before querier is considered no longer existed VigorSwitch V1281 User Guide 39 ...

Page 46: ...ation NMS software which runs on the manager A managed device is a network node that implements an SNMP interface that allows unidirectional read only or bidirectional read and write access to node specific information Managed devices exchange node specific information with the NMSs Sometimes called network elements the managed devices can be any type of device including but not limited to routers...

Page 47: ...in a view Available settings are explained as follows Item Description View Name Enter a name for the MIB view OID Subtree Enter an OID string to be included or excluded from the MIB view Type Determine to include or exclude the selected MIBs Apply Save the settings or changes to the switch VigorSwitch V1281 User Guide 41 ...

Page 48: ...III 2 2 III 2 2 Group Group Group SNMP users and assign different authorization and access privileges VigorSwitch V1281 User Guide 42 ...

Page 49: ...t one of the views The default is all which means the group user can read all MIB views Write View Enabled Users of this group have the right to write the selected MIB view Use the drop down list to select one of the views The default is all which means the group user can write all MIB views Notify View Enabled Users of this group have the right to send notification for the selected MIB view Use t...

Page 50: ... of the SNMP groups for such SNMP community profile View Simply specify one of the view profiles created in SNMP View from the drop down list Access Right Read Only It allows unidirectional access to node specific information Read Write It allows bidirectional access to node specific information Group Specify the SNMP group configured by user SNMP Group to define the object available to the commun...

Page 51: ...lable when SNMPv3 is selected No Security No authentication Authentication Authentication without encryption will be performed for packets Authentication and Privacy Authentication with encryption will be performed for packets Authentication Method It is available when Authentication or Authentication and Privacy is selected as security level Method At present available methods include None MD5 an...

Page 52: ...Add Click to add a new user profile Edit Click to modify the settings for the selected profile Click to remove the selected entry VigorSwitch V1281 User Guide 46 ...

Page 53: ...m Description Engine ID The user defined engine ID is range 10 to 64 hexadecimal characters and the hexadecimal number must be divided by 2 User Defined If it is checked the local engine ID will be configured manually If not the default Engine ID which is made up of MAC and Enterprise ID will be used instead Apply Apply the settings to the switch VigorSwitch V1281 User Guide 47 ...

Page 54: ...scription Address Type Specify the address type for entering hostname or IPv4 IPv6 address Server Address Enter the IP address or the host name of the SNMP server Engine ID Specify the engine ID for remote SNMP server The engine ID is range10 to 64 hexadecimal characters and the hexadecimal number must be divided by 2 VigorSwitch V1281 User Guide 48 ...

Page 55: ...Add Click it to create a new profile Edit Click to modify the settings for the selected server profile Click it to remove the selected entry VigorSwitch V1281 User Guide 49 ...

Page 56: ...eboot when encountering authentication failure including community not match or user password not match Link Up Down Enable VigorSwitch will reboot while encountering port link up or down trap Cold Start Enable VigorSwitch will reboot while encountering user trap Warm Start Enable VigorSwitch will reboot while encountering power down trap Apply Apply the settings to the switch VigorSwitch V1281 Us...

Page 57: ...rms to the host If it is used Timeout and Retry also shall be defined Community user Use the drop down list to choose one of the community profiles Security Level Specify SNMP security level for SNMP notification packet It is available when SNMPv3 is selected No Security No authentication Authentication Authentication without encryption will be performed for packets Authentication and Privacy Auth...

Page 58: ... informs retry count It is available when Inform is selected as Type Use Default If it is checked the default number 3 will be used automaticallty Add Click it to create a new notification profile Edit Click to modify the settings for the selected server profile Click to remove the selected entry VigorSwitch V1281 User Guide 52 ...

Page 59: ...ser s manual for detailed information Wizard Click this button to open the wizard which is used to generate the full URL for connection to your VigorACS server with the IP Hostname and port number Last Inform Displays connection status and the time of the most recent connection to the VigorACS server Test With Inform Click it to send a message based on the event code selection to test if such CPE ...

Page 60: ... for NAT STUN assists the VigorSwitch in passing through a network connection with NAT Network Address Translation This should typically be enabled Server IP Type the IP address of the ACS server Server Port Type the port number of the STUN server typically 3489 Minimum Keep Alive Period the CPE must send binding request to the server for the purpose of maintaining the binding in the Gateway Pleas...

Page 61: ...ing Using recurring mode of daylight saving time Non Recurring Using non recurring mode of daylight saving time USA Using daylight saving time in the United States that starts on the second Sunday of March and ends on the first Sunday of November European Using daylight saving time in the Europe that starts on the last Sunday Daylight Saving Time Offse It is available when Recurring is selected as...

Page 62: ...igure the Time and Date on the VigorSwitch manually or specify an NTP Network Time Protocol server for the VigorSwitch to fetch the time from the specified server Available settings are explained as follows Item Description Manual Time Specify static time year month day hours miniutes and seconds manually Enable SNTP Enable Click it to enable SNTP time server Disable Click to disable the time serv...

Page 63: ...ount simply enter the same string in this field Then modify the password and choose privilege level After clicking Apply the existing user name will be modified with different values Password Enter a password for new account Retype Password Retype password to make sure the password is exactly you typed before in Password field Privilege Level Use the drop down list to select privilege level Admin ...

Page 64: ...lect Admin User privileges for the account Preset Selection Users only Enable this to allow the account to select the Preset active on the VigorSwitch Enabling this option disables the Permitted Source Ouput Port options Permitted Source Port Users only Select the Source ports that the account is allowed to view and modify the settings with Permitted Output Port Users only Select the Output ports ...

Page 65: ...gor router it will use the IP address obtained from the DHCP server on Vigor router Thus the user must type the assigned IP as URL for accessing into the web user interface of VigorSwitch If not 192 168 1 224 shall be the default IP Available settings are explained as follows Item Description Mode Select the mode of network connection Static Use static IPv4 address DHCP Use DHCP provisioned IP add...

Page 66: ...ay in dotted decimal notation If static mode is enabled enter gateway address in this field DNS Server 1 Only available when Static is selected as Mode If static mode is enabled enter primary DNS server address in this field DNS Server 2 Only available when Static is selected as Mode If static mode is enabled enter secondary DNS server address in this field Apply Save the settings or changes to th...

Page 67: ... Auto Configuration is Disable Enter the IPv6 address of your switch If auto configuration mode is disabled enter IPv6 address in this field Link Local Address It is available when Auto Configuration is Disable Type Gateway It is available when Auto Configuration is Disable Enter the IPv6 address of the router as your default IPv6 gateway to access IPv6 Internet or other IPv6 network DHCPv6 Client...

Page 68: ... IP Available when TFTP is selected as Upgrade Method Enter the IPv4 IPv6 address for the TFTP server File Name Available when TFTP is selected as Upgrade Method Enter the firmware image or configuration file name on the TFTP server File Path Available when HTTP is selected as Upgrade Method Choose the firmware file located in your computer Upgrade Type Available when TFTP is selected as Upgrade M...

Page 69: ...ackup method TFTP Using TFTP to backup the VigorSwitch configuration HTTP Using WEB browser to backup the VigorSwitch configuration Server IP Available when TFTP is selected as Backup Method Enter the IPv4 IPv6 address for the TFTP server Backup Type Configuration Make a backup copy of the VigorSwitch configuration Apply Click Apply to start the configuration backup process if HTTP is selected the...

Page 70: ...ly to return to factory default settings for VigorSwitch Tick the Keep my current IPv4 address settings option to retain the current static DHCP IP address configuration of the VigorSwitch when performing the factory reset VigorSwitch V1281 User Guide 64 ...

Page 71: ...III III 10 10 Reboot Reboot Click Apply to reboot VigorSwitch with current settings VigorSwitch V1281 User Guide 65 ...

Page 72: ...Part IV Part IV Troubleshooting Troubleshooting VigorSwitch V1281 User Guide 66 ...

Page 73: ...opper test the results will be shown on the lower side of this web page Available settings are explained as follows Item Description Port Use the drop down list to select the port GE1 to GE28 or ports for performing cable diagnostics Start Perform the copper test action VigorSwitch V1281 User Guide 67 ...

Page 74: ...to check if network path is ok Host Enter the IP address of SNMP server based on the protocol selected above Count It means how many times to send ping request packet Enter a number between 1 and 5 as the count and the default configuration is 4 Interval sec Define the interval to perform ping action For example 1 means the ping action will be performed per second Start Perform ping action Stop Te...

Page 75: ...y emerg alert crit error warning notice info and debug of log messages which you wish to filter out for review Category Select the categories related features of logs you wish to review Category contains AAA ACL AUTHMGR CABLE_DIAG DAI DHCP_SNOOPING GVRP IGMP_SNOOPING IPSG L2 LLDP Mac based VLAN Mirror MLD_SNOOPING Platform PM Port PORT_SECURITY QoS Rate SNMP STP Security suite System Surveillance ...

Page 76: ... into local syslog and specific remote syslog server for storage Available settings are explained as follows Item Description SysLog Service Enable Click it to activate function of syslog Disable Click it to inactivate the function Apply Save the settings or changes to the switch VigorSwitch V1281 User Guide 70 ...

Page 77: ... saving If you want to modify Volatile Memory Non Volatile Memory select Volatile Memory Non Volatile Memory in this field Then use the drop down list of severity to specify type of log message After clicking Apply the Volatile Memory Non Volatile Memory will be modified with new configured severity level Severity Select severity emerg alert crit error warning notice info and debug of log messages...

Page 78: ...cify the port that syslog should be sent to Severity Select severity emerg alert crit error warning notice info and debug of log messages which will be stored Facility One device supports multiple facilities represented with facility ID local0 to local7 of remote Syslog server For each facility ID contains different syslog server configuration please choose a facility ID for such Syslog server App...

Page 79: ...hase original invoice safely in case warranty or other service is ever required Additional Feature Setup These are covered in the main user manual which is available on the Downloads page https www draytek co uk support downloads The online knowledgebase has additional information on how to configure the VigorSwitch s more advanced features https www draytek co uk support product knowledgebase Kee...

Reviews: