background image

2. CONTENTS

1. TITLE PAGE


  1.1   INTRODUCTION..........................................................................................................2   


  1.2   REVISION HISTORY  ..................................................................................................2


  1.3   UNDERSTANDING THIS MANUAL .............................................................................2


  1.4   COPYRIGHT NOTICE .................................................................................................2

2. CONTENTS


  2.1 CONTENTS ....................................................................................................................3

3. WARRANTY


  3.1   WARRANTY.................................................................................................................4

4. INTRODUCTION


  4.1   SCOPE.........................................................................................................................5


  4.2   SPECIFICATION ..........................................................................................................5

5. HEALTH AND SAFETY INFORMATION


  5.1   GENERAL SAFETY INSTRUCTIONS FOR POWER TOOL USE ...............................6   


  5.2   GENERAL SAFETY INSTRUCTIONS FOR COMPRESSED AIR ...............................7 


  5.3   SPECIFIC SAFETY INSTRUCTIONS FOR AIR HAMMERS .......................................8  


  5.4  RESIDUAL RISK ..........................................................................................................9

6. TECHNICAL DESCRIPTION


  6.1  IDENTIFICATION .......................................................................................................10

7. UNPACKING AND CHECKING

    7.1  PACKAGING ............................................................................................................. 11


  7.2  WHAT’S IN THE BOX?............................................................................................... 11

8. AIR SUPPLY


  8.1  AIR TOOL OIL SPECIFICATION ...............................................................................12


  8.2  RECOMMENDED AIR SUPPLY SET UP...................................................................12

9. ASSEMBLY


  9.1  CONNECTION TO THE AIR SUPPLY .......................................................................13


  9.2  CONNECTING CHISELS...........................................................................................13

10. OPERATION


  10.1  TRIGGER SWITCH....................................................................................................14   


  10.2  DUST AND SWARF  ..................................................................................................14

11. MAINTENANCE


  11.1  EVERY-DAY MAINTENANCE CHECKS ....................................................................15


  11.2  AFTER USE MAINTENANCE CHECKS....................................................................15

12. TROUBLESHOOTING


  12.1 TROUBLESHOOTING GUIDE....................................................................................16

13. EXPLANATION OF SYMBOLS


  13.1 EXPLANATION OF SYMBOLS...................................................................................17

14. DISPOSAL


  14.1 DISPOSAL  .................................................................................................................18

DECLARATION OF CONFORMITY .............................................................................. ENCLOSED

14. DISPOSAL

14.1 DISPOSAL

–  At the end of the machine’s working life, or when it can no longer be repaired, ensure that it is 

disposed of according to national regulations.

–  Contact your local authority for details of collection schemes in your area.

  In all circumstances:

  ●  Do not dispose of power tools with domestic waste.

  ●  Do not incinerate.

  ●  During decommissioning of the equipment, certain hazards should be understood and  

 avoided:


  Only with the line pressure released shall the equipment be disassembled. 


  Goggles should be worn.

- 3 -

- 18 -

NOTES

1.  TITLE PAGE

1.1 INTRODUCTION:

USER MANUAL FOR: 6 Piece Air Hammer Kit

Stock No: 65142

Part No: SFAH4

As our user manuals are continually updated, users should make sure that they use 

the very latest version.

Downloads are available from: http://drapertools.com/manuals

Draper Tools Limited  

Hursley Road 


Chandler’s Ford    

Eastleigh

Hampshire

SO53 1YF

UK

Website: drapertools.com

Product Helpline: +44 (0) 23 8049 4344

General Fax: +44 (0) 23 8026 0784

1.3 UNDERSTANDING THIS MANUALS SAFETY CONTENT:

WARNING! – Information that draws attention to the risk of injury or death.

CAUTION! – Information that draws attention to the risk of damage to the product or 

surroundings.

1.4 COPYRIGHT © NOTICE:

Copyright © Draper Tools Limited.

Permission is granted to reproduce this publication for personal and educational use 

only. Commercial copying, redistribution, hiring or lending is prohibited.

No part of this publication may be stored in a retrieval system or transmitted in any 

other form or means without written permission from Draper Tools Limited.

In all cases this copyright notice must remain intact.

1.2 REVISIONS:

Date first published July 2019.

- 19 -

Summary of Contents for STORMFORCE 65142

Page 1: ...tains all the necessary information to ensure its correct and safe use By following all the general safety instructions contained in this manual it will ensure both product and operator safety together with longer life of the product itself AlI photographs and drawings in this manual are supplied by Draper Tools to help illustrate the operation of the product Whilst every effort has been made to e...

Page 2: ... MANUALS SAFETY CONTENT WARNING Information that draws attention to the risk of injury or death CAUTION Information that draws attention to the risk of damage to the product or surroundings 1 4 COPYRIGHT NOTICE Copyright Draper Tools Limited Permission is granted to reproduce this publication for personal and educational use only Commercial copying redistribution hiring or lending is prohibited No...

Page 3: ...RESIDUAL RISK 9 6 TECHNICAL DESCRIPTION 6 1 IDENTIFICATION 10 7 UNPACKING AND CHECKING 7 1 PACKAGING 11 7 2 WHAT S IN THE BOX 11 8 AIR SUPPLY 8 1 AIR TOOL OIL SPECIFICATION 12 8 2 RECOMMENDED AIR SUPPLY SET UP 12 9 ASSEMBLY 9 1 CONNECTION TO THE AIR SUPPLY 13 9 2 CONNECTING CHISELS 13 10 OPERATION 10 1 TRIGGER SWITCH 14 10 2 DUST AND SWARF 14 11 MAINTENANCE 11 1 EVERY DAY MAINTENANCE CHECKS 15 11 ...

Page 4: ...ols are hired out when the warranty period is 90 days from the date of purchase This warranty does not apply to any consumable parts any type of battery or normal wear and tear nor does it cover any damage caused by misuse careless or unsafe handling alterations accidents or repairs attempted or made by any personnel other than the authorised Draper warranty repair agent Note If the tool is found ...

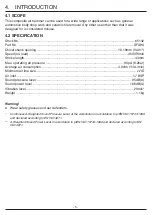
Page 5: ...se other than that it was designed for is considered misuse 4 2 SPECIFICATION Stock No 65142 Part No SFAH4 Chisel shank opening 10 18mm 0 401 Speed no load 4500R min Stroke length 43mm Max operating air pressure 90psi 6 2bar Average air consumption 4 0cfm 113L min Minimum air line size 3 8 ID Air inlet BSP Sound pressure level 95dB A Sound power level 106dB A Vibration level 20m s2 Weight 1 1kg Wa...

Page 6: ...ol will result in tool failure and user injury This covers the use of accessories Dress properly Loose clothing long hair and jewellery are all dangerous because they can become entangled in moving machinery This can also result in parts of body being pulled into the machine Clothing should be close fitted with any long hair tired back and jewellery and neck ties removed Footwear must be fully enc...

Page 7: ...ed for security All plastic plugs in the equipment used for protection during shipping should be removed 3 No piping alterations removal of fittings repairing of equipment etc Should be attempted with air supplies connected Air and electrical supplies must be disconnected before beginning any adjustment maintenance or dismantling of equipment 4 The maximum allowable operating pressures temperature...

Page 8: ...ue to reaction forces or breakage of inserted tool or may cause injuries Power tools shall be isolated from the energy source before changing or adjusting the inserted tool Warning There is a risk of loose clothing hair etc being caught in the tool There is a risk of being injured if hands are not kept away from the air hammer chisel There is a risk of danger to persons from high speed splinters b...

Page 9: ...ntain extensive instructions of safe working with power tools every power tool involves a certain residual risk which can not be completely excluded by safety mechanisms Power tools must therefore always be operated with caution 5 HEALTH AND SAFETY INFORMATION 5 4 RESIDUAL RISK 9 ...

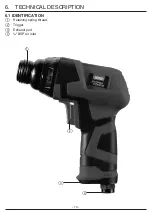
Page 10: ...6 TECHNICAL DESCRIPTION 6 1 IDENTIFICATION 1 Retaining spring thread 2 Trigger 3 Exhaust port 4 BSP air inlet 1 2 3 4 10 ...

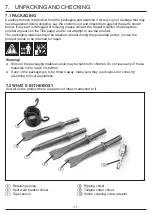
Page 11: ...or missing please contact the Draper Helpline the telephone number appears on the Title page and do not attempt to use the product The packaging material should be retained at least during the guarantee period in case the product needs to be returned for repair Warning Some of the packaging materials used may be harmful to children Do not leave any of these materials in the reach of children If an...

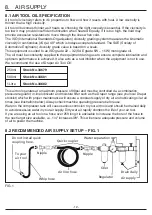
Page 12: ...ntly supplied to the equipment during use to ensure complete lubrication and optimum performance is achieved It also acts as a rust inhibitor when the equipment is not in use We recommend the use of Draper Air Tool Oil This air tool operates at a maximum pressure of 90psi and must be controlled via a combination pressure regulator in line lubricator and moisture filter such as the Draper range see...

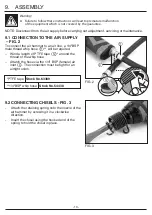
Page 13: ... 9 1 CONNECTION TO THE AIR SUPPLY FIG 2 To connect the air hammer to an air line a 1 4 BSP male thread whip hose 11 will be required Wind a length of PTFE tape 12 around the thread of the whip hose Attatch the hose via the 1 4 BSP female air inlet 4 The connection must be tight for an airtight union 1 4 BSP whip hose Stock No 54438 PTFE tape Stock No 63389 FIG 2 FIG 3 11 4 12 Warning Failure to fo...

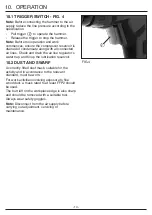
Page 14: ...nected air lines Check and drain the air line regulator s water trap and fill up the lubrication reservoir 10 2 DUST AND SWARF A correctly fitted dust mask suitable for the activity and in accordance to the relevant standard must be worn For work activities involving exposure to fine wood dust a mask rated to at least FFP2 should be used The burr left on the workpiece edge is also sharp and should...

Page 15: ...up the combined separator filter regulator lubricant reservoir Check the line pressure is correct for the tool 11 2 AFTER USE MAINTENANCE CHECKS Repeat the above procedures Lubricate the tool with approximately 1 5ml of oil directly down the air inlet Warning Disconnect from the air supply before carrying out any adjustments servicing or maintenance Never use any sockets or accessories that are no...

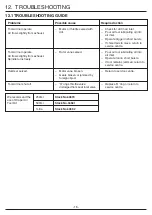
Page 16: ...Check for dirt in air inlet Pour air tool lubricating oil into air inlet Operate trigger in short bursts If chisel fails to move return to service centre Pour air tool lubricating oil into air inlet Operate tool in short bursts If tool remains jammed return to service centre Hammer seized Motor vane broken Gears broken or jammed by foreign object Return to service centre Tool will not shut off O r...

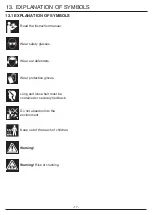
Page 17: ...Read the instruction manual Wear safety glasses Wear ear defenders Wear protective gloves Long and loose hair must be contained or securely tied back Do not abandon into the environment Keep out of the reach of children Warning Warning Risk of crushing 17 ...

Page 18: ...ulations Contact your local authority for details of collection schemes in your area In all circumstances Do not dispose of power tools with domestic waste Do not incinerate During decommissioning of the equipment certain hazards should be understood and avoided Only with the line pressure released shall the equipment be disassembled Goggles should be worn 18 ...

Page 19: ...NOTES 19 ...
Page 20: ... Agent For aftersales servicing or warranty repairs please contact the Draper Tools Helpline for details of an agent in your local area Published by Draper Tools Limited No part of this publication may be reproduced stored in a retrieval system or transmitted in any form or by any means electronic mechanical photocopying recording or otherwise without prior permission in writing from Draper Tools ...

Reviews: