


ASSEMBLY
To make assembly easier we recommend having two persons aid one another in assembly.
NOTE:
The holes in the top cabinet are
tapped and do not require nuts.
NOTE:
Side panels and back panel tabs (flanges) must
be positioned on inside of cabinet facing up.
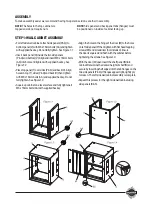
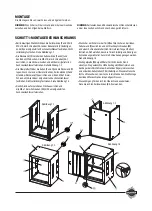
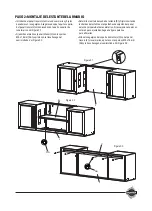
STEP 1: WALL CABINET ASSEMBLY
•
For left side wall cabinet, attach side panels (P & Q) to
bottom panel (V) with M6 x 16mm bolts (AA) and tighten
with supplied hex key. Do not fully tighten. See Figure 1.1
•
Insert back panel (O) inside the two side panels
(P & Q) and bottom (V). Align and insert M6 x 16mm bolts
(AA) into holes and tighten with supplied hex key. See
Figure 1.2
•
Place top panel (T) over sides (P & Q) and back (O). Align
holes on top (T), sides (P & Q) and back (O) then tighten
with M6 x 16mm bolts (AA) and supplied hex key. Do not
fully tighten. See Figure 1.3
•
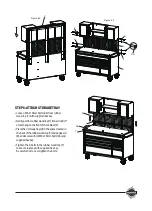
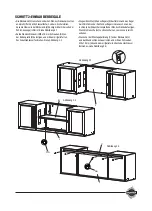
Square up cabinet on a level surface and fully tighten all
M6 x 16mm bolts (AA) with supplied hex key.
•
Align the holes on the hinge of the door (M) to the holes
on left side panel (P) then tighten with flat head tapping
screws (EE) and screwdriver (not included). Ensure
the door is squared and flush with the cabinet before
tightening the screws. See Figure 1.4
•
With the door (M) open insert the shelf panel (N) into
cabinet. Determine the desired height of shelf (N) and
secure by inserting shelf edges into the tab flanges on the
two side panels (P & Q). If flanges appear tight, lightly pry
to loosen. The left side wall cabinet assembly is complete.
•
Repeat this process for the right side wall cabinet using
side panels (R & S).