•
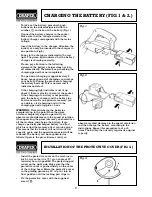
To take out the battery, press both push-
buttons on the sides designated with the
number
✕✌
and take out the battery. (Fig.1.)
•
Connect the battery charger to the socket.
Make sure that the voltage stated on the
battery charger corresponds with the mains
voltage.
•
Insert the battery in the charger. Attention: the
battery can only be inserted in the charger in
one position. (Fig.2.)
•
Power to the charger is indicated with a red
light. The green light indicates that the battery
charger is charging correctly.
•
Please, pay attention to the following
statement: the battery charger does not turn
off automatically. Therefore keep checking the
charging period has not completed.
•
The period of charging is approximately 5
hours. Longer period of charging can damage
your battery. During the process of charging,
the battery heats up. This is normal and it
indicates no defect.
•
If the charging light indicator is not lit up,
check if there is electric current at the socket.
If the charging of a battery is not possible,
give the battery charger and the battery to a
service centre. As an optional accessory, you
can obtain a fast-charging unit with the
charging period of approx. 1 hour.
WARNING:
Never discharge the batteries
completely, up to the point when the grass
trimmer completely stops to operate. If you
observe marked decrease in the speed of rotation
when operating the grass trimmer, you should turn
off the machine and charge the battery. If you
charge a partially discharged battery, an effect
which is called the memory effect can take place.
This means that the battery will not attain its full
capacity again and the operational period will be
reduced. The battery can be regenerated as
follows: Operate the grass trimmer until you
observe marked decrease in the speed of rotation
and then charge the battery according to the
instructions. Repeat this procedure for 4 or 5
times. The battery then usually regains its original
capacity.
INSTALLATION OF THE PROTECTIVE COVER (FIG.3.)
•
Install the protective cover on the machine in
such a way so that it is
✪✌
at an angle of 90°
towards your own position. The projecting part
is now on the right side. Make sure that the
protective cover is pushed firmly on the cover
of the cutting head. Rotate the protective cover
in the guiding groove by 90° to put it into its
final position until the locking part clips in.
•
Fix the protective cover with the supplied
screw
✫✌
.
- 6 -
CHARGING THE BATTERY (FIG.1 & 2.)
Fig.1.
Fig.2.
Fig.3.
Summary of Contents for 56479
Page 11: ... 10 NOTES ...


