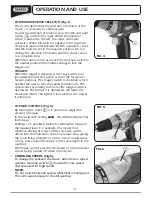
(A)
FIG.4
(B)
FIG.5
(C)
FIG.6
- CHANGING SPEEDS (Fig.6):
To change the speed of the chuck, slide the two speed
gearbox selection switch
(C)
forward for low speed
and backward for high speed.
- NOTE:
Do not switch between speeds whilst drill is being used.
This will cause damage to the drll gearbox.
- 8 -
OPERATION AND USE
- FORWARD/REVERSE SELECTOR (Fig.4):
The switch determines the direction of rotation of the
chuck, i.e. clockwise or anticlockwise.
To alter the direction of rotation, stop the drill and push
switch
(A)
to the left or right. When the direction
switch is pushed to the left, the chuck will rotate
clockwise. When the switch is pushed to the right, the
chuck will rotate anticlockwise. Before operation, check
that the switch is set in the required position. Do not
change the direction of rotation until the chuck comes
to a complete stop.
When the drill is not in use move the direction switch to
the neutral position (the middle setting) to lock the
trigger out.
- TRIGGER:
When the trigger is depressed, the chuck will rotate
(provided the direction switch is set in the forward or
reverse position). This trigger switch is electronic which
enables the user to vary the speed continuously. The
speed varies according to how far the trigger switch is
depressed. The further it is depressed, the faster the
chuck will rotate. The lighter it is depressed, the slower
it will rotate.
- TORQUE CONTROL (Fig.5):
By turning the collar
(B)
it is possible to adjust the
amount of torque.
In the "twist drill" setting , the drill/screwdriver has
full torque.
Settings 1-23 provide a facility for setting the torque to
the required level. For example, this means that
repetitive driving of screws of the same size will be
driven into the material to the same torque, thus giving
the same fixing strength, or in the case of countersunk
screws, these will all be driven to the same depth in the
material.
The torque control prevents the heads of small diameter
screws being twisted off when correctly set.


