background image

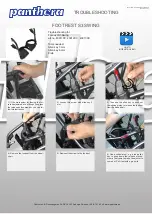
Unloading and Re-assembly of Parts

Gravity will assist down the ramps when you unload the powerbase with its batteries

connected. It is best to bring the powerbase down backwards (facing in the same direction

as when it was loaded). 

Don't forget to release the manual brakes

. It is possible to free-

wheel down the ramps, but we would advise taking it out under power, as this way you

have the electronic braking to assist. Simply use the backwards control button to drive the

powerbase on to the ramps, and guide it with your other hand as it descends. 

Don't forget to return the performance knob to the correct setting for the user's

needs, once the powerbase is out of the car before the SnapDragon is driven.  

The following operations may be necessary in order to reassemble your SnapDragon. 

For complete safety, it is best to turn off the main servo unit while you do this

.

a) Replacing the batteries
The batteries should be replaced in the battery compartment as shown in Fig:2, with the

terminals to the outside and the battery connectors facing one another to the centre. Each

battery is locked in place with a stud in the side of the battery compartment which locates

over the foot of the battery. To locate the battery correctly place it a little away from the

side of the compartment and slide it sideways into place when it will drop down from the

rib in the centre of the compartment and catch securely. When in correctly the tops of the

batteries are level with each other.

The grey connectors should be reconnected to their other halves on the cable from the

servo unit. The battery “bootlid” cover should be relocated with its front edge under the

elevator location bar, and the catch closed at the back. 

b) Re-attaching the Elevator
Offer up the elevator location bar to the front of the battery compartment, so that it sits in

its side channels, and rests on the front edge of the “bootlid” cover. With the elevator

pivoting in this position, release the bottom locking mechanism by pulling the elevator

locking knob. Locate the locking bar into the correct holes in the tilt brackets and let go of

the knob. Make sure that the locking bar is properly located in 

both 

tilt brackets. If only one

side is located, wriggle the elevator a little until the locking spring locates the second lock.

Reattach the elevator cable in the socket on the front of the main servo unit.

c) Replacing the Seat
Lift the seat from the side, with one hand at the top of the seat back and one hand under

the front of the base. Locate the round bar at the back of the seat on to its cradle on the

elevator, making sure that it is symmetrical. Allow the front to lower until the back of the

seat frame is parallel with the elevator. The locking mechanism will automatically engage,

and you will be unable to lift up the front again without pulling the release knob. Reconnect

the DCB cable into the socket on the elevator. 

When lifting the user back into the seat, make sure that the seat belt and/or harness is

done up before turning the main servo unit on again.

SnapDragon

 – Owner's Manual

Dragonmobility Ltd


Issue 1,8

Page 16

© Dragonmobility Ltd, Sept 2016

Summary of Contents for Dragon

Page 1: ...dragonmobility Ltd Dragonmobility Ltd SnapDragon Owner s Manual Issue 1 8 Dragonmobility Ltd Sept 2016 Page 1 Issue 1 8 SnapDragon Owner s Manual ...

Page 2: ...trols 7 Brakes 8 Free Wheel facility 9 Wheels and Tyres 9 Elevation 10 Overload Protection 11 3 Transporting the SnapDragon 12 Cables and Connectors 12 The Main Parts of a SnapDragon 12 General Safety Guidelines for Transport 13 Loading the SnapDragon using Ramps 13 Loading the SnapDragon without Ramps 15 Unloading and Re assembly of Parts 16 Contacting Dragonmobility Ltd 17 SnapDragon Owner s Man...

Page 3: ...ration This also applies to any regular care assistants or other adults who may be in charge of your child while he uses the SnapDragon In this way you can ensure that your child s safety and the safety of others will be maximised and that your child will get the most benefit possible from the freedom of movement a SnapDragon gives You may be reading this manual in printed form but it will also be...

Page 4: ...ing You may find that you are the one lagging behind when you both go out machines don t get tired But bear in mind that more movement means closer supervision depending on the age and ability of your child It also means that discipline is essential As with any child the boundaries need to be set clearly at the beginning If a child is not acting safely and responsibly enough in whatever the circum...

Page 5: ...or whom it has been supplied and is not likely to be suitable for use by any other person Dragonmobility Ltd can accept no liability for damage to persons or property caused by irresponsible or unreasonable use of the SnapDragon including but not limited to use which is contra indicated in this manual SAFETY NOTES Transportation in a Vehicle The Dragon is not suitable for transport in a vehicle on...

Page 6: ...underneath the fibreglass bootlid cover at the back see Fig 1 To remove this pull downwards with your thumb on the black rubber catch in the centre at the very back of the cover and you will find that the hook underneath unclips Then hold the cover with two hands under the back edge and pull it backwards and up To replace the cover reverse this process making sure that the front edge of the cover ...

Page 7: ...using the charger supplied by Dragonmobility Ltd While the charger is plugged into the SnapDragon it can still be used as a seat with user adjustable height however for safety reasons the joystick will not drive the main motors until the charger is disconnected If care is taken for the charger wires the SnapDragon can be moved by putting it in free wheel and pushing it to adjust its position b Dis...

Page 8: ...stent as the battery drains further and when there is virtually no capacity left the light will be on whenever the motors are running At this point the battery must be charged soon The SnapDragon should NOT be used if the light is on permanently whenever the DCB is switched on If the batteries are seriously flat a buzzer in the main servo unit will sound This is intended as a deterrent to use The ...

Page 9: ...and care should be taken to restrict such use unless the user is responsible and experienced enough to ensure his own safety and the safety of others The SnapDragon can be quite a powerful machine Also on the main servo unit are two push buttons which enable an attendant to drive the powerbase backwards or forwards without the user controls DCB connected for instance to load the SnapDragon up ramp...

Page 10: ...sed to a velocity controller or a rear wheel drive powerchair which tend to have different braking characteristics 2 When the machine is stationary the computer applies an electronic parking brake This brake is intended to hold the SnapDragon stationary on a 1 in 4 slope The forces experienced during transport in a bus car or train are greater than this brake is designed to withstand however so 3 ...

Page 11: ...ure proofing compound which is very reliable and will withstand damage from pins nails and even small glass cuts The valve is a standard Schraeder Car type and the tyres should be maintained at a pressure of 35 PSI 2 4 BAR for best performance this is written on the wall of the tyre If the tyre needs replacing it is best done with the wheel removed This is easily done by supporting the SnapDragon ...

Page 12: ...nects on each side to one of the opposing pairs of holes in the two brackets attached to the main chassis Fig 11 To alter the tilt angle pull the black knob Fig 10 at the back of the elevator to release the lock and manually adjust the angle to the appropriate position Make sure that both sides are connected It may be necessary to wriggle the the elevator slightly once one side is connected to mak...

Page 13: ... please consult Dragonmobility at the first sign of any fault Overload Protection The SnapDragon is capable of delivering high power for short periods of time to overcome obstacles however some obstacles are impossible to negotiate such as a brick wall If the SnapDragon is driven against an immovable obstacle so that it is producing the maximum power it is capable of delivering you will hear a tic...

Page 14: ...when connecting up the batteries The Main Parts of a SnapDragon Apart from cable connections the main operations you may need to master are removing and replacing the battery cover removing and replacing the batteries themselves removing and replacing the seat and removing and replacing the elevator Disassembly of all these elements leaves the SnapDragon in five pieces plus the seat which can all ...

Page 15: ... of the child These instructions assume therefore that the SnapDragon will be transported separately from its user Loading the SnapDragon using Ramps In order to load the SnapDragon up ramps into the back of an estate car or similar vehicle it is necessary to remove the seat In order to do this first lift the user into the car seat and make sure that he is safe Move the seat and elevator carriage ...

Page 16: ... and the bootlid to avoid rubbing which might cause damage to the fibreglass or paintwork c Removing the Elevator Folding the elevator flat makes the overall length of the SnapDragon slightly greater so for some smaller cars for instance a hatchback you may need to remove the elevator altogether Before doing this disconnect the elevator control cable Fig 10 at the main servo end by twisting the bl...

Page 17: ...aches with no wheelchair access etc For this purpose the SnapDragon will need to be disassembled as above with the elevator removed Then remove the battery compartment bootlid cover by pulling downwards with your thumb on the black rubber catch in the centre at the very back of the cover You will find that the hook underneath unclips Then hold the cover with two hands under the back edge and pull ...

Page 18: ...with each other The grey connectors should be reconnected to their other halves on the cable from the servo unit The battery bootlid cover should be relocated with its front edge under the elevator location bar and the catch closed at the back b Re attaching the Elevator Offer up the elevator location bar to the front of the battery compartment so that it sits in its side channels and rests on the...

Page 19: ...is diverted to a staff member s phone at week ends If your question is less urgent or you want to send Dragonmobility a photograph or similar then the e mail address to use is support dragonmobility com Although it is not always possible to answer the phone in person any voice mail messages received are treated with high priority please remember to leave your contact details as the person respondi...

Page 20: ...NOTES SnapDragon Owner s Manual Dragonmobility Ltd Issue 1 8 Page 18 Dragonmobility Ltd Sept 2016 ...

Reviews: