background image

USING THE DRAGON TOUCH DT40 BABY MONITOR

1. Set Up

Place the Camera Unit in a convenient location (e.g. on a table or a shelf) and point the
camera lens toward the area you want to monitor.

Note:

 Do not place the Monitor Unit within baby`s reach. If there is interference with the

picture or sound, try moving the units to different locations, and ensure they are not close
to other electrical equipment.

10

11

③ 

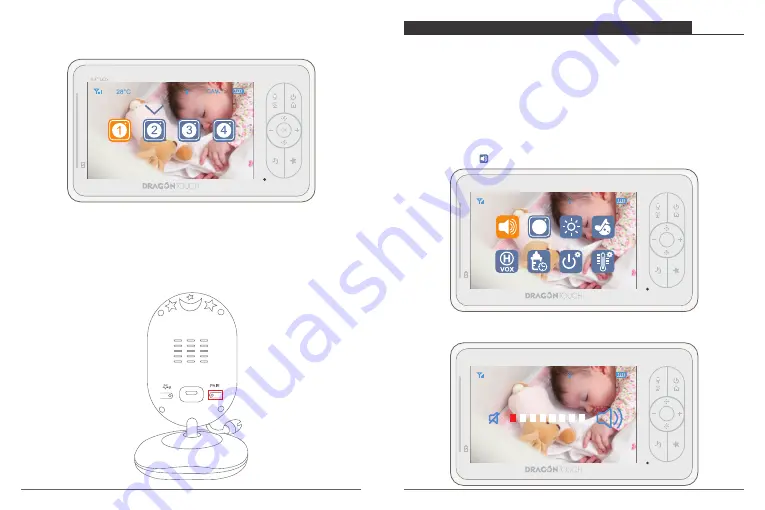
Press the “

-

” Left Button or the “

+

” Right Button to select the desired CAM and press

     the 

OK

 Button to start searching for a Camera Unit.

④ 

Press and hold the 

PAIR

 key behind the Camera Unit for at least 3 seconds. Then the

     connection is successful. 

2. Volume Setting

 Press Menu Button and the menu bar will pop up. Press the “

+

” 

Right 

Button or “

-

” 


Left 

Button until      Volume icon is highlighted.

OK

4.3” LCD

CAM-1

28°C

 Press 

OK

 Button to enter to the interface. Press the “

+

” 

Right 

Button or “

-

” 

Left 

Button

     to adjust the volume.

OK

4.3” LCD

CAM-1

28°C

Summary of Contents for DT40

Page 1: ...USER MANUAL Dragon Touch DT40 Babay Monitor...

Page 2: ...CONTENTS V1 1 81 100 01 20 21 40 61 80 41 60 101 120...

Page 3: ...Warning Packing List Overview Getting Started Using the Dragon Touch DT40 Baby Monitor FQA Contact Us 2 3 3 6 11 20 20 CONTENTS 01 English...

Page 4: ...read and follow all instructions and warnings contained in this booklet 10 This product is intended for indoor use only 11 This product is not intended for use as a medical monitor and its use should...

Page 5: ...Right Button Down Button OK Button Menu On Off Button Talk Sleep Button 04 05 Note The Volume LED light is Blue the Charging LED indicate is red when the red light turn off or turn to green to indica...

Page 6: ...battery is fully charged 2 Charging and Powering the Monitor Unit For best results charge the Monitor Unit before use After the initial charge recharge normally as required The Monitor Unit can be op...

Page 7: ...During power OFF when charging stand s adapter is plugged in put your Monitor Unit into the charging slot the Charging LED indicator will illuminate red to indicate charging then the Charging LED ind...

Page 8: ...close to other electrical equipment 10 11 Press the Left Button or the Right Button to select the desired CAM and press the OK Button to start searching for a Camera Unit Press and hold the PAIR key b...

Page 9: ...lt setting Press the Right Button or Left Button to select the desired CAM and press the OK Button to start searching for a Camera Unit OK 4 3 LCD 1 CAM 1 28 C 3 4 2 12 13 View and Scan Camera These t...

Page 10: ...Right Button or Left Button until Lullaby icon is highlighted OK 4 3 LCD CAM 1 28 C Press OK Button to enter to the interface Press the Right Button or Left Button to adjust the screen Brightness Pres...

Page 11: ...tton or Left Button until Feeding icon is highlighted OK 4 3 LCD CAM 1 28 C Press OK Button to enter to the interface Press the Right Button or Left Button to select the VOX level or turn off it Press...

Page 12: ...by this function 8 VOX Time Setting Press Menu Button and the menu bar will pop up Press the Right Button or Left Button until Setting icon is highlighted OK 4 3 LCD CAM 1 28 C OK 4 3 LCD CAM 1 28 C O...

Page 13: ...itor can standby A After charged fully the monitor can standby about 4 hours Q Can I hear my baby s voice when turn off the screen A Yes please turn on the VOX function and press to turn off the scree...

Page 14: ...Warnung Packliste Men option Beginnen Verwenden des Dragon Touch DT40 Babyphone FQA Kontaktiere Uns 22 23 23 26 31 40 40 21 INHALT Deutsch...

Page 15: ...ht 9 Lesen und befolgen Sie alle Anweisungen und Warnungen in dieser Brosch re bevor Sie dieses Produkt verwenden 10 Dieses Produkt ist nur zur Verwendung in Innenr umen vorgesehen 11 Dieses Produkt i...

Page 16: ...te Down Taste OK Taste Men Ein Aus Taste Talk Sleep Taste 24 25 Symbol Beschreibung Optionen C F VOX 1 2 3 4 1 CAM 1 CAM 2 CAM 3 CAM 4 Batterieleistung Nachtlicht F tterungsalarm VOX Funktion Volume S...

Page 17: ...r Monitoreinheit Laden Sie die Monitoreinheit vor dem Gebrauch auf um optimale Ergebnisse zu erzielen Laden Sie den Akku nach dem ersten Aufladen wie erforderlich auf Die Monitor Einheit kann normal m...

Page 18: ...zu gelangen W hrend des Ausschaltens wenn der Adapter des Ladestations angeschlossen ist stecken Sie die Monitoreinheit in den Ladeschacht Die Lade LED Anzeige leuchtet rot um den Ladevorgang anzuzei...

Page 19: ...cken Sie die linke Taste oder die rechte Taste um die gew nschte Kamera auszuw hlen und dr cken Sie die OK Taste um die Suche nach einer Kameraeinheit zu starten Halten Sie die PAIR Taste hinter der K...

Page 20: ...die rechte Taste oder die linke Taste um die gew nschte Kamera auszuw hlen und dr cken Sie die OK Taste um die Suche nach einer Kameraeinheit zu starten OK 4 3 LCD 1 CAM 1 28 C 3 4 2 32 33 Kamera anze...

Page 21: ...aste bis das Wiegenlied Symbol hervorgehoben ist OK 4 3 LCD CAM 1 28 C Dr cken Sie die OK Taste um zur Benutzeroberfl che zu gelangen Dr cken Sie die rechte Taste oder die linke Taste um die Bildschir...

Page 22: ...das Zuf hrungssymbol hervorgehoben ist OK 4 3 LCD CAM 1 28 C Dr cken Sie die OK Taste um zur Benutzeroberfl che zu gelangen Dr cken Sie die rechte Taste oder die linke Taste um den VOX Pegel auszuw h...

Page 23: ...zwischen C und F zu wechseln 8 VOX Zeiteinstellung Dr cken Sie die Men taste und die Men leiste wird angezeigt Dr cken Sie die rechte Taste oder die linke Taste bis das Einstellungssymbol hervorgehob...

Page 24: ...110 240V F Wie lange kann dieser Monitor auf Standby geschaltet werden A Nach dem vollst ndigen Aufladen kann der Monitor ca 4 Stunden in den Standby Modus wechseln F Kann ich die Stimme meines Babys...

Page 25: ...Advertencia Lista de Embalaje Visi n General Comenzar Uso de Dragon Touch DT40 Vigilab b FQA Cont ctenos 42 43 43 46 51 60 60 41 Espa ol CONTENIDO...

Page 26: ...dvertencias contenidas en este folleto 10 Este producto est destinado nicamente para uso en interiores 11 Este producto no est dise ado para usarse como monitor m dico y su uso no debe reemplazar la s...

Page 27: ...rriba Bot n de Derecho Bot n de Abajo Bot n OK Bot n de Men Encendido Apagado Bot n de Hablar Dormir 44 45 Icono Descripci n Opciones C F VOX 1 2 3 4 1 CAM 1 CAM 2 CAM 3 CAM 4 Energ a de Bater a Luz d...

Page 28: ...verde para indicar que la bater a est completamente cargada 2 Carga y Alimentaci n de Unidad de Monitor Para obtener mejores resultados cargue el monitor antes de usarlo Despu s de la carga inicial r...

Page 29: ...erfaz Durante el apagado cuando el adaptador del soporte de carga est enchufado coloque su monitor en la ranura de carga el indicador LED de carga se iluminar en rojo para indicar la carga y luego el...

Page 30: ...tricos 50 51 Presione el bot n de izquierdo o el bot n derecho para seleccionar la c mara deseada y presione el bot n OK para comenzar a buscar una c mara Mantenga presionado el bot n PAIR detr s de l...

Page 31: ...o o el bot n de izquierdo para elegir la c mara deseada y presione el bot n OK para comenzar a buscar una unidad de c mara OK 4 3 LCD 1 CAM 1 28 C 3 4 2 52 53 Ver y Escanear C mara Estas dos funciones...

Page 32: ...zquierdo o el bot n derecho hasta que se resalte el icono OK 4 3 LCD CAM 1 28 C Presione el bot n OK para ingresar a la interfaz Presione el bot n derecho o el bot n de izquierdo para ajustar el brill...

Page 33: ...erdo o el bot n derecho hasta que se resalte el icono OK 4 3 LCD CAM 1 28 C Presione el bot n OK para ingresar a la interfaz Presione el bot n derecho o el bot n de izquierdo para seleccionar el nivel...

Page 34: ...cilmente con esta funci n 8 Configuraci n de Tiempo de VOX Presione el bot n de men y la barra de men aparecer Presione el bot n de izquierdo o el bot n derecho hasta que se resalte el icono OK 4 3 LC...

Page 35: ...s de cargarlo por completo el monitor puede esperar unas 4 horas Q Puedo escuchar la voz de mi beb cuando apago la pantalla A S active la funci n VOX y presione para apagar la pantalla luego escuchar...

Page 36: ...Avertissement Liste de Colisage Vue d Ensemble Commencer Utilisation du moniteur pour b b Dragon Touch DT40 FAQ Contactez Nous 62 63 63 66 71 80 80 61 CONTENU Fran ais...

Page 37: ...les avertissements contenus dans ce livret 10 Ce produit est destin une utilisation en int rieur uniquement 11 Ce produit n est pas destin tre utilis comme moniteur m dical et son utilisation ne doit...

Page 38: ...n de Droite Bouton Bas Bouton OK Bouton de Menu Marche Arr t Bouton de Parle Sommeil 64 65 Ic ne Description Options C F VOX 1 2 3 4 1 CAM 1 CAM 2 CAM 3 CAM 4 Puissance de la Batterie Veilleuse Alarme...

Page 39: ...sse au vert pour indiquer que la batterie est compl tement charg e 2 Charger et Fournir l lectricit pour Moniteur Pour de meilleurs r sultats chargez le moniteur avant utilisation pour la premi re foi...

Page 40: ...ge est branch placez votre unit de moniteur dans le logement de chargement l indicateur DEL de charge s allume en rouge pour indiquer le chargement puis l indicateurt DEL de charge s teint pour indiqu...

Page 41: ...0 71 Appuyez sur le bouton de gauche ou sur le bouton de droit pour s lectionner la cam ra souhait e puis appuyez sur le bouton OK pour lancer la recherche d une cam ra Appuyez sur le bouton PAIR situ...

Page 42: ...Appuyez sur le bouton de droit ou sur le bouton de gauche pour s lectionner le module Cam ra souhait puis appuyez sur le bouton OK pour lancer la recherche d une cam ra OK 4 3 LCD 1 CAM 1 28 C 3 4 2 7...

Page 43: ...u le bouton de gauche jusqu ce que l ic ne Berceuse soit en surbrillance OK 4 3 LCD CAM 1 28 C Appuyez sur le bouton OK pour acc der l interface Appuyez sur le bouton de droit ou sur le bouton de gauc...

Page 44: ...gauche jusqu ce que l ic ne d alimentation soit en surbrillance OK 4 3 LCD CAM 1 28 C Appuyez sur le bouton OK pour acc der l interface Appuyez sur le bouton de droit ou sur le bouton de gauche pour s...

Page 45: ...glage de l heure VOX Appuyez sur le bouton Menu et la barre de menu appara tra Appuyez sur le bouton de droit ou le bouton de gauche jusqu ce que l ic ne R glage de l heure VOX soit en surbrillance OK...

Page 46: ...ien de temps ce moniteur peut il rester en veille R Une fois charg compl tement le moniteur peut rester en veille environ 4 heures Q Puis je entendre la voix de mon b b lorsque l cran est teint R Oui...

Page 47: ...Avvertimento Lista del Imballaggio Panoramica Iniziato Utilizzare Dragon Touch DT40 Baby Monitor FAQ Contattaci 82 83 83 86 91 100 100 81 CONTENUTI Italiano...

Page 48: ...e le istruzioni e le avvertenze contenute in questo opuscolo 10 Questo prodotto destinato esclusivamente ad uso interno 11 Questo prodotto non destinato all uso come monitor medico e il suo utilizzo n...

Page 49: ...o Pulsante Su Pulsante destro Pulsante Gi Pulsante OK Pulsante di Menu On Off Pulsante di conversazione sospensione 84 85 Icona Descrizione Opzioni C F VOX 1 2 3 4 1 CAM 1 CAM 2 CAM 3 CAM 4 Potenza de...

Page 50: ...icare che la batteria completamente ricarica 2 Ricarica e alimentazione dell unit del monitor Per risultati ottimali carica l unit del monitor prima dell uso Dopo la carica iniziale ricarica normalmen...

Page 51: ...rfaccia Durante lo spegnimento quando collegato l adattatore del supporto di ricarica inserisci l unit del monitor nello slot di ricarica l indicatore LED di ricarica si illumina in rosso per indicare...

Page 52: ...iature elettriche 90 91 Premi il pulsante sinistro o il pulsante destro per selezionare la tekecamera desiderata e premi il pulsante OK per iniziare la ricerca di una telecamera Tieni premuto il pulsa...

Page 53: ...il pulsante destro o il pulsante sinistro per selezionare la telecamera desiderata e premi il pulsante OK per iniziare la ricerca di un unit di telecamera OK 4 3 LCD 1 CAM 1 28 C 3 4 2 92 93 Visualiz...

Page 54: ...ro o il pulsante sinistro finch l icona di Ninnananna non viene evidenziata OK 4 3 LCD CAM 1 28 C Premi il pulsante OK per accedere all interfaccia Premi il pulsante destro o il pulsante sinistro per...

Page 55: ...ulsante sinistro finch l icona di alimentazione non viene evidenziata OK 4 3 LCD CAM 1 28 C Premi il pulsante OK per accedere all interfaccia Premi il pulsante destro o il pulsante sinistro per selezi...

Page 56: ...ione 8 VOX Time Setting Premi il pulsante Menu per visualizzare la barra dei menu Premi il pulsante destro o il pulsante sinistro finch l icona di Impostazioni non viene evidenziata OK 4 3 LCD CAM 1 2...

Page 57: ...tempo questo monitor pu rimanere in standby R Dopo la ricarica completa il monitor pu rimanere in standby per circa 4 ore D Posso sentire la voce di mio figlio quando spengo lo schermo R S si prega di...

Page 58: ...Dragon Touch DT40 FQA 102 103 103 106 111 120 120 101...

Page 59: ...1 3 1m 2 3 3 4 AC 5 6 7 8 9 10 11 12 13 AC 14 15 16 1 102 103 DT40 DT40 PAIR 4 1 2 3 5 6 8 7 9...

Page 60: ...2 3 IR LEDs DC 5V LED LED OK 104 105 C F VOX 1 2 3 4 1 CAM 1 CAM 2 CAM 3 CAM 4 VOX C F 5 8 1h 2h 3h 4h X L M H X L M H 3 LED...

Page 61: ...106 107 1 3 3 LED LED LED 2 USB USB USB DC 2 LED LCD 5...

Page 62: ...108 109 4 5 LED LED LED...

Page 63: ...DRAGON TOUCH DT40 1 110 111 OK 3 2 OK 4 3 LCD CAM 1 28 C OK OK 4 3 LCD CAM 1 28 C...

Page 64: ...3 PAIR 3 1 OK 4 3 LCD CAM 1 28 C OK 1 OK OK 4 3 LCD 1 CAM 1 28 C 3 4 2 112 113 2 2 20 OK 20 SCAN1 SCAN2 SCAN3 SCAN4...

Page 65: ...4 5 OK 4 3 LCD CAM 1 28 C OK OK OK 4 3 LCD CAM 1 28 C OK 4 3 LCD CAM 1 28 C OK 4 3 LCD CAM 1 28 C OFF 1 2 3 4 114 115...

Page 66: ...6 VOX VOX 7 OK 4 3 LCD CAM 1 28 C OK VOX OK OK 4 3 LCD CAM 1 28 C L OK 4 3 LCD CAM 1 28 C OK 4 3 LCD CAM 1 28 C 1h 2h 3h 4h 116 117...

Page 67: ...OK VOX OK 8 VOX OK 4 3 LCD CAM 1 28 C OK 4 3 LCD CAM 1 28 C OK 4 3 LCD CAM 1 28 C 1m 2m 3m 4m 9 OK 4 3 LCD CAM 1 28 C 119 118...

Page 68: ...FQA Q A 1 2 900 Q A 1 2 Q A Q 220V A 110 240V Q A 4 Q A VOX Q A LED 120 E E cs dragontouch com www dragontouch com...

Reviews: