background image

E3

ELECTRIC DEFROST: 3-PHASE

ELECTRICAL WIRING

Summary of Contents for Hillphoenix ONRZ

Page 1: ...rigerated display merchandisers and storage cabinets For a list of Hillphoenix authorized installation service contractors please visit our Web site at www hillphoenix com General Information 2 Case Installation 3 5 Case Connections 6 7 Pre Power Checklist 8 Airflow Defrost 9 Fans Case Cleaning 10 Appendix 11 Table of Contents COMPONENT REACH IN DOOR MERCHANDISER INSTALLATION OPERATIONS MANUAL ORZ...

Page 2: ...ulated Acrylic Partition installation instructions Appendix L B Moody V1 02 02 05 13 Updated 3 Phase Electric Defrost Wiring Diagram Appendix E B Moody V1 03 06 28 13 Added Parts List Appendix H Updated 1 Phase and 3 Phase Wiring Diagrams Appendix E B Moody V1 04 12 16 13 Updated Case Top Fascia information Appendix G Added Electronic Display Module information Appendix M B Moody V1 05 03 17 14 Ad...

Page 3: ...he display is situated e g store and to any surrounding property DO NOT use misting systems water hoses or other devic es that spray liquids in Hillphoenix display cases with light ed shelves If a misting system or water hose is installed or used on a display case with a shelf lighting system then Hillphoenix shall not be subject to any obligations or liabili ties whether arising out of breach of ...

Page 4: ...he Service Parts Department at 1 800 283 1109 CASE DAMAGE Claims for obvious damage must be 1 noted on either the freight bill or the express receipt and 2 signed by the car rier s agent otherwise the carrier may refuse the claim If damage becomes apparent after the equipment is unpacked retain all packing materials and submit a written request to the carrier for inspection within 14 days of recei...

Page 5: ...asurement Multi Case 1 Remove shelves and discard the shelf clips 2 Remove any loose items shipping braces mirror as semblies etc from the cases that may interfere with case joining Keep all loose items as they will be used later in the installation process 3 Remove the return air grill at the case joint The grill lifts out without fasteners and may be easily removed to gain clear access to the ca...

Page 6: ...EXTERNAL BUMPER JOINT TRIM OUT 1 To align the master bumpers install the master bumper joint trim in between adjoining master bumpers Fig 4 Slide the master bumpers left or right to close the seams as required working outwards from the center of the line up to the ends 2 Close the seam where the bumper joins the case end The bumper joint closes the seam that may develop if the master bumper is mov...

Page 7: ...ng the supplied T bolts 11 Using the screws provided install the upper kickplate retainer and the J rail both of which are shipped loose in the case Fig 9 The kickplate brackets are pre installed at the factory 12 Insert top of kickplate into the kickplate retainer Slide the kickplate up into the retainer then down onto the J rail Fig 10 Be certain that the bottom of the kick plate is fitted over ...

Page 8: ...with canned foam sealant and white RTV CASE CONNECTIONS ATTENTION If brazing is necessary place wet rags around the area to avoid tank damage Fig 12 Remove the shipping blocks REMOVE Fig 11 Penetrate foam as needed to access piping ACCESS PUNCH OUT ORZ ORZ shown For piping locations in other case models see Appendices A D 41 7 16 in 105 2 cm 81 in 205 7 cm 83 in 210 8 cm 42 1 16 in 106 8 cm COIL P...

Page 9: ...see Appendix E The drain lines can be run left or right of the tee with the proper pitch to satisfy local drainage requirements Since the kickplate is shipped loose with the case you should have open access to the drain line area during installation If the kickplate has been installed you will find it very easy to remove Simply lift the kickplate up from the J rail and pull it out away from the ca...

Page 10: ...pg 3 Have you checked the vertical plumb of the case The horizontal level see pg 3 Have you applied the foam tape gasket and sealant between adjoining cases see pg 3 Have you sealed the case to case joints by applying caulk and acrylic tape to the pipe chase seam see pg 4 Have you removed the shipping blocks from the refrigeration lines see pg 6 Have you sealed any tank penetrations see pg 6 Have ...

Page 11: ... the electrical raceway etc If electric defrost is used the defrost termination sensor will be located in a drop tube in the coil or mounted to the return bend on the coil If hot gas defrost is used the defrost termination sensor will be mounted to the dump line the sensor should always be mounted on the coil side of the check valve or solenoid valve For proper case operation the defrost terminati...

Page 12: ...LENUM COIL CAUTION Exercise extreme caution when working in a case with the coil cover removed The coil contains many sharp edges that can cause severe cuts to the hands and arms metal parts that are left on for long periods of time We recommend cleaning once a week To avoid shock hazard be sure all electrical power is turned off before cleaning In some installations more than one disconnect switc...

Page 13: ...C ONRZ OPERATING DATA CASE DIMENSIONS D ONRZH OPERATING DATA CASE DIMENSIONS E ELECTRICAL WIRING F SPORLAN PRESSURE TEMPERATURE CHART G CASE TOP FASCIA H PARTS LIST J SEISMIC BRACKETS K DEFROST SENSOR ACCESS PANEL L NON INSULATED ACRYLIC PARTITIONS M ELECTRONIC DISPLAY MODULES N PEG HOOKS ...

Page 14: ...o terminate defrost cycle termination temperature should be set to 55ºF 8 NOTE indicates that the feature is not an option with this case model Guidelines Control Settings Defrost Controls Anti Condensate Heater Data Application Door BTUH door Evaporator F Superheat Set Point Bulb F Discharge Air F Discharge6 Air Velocity FPM Conventional Parallel Frozen ELMD Polar RE 1044 1014 7 3 5 3 400 Elimina...

Page 15: ... GAP IS REQUIRED BETWEEN THE REAR OF THE CASE AND A WALL SUCTION LINE 2DR 3DR 5 8 SUCTION LINE 4DR 5DR 6DR 7 8 LIQUID LINE ALL LENGTHS 3 8 LIQUID LINE w HOT GAS DEFROST ALL LENGTHS 1 2 AVAILABLE SHELF SIZES WIRE SHELVES 16 18 20 22 23 1 2 SOLID SHELVES 18 20 22 24 27 TOP SHELF MUST BE 24 OR SHORTER WHEN USING 27 SHELVES RECOMMENDED CONFIGURATION IS 1 24 SHELF AND 4 27 SHELVES BELOW TOP SHELF DASHE...

Page 16: ...rost cycle termination temperature should be set to 55ºF 8 NOTE indicates that the feature is not an option with this case model Guidelines Control Settings Defrost Controls Anti Condensate Heater Data Application Door BTUH door Evaporator F Superheat Set Point Bulb F Discharge Air F Discharge6 Air Velocity FPM Conventional Parallel Frozen ELMD Polar RE 1044 1014 7 3 5 3 400 Eliminaator 2 Polar LE...

Page 17: ...105 2 cm 42 1 16 in 106 8 cm COIL PLENUM 30 3 8 in 77 1cm 5 1 8 in 13 1 cm 16 1 4 in 41 2 cm 7 1 2 in 19 1 cm 29 3 16 in 74 1 cm 38 1 8 in 96 8 cm 85 1 16 in 216 0 cm 87 in 221 1 cm 63 in 160 1 cm 66 3 8 in 168 6 cm Door Height 68 3 8 in 173 6 cm Frame Height C L 29 3 16 in 74 1 cm WIRING TO THE TOP OPTIONAL 28 1 2 in 72 4 cm 1 1 2 PVC DRAIN CONNECTION 28 5 8 in 72 7 cm 38 1 8 in 96 8 cm REFRIGERA...

Page 18: ...lti door 1027 998 15 3 5 10 400 Doors Anthony Gemtron ELMD Eliminaator5 Eliminaator 25 Polar RE Polar LE Polar EF 120 Volts 120 Volts 120 Volts 120 Volts 120 Volts 120 Volts Amps Watts Amps Watts Amps Watts Amps Watts Amps Watts Amps Watts 2 door 2 1 256 1 7 209 1 2 145 2 1 254 1 4 166 1 2 140 3 door 3 2 378 2 6 309 1 8 213 3 2 378 2 1 246 1 7 207 4 door 4 2 502 3 4 403 2 3 276 4 2 501 2 7 325 2 3...

Page 19: ...RAIN CONNECTION REFRIGERATION FRONT OF CASE 26 13 16 in 68 1 cm 23 1 4 in 59 1 cm 1 1 2 in 3 8 cm END 8 11 16 in 22 1 cm COIL PLENUM 23 1 4 in 59 1 cm 22 in 55 8cm 31 in 81 0 cm 34 7 8 in 88 5 cm 5 1 8 in 13 1 cm 16 1 4 in 41 3 cm 7 1 2 in 19 1 cm 64 3 8 in 163 5 cm Frame Height 62 3 8 in 158 4 cm Door Height 59 in 149 9 cm 22 in 55 8 cm 31 in 81 0 cm 4 in 10 2 cm 31 in 76 2 cm 1 Door 60 in 152 4 ...

Page 20: ...lti door 1027 998 15 3 5 10 400 Doors Anthony Gemtron ELMD Eliminaator5 Eliminaator 25 Polar RE Polar LE Polar EF 120 Volts 120 Volts 120 Volts 120 Volts 120 Volts 120 Volts Amps Watts Amps Watts Amps Watts Amps Watts Amps Watts Amps Watts 2 door 2 2 265 1 8 214 1 2 149 2 1 253 1 4 171 1 2 143 3 door 3 3 391 2 6 315 1 8 217 3 2 379 2 1 256 1 8 214 4 door 4 3 520 3 5 415 2 4 284 4 2 505 2 8 341 2 4...

Page 21: ...cm 22 in 55 8 cm 30 1 4 in 76 8 cm 34 5 8 in 88 0 cm 87 in 220 9 cm 85 in 215 9 cm 63 in 160 0 cm 66 3 8 in 168 6 cm Door Height 68 3 8 in 173 6 cm Frame Height C L WIRING TO THE TOP OPTIONAL 1 1 2 PVC DRAIN CONNECTION REFRIGERATION FRONT OF CASE 23 1 8 in 58 1 cm 23 1 4 in 59 1 cm 1 1 2 in 3 8 cm END 8 11 16 in 22 1 cm 22 in 55 8 cm 30 1 4 in 76 8 cm 4 in 10 2 cm 34 7 8 in 88 5 cm STREAMLYNE BUMP...

Page 22: ...D SERVICE LIGHT HI PRESSURE HIGH PRESSURE SWITCH DUAL PRESSURE SWITCH CONDENSING UNIT POWER CONDENSING UNIT FAN 1 2 L1 L3 L2 13 14 16 15 18 17 10 9 36 37 4 3 40 5 6 7 8 12 11 60 62 19 20 22 21 23 28 27 29 31 30 39 38 41 42 24 25 34 35 33 32 N 58 57 53 54 49 50 51 52 47 48 45 46 44 220V IG RECEPTACLE GFI RECEPTACLE HUMIDIFIER 26 43 56 55 70 71 GREEN REFRIGERATED PAN SOLENOID REFRIGERATED PAN BYPASS...

Page 23: ...ELECTRIC DEFROST 1 PHASE E2 ELECTRICAL WIRING ...

Page 24: ...E3 ELECTRIC DEFROST 3 PHASE ELECTRICAL WIRING ...

Page 25: ...E4 ELECTRIC DEFROST HOT GAS ELECTRICAL WIRING ...

Page 26: ...4 388 0 18 7 8 17 0 52 7 55 6 31 4 394 3 19 7 2 17 7 54 0 56 9 32 4 400 7 20 6 7 18 4 55 3 58 3 33 5 407 2 21 6 1 19 1 56 6 59 6 34 6 413 8 22 5 6 19 9 58 0 61 0 35 7 420 4 23 5 0 20 6 59 3 62 4 36 8 427 1 24 4 4 21 3 60 7 63 8 37 9 433 8 25 3 9 22 1 62 1 65 3 39 0 440 7 26 3 3 22 9 63 5 66 7 40 2 447 6 27 2 8 23 7 64 9 68 2 41 4 454 6 28 2 2 24 5 66 4 69 7 42 6 461 7 29 1 7 25 3 67 8 71 2 43 8 46...

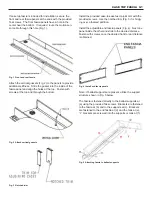
Page 27: ...screws Use the notched trim Fig 3 for bridg ing over a foamed partition Install the adjustable end fascia panels Fig 4 Nest one panel inside the other and slide to the desired distance Fasten with screws once the desired front to rear distance is obtained Fig 1 Front and rear fascia Fig 2 Attach vertical gussets Fig 3 Notched trim Note If ballast supports are present utilize the support structure ...

Page 28: ...PARTS LIST H1 34 PARTS ORDERING 23 24 11 9 1 2 17 88 E02 E01 55 4 87 10 15 20 23 E08 E09 E11 E10 E20 12 13 69 81 82 83 25 56 78 ...

Page 29: ...rear 24 J Rail for Kickplate 25 Top Flue Panel Painted 36 Plug Button Not Shown 55 Door Specify Mask Color Ardco or Anthony Door Handle Type Low or Medium Temperature Application Left or Right Hand Swing 56 Door Frame Manufacturer Low or Medium Temperature Application 69 Coil 78 Bumper Retainer 81 Bottom Wire Racks 82 Tag Moulding PVC or Aluminum 83 Thermometer Includes Bracket 87 End Assembly Sol...

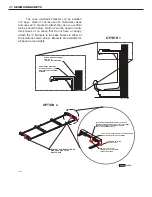
Page 30: ...wn below Brackets are available for all base frame heights CONSTRAINT BRACKET ATTACH TO TOP OF CASE USE 3 10 SELF TAPPING SCREWS ATTACK BRACKET TO WALL USE 1 0 5 OR 2 0 375 ANCHORS BASE FRAME CONSTRAINT BRACKET 2 PER CASE BRACKET SHOWN HERE IS FOR A 5 TALL BASE FRAME CONSTRAINT BRACKETS ARE ALSO AVAILABLE FOR ALL BASE FRAME HEIGHTS USE 3 10 SELF DRILLING SELF TAPPING SCREWS FOR ATTACHMENT TO THE B...

Page 31: ...J2 SEISMIC BRACKETS 5 BRACKETS ...

Page 32: ...J3 SEISMIC BRACKETS 7 BRACKETS ...

Page 33: ...J4 SEISMIC BRACKETS 11 BRACKETS ...

Page 34: ...J5 SEISMIC BRACKETS 15 BRACKETS ...

Page 35: ...ckets as shown in figure 3 Note that the vertical and horizontal retainer brackets are identical Step 2 Slide the Plexiglas partition into the vertical retainer brackets Use the supplied retainer bolts and nuts 8 32x1 2 to secure the Plexiglas partition to the vertical retainer brackets as shown in figure 3 Drill additional holes in the Plexiglas if the pre drilled holes in the Plexiglas do not li...

Page 36: ...1 Electronic display module inside protective enclosure Fig 2 Slide EDM through pre cut hole in fascia Align the pre drilled holes in the display module and the fascia Fig 3 then secure the module using the provided screws NOTE these instructions do not apply to Airewave fascia If top fascia is not included align the front of the display module flush to the front of the cornice Fig 4 locating the ...

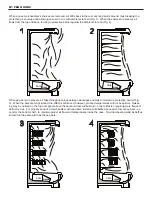
Page 37: ...d fails to maintain a protective barrier Fig 3 When the bars are fully stocked the effect is minimized however product temperatures will not be optimal Sweat ing may be noticed on the top duct panel above the bars and frost will build up on the coil faster requiring more frequent defrost cycles For proper set up of a merchandiser with peg bars install a solid baffle above each row of peg bars ex c...

Page 38: ... sales tax or upgrading 5 When the operation is impaired due to improper installation 6 When installation and startup forms are not properly complete or returned within two weeks after startup THIS PLAN DOES NOT COVER CONSEQUENTIAL DAMAGES Manufacturer shall not be liable under any circumstances for any consequential damages including loss of profit additional labor cost loss of refrigerant or foo...

Page 39: ...or cleaning cases observe the following procedures to avoid case damage or injury Be certain that all electricity to the case is turned off before servicing or cleaning to avoid electrical shock In some cases more than one switch may need to be turned off to completely de energize the case Do not spray cleaning solution or water directly on fan motors or any electrical connections All lighting com...

Reviews: