background image

PARTS LIST

MEDIA MASTER MODEL 1300

7

1121-1489

340-1926

1121-1490
1107-1467

308-1081
340-1280
340-1964
308-1006
340-1218
324-1018

1107-1130
1107-1464

340-1285
341-1280
343-1100
387-1030
340-1957
308-1206
308-1109
340-1970
307-1001
340-1962
308-1251
330-1027
395-1014
340-1201
387-1003
346-1013
346-1035
340-2160

1300-1014
1300-1002

308-1004
340-1779

1121-1436

365-1757
368-1066

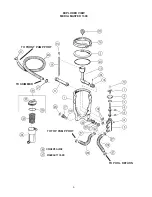
Tank
Tank Cover
Valve Body With Decal
Valve Cap
Valve Cap Gasket
Valve Spool
T-Handle
Piston Rod O-Ring
 1/4" Pipe Plug
 1/4" x 1" Carriage Bolt
Lateral
Distributor Tube Assembly
Valve Adaptor
Air Relief Tube
Air Relief
V-Clamp
Drain Fitting
O-Ring
Valve Gasket
Drain Fitting Nut
Drain Cap Gasket
Drain Cap
Tank O-Ring
#8 x 1/2" Screw
2" Pressure Gauge
Sand Filter Drain
Hose Clamp
1-1/2" x 2-1/2" Hose
1-1/2" x 8' Hose
Washer - 1.85 O.D. x 1.42 I.D.
Strainer Pot Assembly
Basket
O-Ring
Strainer Body
Strainer Lid w/Decal
Owner's Guide
Warranty Card

1
1
1
1
1
1
1
2
1
1
1
1
1
1
1
1
1
1
2
1
1
1
1
1
1
1
6
1
2
1
1
1
1
1
1
1
1

ITEM

PART #

QTY

DESCRIPTION

1
2
3
4
5
6
7
8
9

10
11
12
13
14
15
16
17
18
19
20
21
22
23
24
25
26
27
28
29
30
31
32
33
34
35
36
37

Summary of Contents for Media Master 1300

Page 1: ...365 1757 the original portable pool Media Master Sand Filter with 2 Position Valve Model 1300 Item No 0 1700 013 Owner s Guide Shown with Power Pak I not included ...

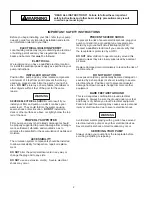
Page 2: ...lace ment DO NOT alter the pump electrical cord in any way or change the plug end to any style DO NOT use an extension cord s Severe electrical shock may occur IMPORTANT SAFETY INSTRUCTIONS PREVENT SEVERE SHOCK To prevent the risk of severe electrical shock plug your pump cord end into a grounding type receptacle pro tected by a ground fault circuit interrupter GFCI Contact a qualified electrician...

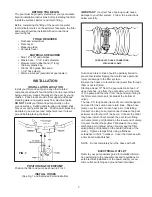
Page 3: ...G 1 Suction and return lines should be partially buried to prevent accidental tripping that could cause personal injury or damage to the filter system Be sure the hoses are routed so that water flow through them is not restricted Starting at least 12 from the pool wall make two 3 4 deep trenches one from the pool skimmer to the front of the pump and the other from the pool return fitting to the fi...

Page 4: ...begin filtering your pool the filter sand must be backwashed thoroughly to remove the extra fine sand grains normally found in new filter sand 1 Loosen the pump strainer pot lid to allow air to escape Tighten lid when water begins to flow between strainer pot lid and strainer body Do not overtighten 2 Plug in your pump to the GFCI protected receptacle Refer to WARNINGS 3 Push valve handle down aga...

Page 5: ...k each of the parts assembled position as it relates to its mating parts This assures proper alignment when reassembled Malfunction will occur if not properly assembled See your dealer for original replacement parts CAUTION BEFORE removing filter or pump from pool for servic ing prevent the backflow of water from your skimmer and return inlet from flowing out of disconnected hoses 1 Remove skimmer...

Page 6: ...6 EXPLODED VIEW MEDIA MASTER 1300 TO POOL RETURN TO SKIMMER WARRANTY CARD OWNER S GUIDE TO TOP PUMP PORT TO FRONT PUMP PORT ...

Page 7: ... Handle Piston Rod O Ring 1 4 Pipe Plug 1 4 x 1 Carriage Bolt Lateral Distributor Tube Assembly Valve Adaptor Air Relief Tube Air Relief V Clamp Drain Fitting O Ring Valve Gasket Drain Fitting Nut Drain Cap Gasket Drain Cap Tank O Ring 8 x 1 2 Screw 2 Pressure Gauge Sand Filter Drain Hose Clamp 1 1 2 x 2 1 2 Hose 1 1 2 x 8 Hose Washer 1 85 O D x 1 42 I D Strainer Pot Assembly Basket O Ring Straine...

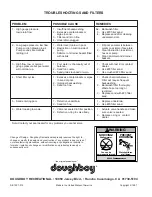
Page 8: ...chemical balance in sand or pool Filter will require frequent 2 Improper backwashing backwashing 3 Sand too fine 2 Backwash filter thoroughly Waste hose too long or restricted 3 Replace sand with 20 filter sand 5 Sand entering pool 1 Defective underdrain 1 Replace underdrain 2 Sand too fine 2 Use 20 filter sand 6 Water leaking to waste 1 Valve not seated in filter position 1 Actuate valve handle a...

Reviews: