3
BEFORE YOU BEGIN
The pool must be properly erected per your pool assem-
bly and installation instructions before installing the filter.
Install the surface skimmer and return fitting.
Before completing the filling of the pool to the water
level indicator marks on the skimmer face plate, the filter
and pump should be installed with all connections
secured tightly.
TOOLS REQUIRED
• Flat head screwdriver
• Flat shovel
• Measuring tape
• Carpenter level
MATERIALS REQUIRED
• Nine 12" x 12" patio blocks
• Waste hose - 1-1/2" inside diameter
• Medium sized rubber band (3" long)
• Ordinary plastic bag
• 100 lbs. #20 grade filter sand
• 1-1/2" hose clamp
• Silicone lubricant (available at pool dealer)
INSTALLATION
INSTALLATION LOCATION
Install your filter and pump and any other related
components at least 4 feet from the pool to prevent their
being used as a means of access to the pool by young
children. Patio blocks provide firm support and keeps
standing water and weeds away from electrical parts.
DO NOT install your filter and pump directly on the
ground surface. Settling and stressing circulation lines
may occur during wet seasons. Position patio blocks as
illustrated, use a shovel and carpenter’s level to level
ground before placing the blocks.
POSITIONING FILTER/PUMP
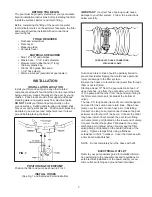
Position the filter and pump as shown in FIG. 1.
INSTALL HOSES
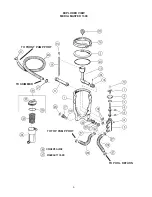
(See Fig. 1 and Exploded Parts Illustration)
FIG. 1
Suction and return lines should be partially buried to
prevent accidental tripping that could cause personal
injury or damage to the filter system.
Be sure the hoses are routed so that water flow through
them is not restricted.
Starting at least 12" from the pool wall, make two 3-4"
deep trenches, one from the pool skimmer to the front
of the pump and the other from the pool return fitting to
the filter valve return port (located at the bottom of
valve).
The two 8 ft. long hoses (Items 29) are interchangable
and used for the suction and return lines. Slip a hose
clamp over the ends of each hose prior to installing.
Connect one long hose (suction line) between the pool
skimmer and front port of the pump. Connect the other
long hose (return line) between the pool return fitting
and valve return port (located on the lower end of valve).
Connect the short hose (Item 28) between the pump
discharge port (located at top of pump) and the filter
valve pump port (located on the center left side of the
valve). Tighten clamps firmly using a flathead
screwdriver or 5/16" nutdriver. Cover the trenches with
a firm board when finished.
NOTE: Do not completely bury the hoses with dirt.
ELECTRICAL OUTLET
Refer to your pump owners guide for detailed informa-
tion pertaining to the requirements and regulations for
safe electrical installation of the power supply, recep-
tacle outlet, switching and ground fault interrupter.
IMPORTANT: Incorrect hose hook-up could cause
damage to your filter system. Follow the instructions
below carefully.
CORRUGATED HOSE CONNECTION
WITH WIRE CLAMP


