

27
26
5.8 Battery replacement / Battery status indication
ATTENTION!
Please observe our battery recommendation strictly. Use only the LS 14250 3.6 volt
ATTENTION!
Please observe our battery recommendation strictly. Use only the LS 14250 3.6 volt
battery from the manufacturer SAFT or DYNAMIS Lithium Batt. LI-110 1/2 AA / S, respectively, only
batteries authorized by the manufacturer.
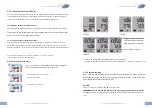
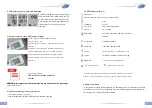
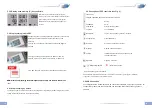
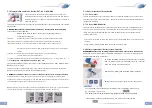
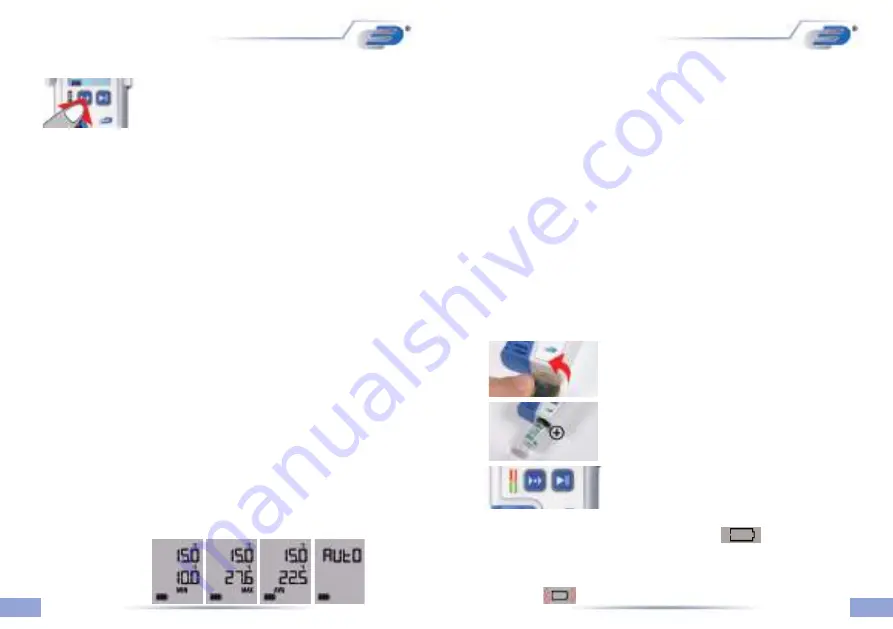
To replace the battery, please open the battery cover on the rear
side. Therefore you have to turn the battery cover 20 ° to the left.
Use a coin to open / close the battery lid.
Remove empty battery and insert new battery as shown.
Battery change ok: both LEDs light for 1second, beep sounds.
•
The empty battery symbol indicates that the battery needs to be replaced. Device will only
work correctly for 10 more hours.
•
The battery symbol indicates the battery status between 0 and 3 segments.
•
If battery symbol is flashing, the battery is empty. The instrument does not operate!
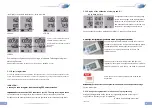
5.7.1 Special function of Mode Button
5.7.1.1. Set marker
To mark special events during the record, markers can be set. Hit MODE key for 2.5 seconds until a
short beep sounds (see mark on PDF Fig. C). The marker is stored along with the next measurement
(respect record interval!).
5.7.1.2 Reset MAX-MIN buffer
The logger has a MIN / MAX function to record extreme values for any period. Hit the MODE key for 5
seconds, until a short melody sounds. This restarts the measurement period. One possible use is the
finding of day and night external temperatures. The MIN / MAX function runs independent of data
recording. Please note:
- At the start of record, the MIN / MAX / AVG buffer is also reset to show MIN / MAX / AVG values that fit the
recording
- During recording, resetting the MIN / MAX / AVG buffer will force a marker.
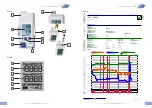
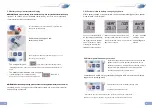
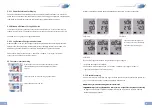
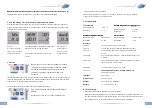
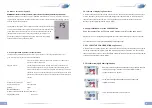
5.7 Display Modes and Mode - Button: EXT, AVG, MIN, MAX
The first line always shows the current measurement value of the main
measurement channel: LOG200: Temperature, LOG210: Humidity, LOG220:
Air pressure, LOG200 TC / LOG210 TC: External temperature 1, LOG200 E:
Internal temperature,
LOG220 E: Internal air pressure. The second line display depends on the selected mode. There are two
display modes:
1. AUTO mode (
default for LOG200, LOG210, LOG220) - the second line shows alternating
1. AUTO mode (
default for LOG200, LOG210, LOG220) - the second line shows alternating
values each 3 seconds: LOG200:
Minimum (MIN), maximum (MAX) / average (AVG) or temperature LOG210:
Temperature and dewpoint
LOG220:
Humidity, temperature and dewpoint LOG200 TC: Internal temperature and external
temperature 2 LOG210 TC: Internal temperature, internal humidity, internal dewpoint and external
temperature 2 LOG200 E: current temperature Minimum (MIN), maximum (MAX) / average (AVG) or
temperature (external) and Minimum (MIN), maximum (MAX) / average (AVG) or temperature
(internal)
LOG220 E: current measurements of connected external sensors / current measurements
of internal humidity, temperature and dewpoint.
The displayed measurement channel can be identified by the physical unit (° C / ° F = temperature, Td + ° C
/ ° F = dewpoint,% rH = humidity, hPa = air pressure, ppm = CO
2)
/ ° F = dewpoint,% rH = humidity, hPa = air pressure, ppm = CO
2)
along with the extension symbols <no symbol> = current measurement value, MIN = Minimum, MAX =
Maximum, AVG = average.
AUTO mode provides a quick overview of the current measurement values of all channels. Pressing the
MODE key (left key) leaves AUTO mode and enters MANUAL mode:
2. MANUAL
mode (default for LOG200 TC, LOG210 TC) - MODE key flips the second line through all available
2. MANUAL
mode (default for LOG200 TC, LOG210 TC) - MODE key flips the second line through all available
measurement values, following the sequence current value (no symbol), minimum (MIN), maximum (MAX),
average (AVG). LOG200 TC and LOG210 TC show MIN, MAX and AVG with a blinking EXT for external sensor 1
(main measurement channel) and a steady EXT for external sensor 2.
MANUAL mode is handy to view any meas channel along with the main meas channel. Eg. air pressure maximum
vs. main channel air pressure. Hit MODE key until display shows AutO to resume AUTO mode.


