background image

English

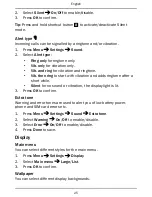
Sync. intervals

You can select different synchronisation intervals.

1.

Press

Menu

Settings

Doro Experience

.

2.

Select

Sync. intervals

:

Manual

to synchronise manually. No automatic synchronising.

Hourly

to synchronise automatically every hour.

Daily

to synchronise automatically every day.

3.

Press

OK

to confirm.

Tip:

You can also synchronise manually by pressing

Synchronize now

.

Account

1.

Press

Menu

Settings

Doro Experience

.

2.

Select

Account

to view your account information details.

3.

Press

Back

to return.

Weather

Note!

You need to have Internet access to use this feature. We

recommend that you contact your service provider about data rates.

You can select to view the weather in standby mode. Enter the name of a
city you want to view the weather for. See

Weather

, p.46.

1.

Press

Menu

Settings

Weather

.

2.

Select

City

and enter the name of the city.

3.

Use

/

to select the city in the list.

4.

Select

Wallpaper

and select

On

.

5.

Press

OK

to confirm.

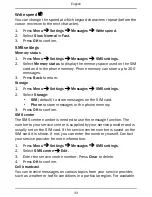
Calls

Voice mail

If your subscription includes an answering service, callers can leave a
voice mail message when you cannot answer a call.

Voice mail

is a net-

work service and you may need to subscribe to it first. For more informa-
tion and for the voice mail number, contact your service provider.

1.

Press

Menu

Settings

Calls

Voice mail

.

28

Summary of Contents for secure 628

Page 1: ...English Doro Secure 628 ...

Page 2: ...Input method Silent 9 Camera shortcut 10 Message shortcut 11 Volume control 12 End call Power on off 13 Microphone 14 Right selection button 15 Charging socket 16 Headset socket 17 Assistance button 18 Camera lens 19 Flash 20 External display 21 Loudspeaker 22 Green light New message Missed call 23 Red light Battery level low Charging 24 Charging stand 25 Lanyard ...

Page 3: ...t vary depending on the soft ware and accessories available in your region or offered by your service provider You can obtain additional accessories from your local Doro deal er The supplied accessories provide the best performance with your phone ...

Page 4: ... symbols 7 Display main symbols 7 Call functions 8 Make a call 8 Call from the phonebook 8 Receive a call 8 Volume control 9 Hearing aid compatible 9 Call options 10 Call waiting 10 Call information 10 Speed dial 11 Silent 11 Headset 11 SOS calls 11 Assistance button 11 Phonebook 11 Add contact 11 Create ICE contact In Case of Emergency 12 Manage phonebook contacts 12 Owner number 13 ICE In Case o...

Page 5: ... the USB cable safely 21 Settings 21 General 21 Sound 24 Display 25 Doro Experience 27 Weather 28 Calls 28 Messages 32 Camera 36 Connectivity 36 Security 39 File manager 40 Additional functions 41 Organizer 41 More 43 Status 46 Weather 46 Troubleshooting 47 Safety instructions 49 Network services and costs 49 Operating environment 49 Medical units 49 Areas with explosion risk 50 Li ion battery 50 ...

Page 6: ...2 Care and maintenance 52 Warranty 53 Specifications 53 Copyright and other notices 54 Hearing aid compatibility 55 Specific Absorption Rate SAR 55 Correct disposal of this product 56 Correct disposal of batteries in this product 56 Declaration of Conformity 57 ...

Page 7: ...the memory card contacts are facing up wards and push the card in until you hear a click Take care not to scratch or bend the contacts on the card To remove or replace the card push the card in until you hear a click and then pull the card out 3 Insert the SIM card by gently sliding it into the holder Make sure that the SIM card s contacts are facing down and that the cut off cor ner is pointing o...

Page 8: ...arging socket y When the charger is connected to the phone is displayed briefly and when it is disconnected The battery charge indicator will be ani mated while charging It takes approximately 3 hours to fully charge the battery When charging is completed is displayed on the screen If the phone is turned off when the charger is connected to the phone only the battery charge indicator will be shown...

Page 9: ...ifica tion Number PIN is displayed Enter the PIN code and press OK upper left corner of keypad Delete with Clear upper right corner of keypad Note If PIN and PUK codes were not provided with your SIM card please contact your service provider Attempts shows the number of PIN attempts left When no more at tempts remain PIN blocked is displayed The SIM card must now be un locked with the PUK code Per...

Page 10: ...ing low and during charging External display The external display shows the time a number of status indicators and notifications for incoming calls and events The external display can only display characters in black and white If the external display times out press and hold any of the side keys to turn it back on Navigate the phone Standby idle mode When the phone is ready to use and you have not...

Page 11: ...aracter is shown Wait a few seconds before entering the next character Special characters 1 Press for a list of special characters 2 Select the desired character with and press OK to confirm Move the cursor within text Use the side keys to move the cursor within the text Upper case lower case and numerals Press to choose between upper case lower case and numerals See Input mode p 6 Change input la...

Page 12: ... case with predictive text Abc Sentence case ABC UPPER CASE abc lower case 123 Numerals Doro Experience Doro Experience Manager The web based Doro Experience Manager www mydoromanager com enables you to remotely manage a Doro Experience phone from any where in the world Remotely manage reminders and important calendar events con tacts and much more See Doro Experience p 27 for more information and...

Page 13: ... call Bluetooth on invisible to others Headset connected Unread picture message MMS Voice mail message received Steady light GPS position known Data transmission Flashing Searching for GPS position Service centre connected Service centre unavailable Display main symbols Mute Charger connected Message sending success Charger removed Message sending failed Headset in Error Headset out Warning Speake...

Page 14: ...n Press twice for the international prefix Call from the phonebook 1 Press Name to open the phonebook 2 Use to scroll through the phonebook or quick search by pressing the key corresponding to the first letter of the entry see En tering text p 5 3 Press Call to dial the selected entry or press Back to return to standby Receive a call To answer an incoming call when the flip is closed open the flip...

Page 15: ...ring aids To ensure that a specific hearing aid works well with this phone test them together before making a purchase The standard for hearing aid compatibility contains two types of ratings M To use your hearing aid in this mode make sure that your hearing aid is set to M mode or acoustic coupling mode and position the phones receiver near the hearing aid s built in microphone For the best resul...

Page 16: ...learly into the phone microphone at a maximum distance of 1 m Use the side keys to adjust the loudspeaker volume SPK off to return to normal mode Note Loud background noises music etc may interfere with the sound quality Call waiting An alert tone is heard if there is an incoming call while talking To put the current call on hold and answer the incoming call Press Options Answer Tip Call waiting m...

Page 17: ...key on the head set to answer and end calls CAUTION Using a headset at high volume may damage your hearing Adjust the volume level carefully when using a headset SOS calls As long as the phone is switched on it is always possible to place an SOS call by entering the main local emergency number for your present loca tion followed by Some networks accept calls to emergency numbers without a valid SI...

Page 18: ...ditional information and medical information first responders can access information from the victim s phone in case of emergency In the event of a trauma it is critical to have this information as early as possible which can increase the chances of survival All fields are option al but the more information provided the better See ICE In Case of Emergency p 14 on how to configure your ICE informat...

Page 19: ...d by SMS to send the selected phonebook contact as a vCard via text message Enter the phone number of the recipient Alternatively use to scroll through the phonebook or quick search by pressing the key corresponding to the first let ter of the entry see Entering text p 5 Press OK to send Send vCard Send by MMS to send the selected phonebook contact as a vCard via picture message Write your message...

Page 20: ...ht Weight enter your weight Address enter your home address Language enter your preferred language Insurance enter your insurance provider and policy number Contact 1 Contact 2 and Doctor Press Options to Add or Delete a contact from the phonebook or Save to accept the current entry If possible add your relationship to your ICE contacts in the phonebook such as ICE Wife Mary Smith Important info C...

Page 21: ...press Done 5 Press Add to add more recipients You can modify the recipients by selecting one press Options Edit Delete Delete all 6 Press Send to send Note If you choose to add multiple recipients you will be charged for each recipient maximum 10 For international calls always use before the country code for best operation Press twice for the international prefix Create and send picture message MM...

Page 22: ...d Create and send a voice message A voice message uses the same technology as a picture message Both you and the recipient must have subscriptions that support picture mes sage The settings for picture message are supplied by your service pro vider and can be sent to you automatically via text message If not see MMS settings p 34 on how to set your MMS profile 1 Press shortcut button Alternatively...

Page 23: ... Delete to delete Press Yes to delete or No to return Download Cancel download If the message is not downloaded yet press Download Edit to edit the message then press Send Forward to forward the message Edit the message if desired then press Send Use number to display all phone numbers contained in the message as well as the sender s number Use number Call to call the selected number Use number Sa...

Page 24: ... show details for the selected call Delete to delete the call Delete all to delete all calls in the call log Save to save the number in the phonebook 4 Press OK to confirm 5 Press to dial Camera You can take photos record videos and view your photos and vid eos using the Camera menu Camera take photos To get sharp photos wipe the lens clean with a dry cloth 1 Press shortcut button Alternatively pr...

Page 25: ...ore camera settings see Camera p 36 Video camera To get sharp videos wipe the lens clean with a dry cloth 1 Press Menu Camera Video camera 2 Press to start recording 3 Press to stop recording Select Yes to save 4 Press Options Play Send Send by MMS to send as picture message See Create and send picture message MMS p 15 Send Send by Bluetooth to send to a Bluetooth device see Bluetooth p 36 Delete ...

Page 26: ...ssage MMS p 15 Send Send by Bluetooth to send to a Bluetooth device see Bluetooth p 36 Delete to delete Press Yes to confirm or No to return Use picture only Wallpaper to save as display background Use picture only Phonebook picture to save as phonebook contact Details to view detailed information about the file e g date size copyright Rename to rename picture 4 Press OK to confirm Connect the pho...

Page 27: ... as the camera may not be accessible You can transfer files using a USB cable on most devices and operating systems supporting a USB Mass Storage interface Disconnect the USB cable safely 1 Make sure to enable the hardware to be safely removed 2 Disconnect the USB cable Note Do not disconnect the USB cable when transferring content as this may corrupt the content Computer instructions may vary dep...

Page 28: ...ontact your service provider for more information 1 Press Menu Settings General Network setup 2 Select one of the following options and press OK to confirm Select network New search to perform a new search if connection is lost Select network to view available network a list of available network operators is displayed after a short delay Select desired operator Network mode to select another netwo...

Page 29: ... Press OK to confirm Note The torch will drain the battery very quickly Remember to turn off the torch after use Phonebook storage 1 Press Menu Settings General 2 Select Phonebook storage SIM to save 1 phone number per contact Number and length of the phone numbers contacts that can be stored will vary de pending on SIM card service provider preferences Phone to save 500 contacts with 3 phone numb...

Page 30: ...rment or use in a noisy environment High for moderate hearing impairment or use in a very noisy environment HAC mode for use with hearing aid in the T position 3 Press OK to confirm Tone setup 1 Press Menu Settings Sound 2 Select Tone setup Ringtone 3 Use to select one of the available melodies the melody will be played 4 Press OK to confirm or Back to discard changes 5 Set up the Alarm Message to...

Page 31: ...h vibration and adds ringtone after a short while Silent for no sound or vibration the display light is lit 3 Press OK to confirm Extra tone Warning and error tones are used to alert you of low battery power phone and SIM card errors etc 1 Press Menu Settings Sound Extra tone 2 Select Warning On Off to enable disable 3 Select Error On Off to enable disable 4 Press Done to save Display Main menu Yo...

Page 32: ...nfirm Idle display In standby mode the display can show clock only clock and the service provider or all information 1 Press Menu Settings Display 2 Select Idle display Clock only Clock Operator All info 3 Press OK to confirm Themes You can select different themes to personalise the phones text and background 1 Press Menu Settings Display Themes 2 Use to select a theme 3 Press OK to confirm LCD ba...

Page 33: ...operator about data rates Using data services while roaming can be costly Check with your mobile operator for data roaming rates before you use data roaming Create account 1 Press Menu Settings Doro Experience Create account 2 Your username is automatically set to your phone number owner number The owner number is supplied by your service provider and is usually set on the SIM card If not you can ...

Page 34: ...Internet access to use this feature We recommend that you contact your service provider about data rates You can select to view the weather in standby mode Enter the name of a city you want to view the weather for See Weather p 46 1 Press Menu Settings Weather 2 Select City and enter the name of the city 3 Use to select the city in the list 4 Select Wallpaper and select On 5 Press OK to confirm Ca...

Page 35: ...peed dial A B 0 and 2 9 can be used for speed dialling To speed dial an entry from standby press and hold corresponding button 1 Press Menu Settings Calls Speed dial 2 Select A Add and select an entry from the phonebook 3 Press OK to confirm 4 Repeat to add speed dial entries for buttons B 0 2 9 To change a contact select an existing entry and press Options Edit Delete You can edit the contact inf...

Page 36: ...of your calls 1 Press Menu Settings Calls 2 Select Call time Last call to show the elapsed time of the most recent call Outgoing calls to show the elapsed time of all dialled calls Received calls to show the elapsed time of all received calls Reset all Yes to reset all 3 Press OK to confirm Answer mode 1 Press Menu Settings Calls 2 Select Answer mode Open to answer On to answer incoming calls by o...

Page 37: ...hold and answer the incoming call press Options Answer 1 Press Menu Settings Calls Call setup 2 Select Call waiting Activate to enable call waiting Deactivate to disable call waiting Query status to display if call waiting is active or not 3 Press OK to confirm Call divert You can divert calls to an answering service or to another phone number Set up which calls should be diverted Select a conditi...

Page 38: ...o call international numbers except to the country associated with the SIM card 4 Press OK to confirm 5 Select Incoming calls All calls to dial out but not receive incoming calls When roaming unable to receive incoming calls while roaming operating in other networks 6 Press OK to confirm 7 Select Cancel all to cancel all call barring password needed Press OK to confirm Messages Predictive text 1 P...

Page 39: ...tore messages on the SIM card Phone to store messages in the phone memory 3 Press OK to confirm SMS centre The SMS centre number is needed to use the message function The number to your service centre is supplied by your service provider and is usually set on the SIM card If the service centre number is saved on the SIM card it is shown If not you can enter the number yourself Contact your service...

Page 40: ... the service Some service providers require that you contact them before enabling picture message for your account Contact your service provider s Customer Services Press during set up to exit without saving Memory status 1 Press Menu Settings Messages MMS settings 2 Select Memory status to display the memory space used in the phone memory 3 Press Back to return Storage Picture messages are saved ...

Page 41: ...e 3 Press OK to confirm Vibration The text message vibration alert is several short vibrations that continues for Short 4 seconds or Long 12 seconds 1 Press Menu Settings Messages 2 Select Vibration Short 4 seconds Long 12 seconds 3 Press OK to confirm Note If Alert type is set to Ring only the phone will not vibrate Delivery report You can select if you want the phone to notify you when your text...

Page 42: ... or 2 MP high est quality Video camera Quality to set as High or Low Video camera Record time to set as No limit or 1 min Shutter sound Off Low High 2 Press OK to confirm Note With higher quality less pictures or videos can be stored in the internal memory Connectivity Bluetooth IMPORTANT When you are not using Bluetooth connectivity select Function on off Off or select Visibility Off Do not pair ...

Page 43: ... connecting to another Bluetooth device you need a shared password Enter the password and press OK My device Add new devices or view saved 1 Press Menu Settings Connectivity Bluetooth My device 2 Select device from the list and press Options Connect Disconnect to connect disconnect with the selected device This may require a profile usually a headset Set default to set the connected device as defa...

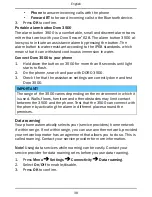
Page 44: ...he assistance settings are correctly done and test Doro 3500 IMPORTANT The range of the 3500 varies depending on the environment in which it is used Walls floors furniture and other obstacles may limit contact between the 3500 and the phone Test that the 3500 can connect with the phone by activating the alarm in different places around the premises Data roaming Your phone automatically selects you...

Page 45: ...PIN code needs to be en tered to unlock 3 Press OK to confirm Note You need to enter the current PIN code to disable enable SIM lock Phone lock 1 Press Menu Settings Security Phone lock 2 Select On Off to enable disable 3 Press OK to confirm Note You need to input the current phone code to disable enable Phone lock The default phone code is 1234 Fixed dial FDN You can limit calls to certain number...

Page 46: ... the new code again and confirm with OK File manager Manage the contents and properties of files You can open delete move copy and rename files 1 Press Menu Settings File manager 2 Select Phone Memory card Open 3 Select a folder eg Photos and press Open 4 Select a file and press Options Play audio video music press to Play or to Stop View photos images for single view Send Send by MMS to send as p...

Page 47: ...alendar Notes Alarm 1 Press Menu Organizer Alarm On 2 Enter the alarm time using the keypad 3 Press OK to confirm 4 For a single occurrence select Single For a repeated alarm select Repeated Scroll through the list of days and press On Off to enable disable the alarm for each day To edit an alarm press Edit To stop the alarm press Off Note The alarm will work even when the phone is switched off Do...

Page 48: ...2 Enter the date 3 Press OK to confirm View all 1 Press Menu Organizer Calendar 2 Select a task and press Options View all 3 Press Options Edit to edit selected task Delete to delete selected task Delete all to delete all tasks 4 Press OK to confirm Note The calendar will work even when the phone is switched off Do not press Yes to power on if wireless phone use is prohibited or when it may cause ...

Page 49: ...nder Add to add new reminder Edit to edit selected reminder Delete to delete selected reminder Delete all to delete all reminders 3 Press OK to confirm Note The reminder will work even when the phone is switched off Do not press Yes to power on if wireless phone use is prohibited or when it may cause interference or danger Notes 1 Press Menu Organizer Notes 2 Select Add to enter your note using th...

Page 50: ...io will continue to play Volume 1 Press Menu More FM radio 2 Press Options Volume 3 Use or or the side buttons to adjust the volume 4 Press OK to confirm Save frequency 1 Press Menu More FM radio Options Save frequency 2 Enter a name for the new channel see Entering text p 5 3 Press Save Switch off Press Menu More FM radio Options Switch off Tip Disconnecting the headset will also turn off the rad...

Page 51: ... manually with or Auto search to use automatic station search with or 3 Press OK to confirm Auto save Note This will overwrite all previously saved channels 1 Press Menu More FM radio Options 2 Select Auto save to automatically install available radio stations in channels 1 9 3 Press OK to confirm Calculator The calculator can perform basic mathematical operations 1 Press Menu More Calculator 2 En...

Page 52: ...s to select On Off Settings Volume to adjust the sound volume using the side buttons 3 Press OK to confirm Status Scroll through the status list to get further information about the icons shown on top of your display Icons shown on the display varies de pending on your phone status 1 Press Menu Status 2 Use or to scroll the list 3 Press Back to return to standby mode Weather Note You need to have ...

Page 53: ...arging environment Charger incorrectly con nected to phone or power socket Check the charger connections Standby time decreases Battery charge capacity too low Install a new battery Too far from base sta tion phone is constantly searching for signal Searching the network consumes battery power Find a place with a stronger signal or tempora rily turn off the phone Failure to place or receive calls ...

Page 54: ...e station Try again from another location Network congestion Try calling at a later time Echo or noise Regional problem from bad network relay Hang up and redial This may switch to another network relay Failure to add a contact Phonebook memory full Delete contacts to free up memory Failure to set a function Function not supported or subscribed from network Contact your service provider Unable to ...

Page 55: ...w the rules and laws that apply wherever you are and always turn off the unit whenever its use is prohibited or can cause interference or hazards Only use the unit in its normal user position Parts of the unit are magnetic The unit can attract metal objects Do not keep credit cards or other magnetic media near the unit There is a risk that information stored on them can be erased Medical units The...

Page 56: ... blasting is in progress Areas with risk for explosion are often but not always clearly marked This also ap plies to below decks on ships the transport or storage of chemicals vehicles that use liquid fuel such as propane or butane areas where the air contains chemicals or par ticles such as grain dust or metal powder Li ion battery This product contains a Li ion battery There is a risk of fire an...

Page 57: ...led or are inadequately protected Contact the manufacturer or its repre sentative for more information about your vehicle or any additional equipment Do not keep or transport flammable liquids gases or explosives together with the unit or its accessories For vehicles equipped with air bags Remember that air bags fill with air with considerable force Do not place objects including fixed or portable...

Page 58: ...aintenance Your unit is a technically advanced product and should be treated with the greatest care Negligence may void the warranty Protect the unit from moisture Rain snow humidity and all types of liquids can contain substances that corrode the electronic circuits If the unit gets wet you should immediately power off the phone remove the battery and allow the unit to dry completely before you r...

Page 59: ...ies to the unit battery power adapter and other accessories If the phone is not working as it should please contact the place of purchase for service Don t forget the receipt or a copy of the invoice Warranty This product is guaranteed for a period of 12 months from the date of purchase In the unlikely event of a fault occurring during this period please contact the place of pur chase Proof of pur...

Page 60: ...ent portfolio licenses for the personal and noncommercial use of a consumer for i encoding video in compli ance with the MPEG 4 visual standard MPEG 4 video or the AVC standard AVC vid eo and or ii decoding MPEG 4 or AVC video that was encoded by a consumer engaged in a personal and non commercial activity and or was obtained from a video provider licensed by MPEG LA to provide MPEG 4 and or AVC v...

Page 61: ... aid in this mode make sure that your hearing aid is set to M mode or acoustic coupling mode and position the phones receiver near the hearing aid s built in microphone For the best results try using the phone in differ ent positions relative to your hearing aid for example placing the receiver slightly above the ear may result in better performance for hearing aids with microphones positioned beh...

Page 62: ... recommend you reduce your usage or use a hands free accessory to keep the device away from your head and body Correct disposal of this product Waste Electrical Electronic Equipment Applicable in countries with separate collection systems This marking on the product accessories or manual indicates that the product and its electronic accessories e g charger headset USB cable should not be disposed ...

Page 63: ... protect natural resources and to promote material reuse please separate batteries from other types of waste and recycle them through your local free battery return system Declaration of Conformity Doro hereby declares that Doro Secure 628 conforms to the essential requirements and other relevant regulations contained in the Directives 1999 5 EC R TTE and 2011 65 EU RoHS A copy of the Declaration ...

Page 64: ...Secure 628 1021 English Version 1 0 2016 Doro AB All rights reserved www doro com REV 16349 STR 20160829 ...

Reviews: